↧
Protected: Odoo Affiliate Management
↧
Joomla Virtuemart Marketplace Single Seller Checkout
Joomla Virtuemart Marketplace Single Seller Checkout:
Joomla Virtuemart Marketplace Single Seller Checkout wonderful add-on that allows to checkout from single seller only. Customers can add only one seller’s product to the cart. This add-on is very useful when admin wants to create order from a single seller only and not from multiple sellers. In addition to this alert, features have been added admin can select bootbox alert or sweet alert, which will be implemented at cart page.
FEATURES-
- This plugin provides the feature to restrict multiple Sellers product in the cart at a time.
- Buyer can purchase only Single seller’s product at a time.
- Proper alert message feature has been provided, if user adds a different sellers product in his cart.
- Styling option for the message are provided in plugin configuration.
FLOW OF INSTALLATION AND CONFIGURATION
Step1.
Browse the ‘Joomla Virtuemart Marketplace Single Seller Checkout’ zip file and then upload and install.
Browse the ‘Joomla Virtuemart Marketplace Single Seller Checkout’ zip file and then upload and install.

Step2.
Now, click on ‘Extensions’ and move to ‘Plugins’ in the drop-down and click on it.
Now, click on ‘Extensions’ and move to ‘Plugins’ in the drop-down and click on it.

Step3.
click on the required plugin for setting.
click on the required plugin for setting.

Step4.
Here you need to do select the messgae alert style and target for links.
Here you need to do select the messgae alert style and target for links.

“Bootbox Alert example”

“Sweet Alert”

FRONT-END VIEW
Ste7.
This is the front-end view, here you can see whenever buyer try to add product of different sellers then a alert message pop-up automatically.
This is the front-end view, here you can see whenever buyer try to add product of different sellers then a alert message pop-up automatically.

WEBKUL SUPPORT
That’s all for the Joomla Virtuemart Marketplace Single Seller Checkout still, have any issue feel free to add a ticket and let us know your views to make the component better http://webkul.uvdesk.com
↧
↧
CS-Cart Endicia Shipping Label Generation
CS-Cart Endicia Shipping Label: Integrate Endicia with CS-Cart to print professional USPS shipping labels and simplify your shipping process. This splendid addon allows store Admin to check Endicia account status and generate USPS shipping labels. Endicia, a leading provider of Internet-based postage services for e-commerce businesses of all sizes, is known for its simplified shipping operations.
Features
- Well integrated with CS-Cart Multi-Vendor.
- Both Admin and vendor can generate shipping labels.
- Functionality to check Endicia account status and all transactions at admin end.
- Functionality to view Endicia transactions at vendor end.
- Option to change Endicia passphrase directly at admin end.
- Easy to configure and manage at admin end.
- The codes are open to be further customized easily.
How To Upload and Install
After downloading the CS-Cart Endicia Label, you will get a zip file and install.txt . Read the install.txt carefully and configure it accordingly.
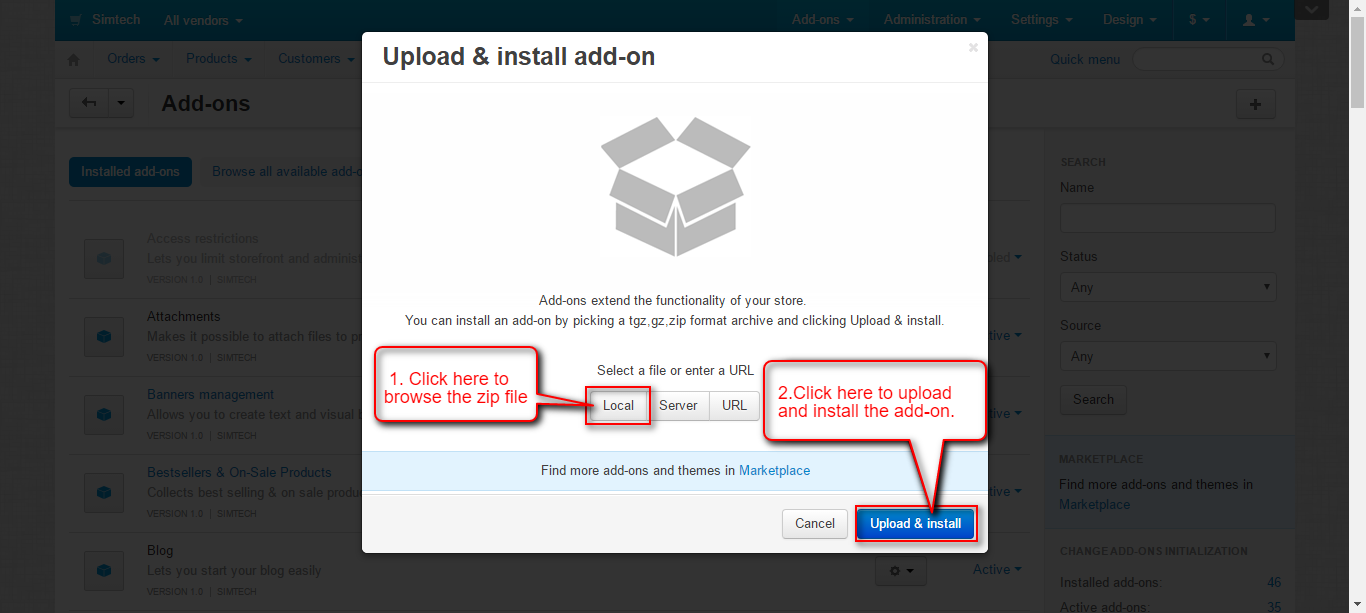
Go to “Manage add-ons”, click on “+” to upload and install the zip file as shown below.

Click on “Local” to browse the zip file and then click on “Upload & Install” as shown below in snapshot.
How To Configure Endicia
Once CS-Cart Endicia Label is installed successfully, Click on settings as shown in screenshot.

Set the below mentioned parameters:
- Select the Mode as Sandbox or Production as per your requirement.
- Enter the Endicia Credentials which include Account Id , Passphrase and Requester Id.
- Check the box in case you need to generate new passphrase.
- Save the settings.

The new passphrase (if generated) will get popped up as shown below. Just copy and save this new passphrase to addon settings.

SHIPMENT CREATION AT BACKEND
Open the order detail page at backend. Click on Create detailed shipment to create a new shipment.

Shipping method will be as per chosen by the customer at front end. Select the carrier as USPS and click the checkbox to generate the shipping label for USPS in Real Time.

On clicking the checkbox to Generate Endicia Label , You will get an option to choose the Endicia Mail Class . Select the Mail Class and fill the other parameters accordingly. Click on the button to Create the shipment.

Once the shipment is created with enabled Generate Endicia Label, a shipping label is generated automatically in accordance with a shipping method chosen by a customer. The charges for label generation will get deducted from the Admin’s Endicia Account Balance on each label generation.
HOW TO GENERATE SHIPPING LABEL
On successful shipment creation, the option to print Endicia Label appears on various pages at the backend. Let’s see how can we get USPS label:
On shipment creation, an option to Print Endicia Label appears on clicking the gear button on the right corner of order detail page. Please check the screenshot below.

Also, You can print it from the shipment list page. Click on Shipments on the order detail page at the backend. Refer the below snapshots.

Click on gear button of the desired shipment and click on Print Endicia Label.

Endicia USPS Shipping Label:

Is there any way to print labels in bulk ??
Yes, To Print labels in bulk for various shipments: Select the desired shipments by clicking the checkbox and click on Endicia Label Bulk Print to print the USPS label in bulk.

Admin End View For Endicia
A separate view for Endicia account details has been provided at admin end. Where admin can view all the transactions at Endicia end along with the account balance.
Go to Orders and click on Endicia as shown below.

Here admin can view the transactions details and Account balance. These Account Balance and transaction logs are getting updated in real time.

Support
This is all about CS-Cart Endicia Shipping Label Generation. Thank you for viewing this blog. For further any query feel free to contact us at http://webkul.uvdesk.com
↧
Odoo POS Product Detail
introduction
Now get the detailed information of your products on Point of Sale Screen!
Our module POS Product Detail allows the seller to view the details of any product in Point of Sale by using the “click and hold event” on any product’s image or any order line on the cart. In this way, a seller can easily select the product which he wishes to add to the cart and he doesn’t need to switch to the Odoo backend every time, hence it saves time and expedites the process of sale.
It also gives the ability to the POS user to toggle the Action Pad display in the POS interface. This is helpful in the cases when the Action Pad utilizes most of the screen’s space and the cart is not fully visible.
features
- A seller can view the details associated with any product in the POS interface.
- Click and Hold event on any product’s image or any order lines on the screen is used to achieve the same.
- A seller can toggle the display of the Action Pad and the Num Pad by using the toggle button.
- It provides an efficient way to view product information at POS Screen.
workflow
Product Details on POS Session-


Toggle the display of Action Pad-

POS Product Detail Configuration
Go to- Point of Sale > Configuration >under Settings, mention the details on “POS Product Detail Tab ” and then “Apply” it. Only those details will appear on POS Screen which is added here.

support
For any further query feel free to raise a ticket at http://webkul.uvdesk.com/ or drop a mail at support@webkul.com
Thanks for reading this blog!!
↧
Best Practices For Web Testing
Web application testing is a testing methodology focused on applications that are hosted on the web. Web Testing in simple terms is checking your web application for bugs before its made live or before code is moved into the production environment. In web application testing, some of the testing types such as Cross-browser, Responsiveness, performance, security become more important than others. Here are the checklist for Web testing-
Cross Browser Testing:
There are lots of browsers available in the market which means our website under test needs to be working well for your supported browsers.
Cross Browser Testing is a type of functional test to check that your web application works as expected in different browsers.
Like- Some people prefer to open their desire sites in Firefox browser while other’s can be using Chrome browser.

In the diagram below you can observe that in the chrome browser our sign up form looks perfect on the other hand in Firefox browser same form is looking different. You will not get the sign-up form with rounded corner even submit button is not at the right position.

The reason for Cross Browser Issue:
Font size mismatch in different browsers.
JavaScript implementation can be different.
CSS,HTML validation difference can be there.
Some browser still not supporting HTML5.
Browser incompatibility with OS. Etc.
Check for dead links:
Most of the websites suffer from something called dead links where hyperlinks are left to decay resulting in many links that no longer go anywhere, or out of date and unsupported pages. It is very important that to check dead links in our application.We can check dead links manually but it is more time consuming, so we can automate this task. There are lots of automated tools which are available for checking the dead links.

Responsive Websites:
Nowadays most of the people accessing websites using their mobile phones. This means that our websites should not be restricted for desktop only. It should be visible perfectly to all devices. Hence always try to load your site/application using a mobile phone or other devices and see how it performs.

Check For SEO:
Getting hits on the website is not the only thing that is important for web applications, It’s also important that create a site that isSearch Engine Optimised (SEO). Search Engine Optimization is the process of improving the visibility of a website or a web page in search engines. For this, you need to do some research on what to do or what not to do with SEO.

That’s all for this blog. You can check the blog on security testing using this link- https://webkul.com/blog/glimpses-security-testing/
↧
↧
Create dynamic variables using loop in Less
Create dynamic variables using loop in Less
I hope you have gone through my previous blogs related to Less. So based on that I came up with a new blog today, in which I will explain that how you can create dynamic variables in your Less file. So here is a less code to generate dynamic variables.
@suffix: 'px';

.mixin-loop(10,'temp'); // this will iterate from 10 to 1

.mixin-loop (@i,@j) when (@i > 0) { //on first call, @i = 10 and @j = 'temp'

    @tmp:~"@@{j}_@{i}@{suffix}"; // it will give @temp_10px
    @{tmp}: @i/16rem;            // now in variable @temp_10px: 0.625rem

    .mixin-loop(@i - 1,@j); //calling mixin again with decrement of 1 in @i
}
In above example, I called a mixin with two arguments, you can add more depending on your need. So when mixin is called there is a condition in it which checks the value of @i is greater than 0 or not. If the value is greater than 0 then it flows inside and create dynamic variable and then again calls itself till when the condition become false.
In the body of mixin, I have written a line of code which is generating dynamic variable, i.e, @tmp:~”@@{j}_@{i}@{suffix}”;
Lets understand this code for its first iteration when @i=10 and @j=’temp’ and @suffix=’px’. Put the respective values of variables, i.e.
@tmp:~”@temp_10px”; //@tmp:~”@@{j}_@{i}@{suffix}”;
now @tmp variable contains the string “@temp_10px”
Lets consider second line, i.e. @{tmp}: @i/16rem;
in this code, replace the value of @tmp variable with its value, i.e. @temp_10px : 10/16rem;
finally, @temp_10px: 0.625rem;
and then I again called mixin with decrement of 1 in first argument so that loop continues till the condition become false. Finally following CSS will be generated from the above LESS code.
@temp_10px: 0.625rem;
@temp_9px: 0.5625rem;
@temp_8px: 0.5rem;
@temp_7px: 0.4375rem;
@temp_6px: 0.375rem;
@temp_5px: 0.3125rem;
@temp_4px: 0.25rem;
@temp_3px: 0.1875rem;
@temp_2px: 0.125rem;
@temp_1px: 0.0625rem;
You can change/modify variables name depending on your need, this is only for those who do not want no calculate the font pixels in rem unit manually. So the formula is written in it and then it generates the equivalent unit in rem from px.
So that’s it in today’s article. Try this and if you have any query then just comment below 
↧
Using PHP Traits with Opencart
According to PHP documentation, Traits are a mechanism for code reuse in single inheritance languages such as PHP. A Trait is intended to reduce some limitations of single inheritance by enabling a developer to reuse sets of methods freely in several independent classes living in different class hierarchies.
We must keep in mind that a Trait can not be instantiated. Neither it can extend a class nor a trait itself. The best part of Traits is that its members can be accessed without using inheritance.
The basic syntax of Traits:
<?php
trait traitName {
    public function method1() { // user defined methods
        // something
    }
    public function method2() { // user defined methods
        // something
    }
}
?>
We can easily use the trait by simply write the trait name after the ‘use’ keyword in a class. For example:
<?php
class Test {
  use traitName;
}
?>
We can use the Traits in the Opencart as well. A simple example to show how it works in the Opencart.
<?php
/**
 * Webkul Software.
 *
 * @category Webkul
 * @package JavaScript Concepts
 * @author Webkul
 * @copyright Copyright (c) 2010-2017 Webkul Software Private Limited (https://webkul.com)
 * @license https://store.webkul.com/license.html
 */
trait traitExample {
    public function common1() {
        echo 'Something common1';
    }
    public function common2() {
        echo 'Something common2';
    }
}
class ControllerTestTest extends Controller { // class declaration in the Opencart
    use traitExample; // using trait
    public function index() {
        $this->common1(); // calling the trait's method
    }
}
?>
Now, here’s the example of the application of the Trait in the Opencart. This is an example to convert the currency using the Google’s API.
So, in order to use the trait, we have created a file with the name trait.php and put this code to it.
<?php
/**
 * Webkul Software.
 *
 * @category Webkul
 * @package JavaScript Concepts
 * @author Webkul
 * @copyright Copyright (c) 2010-2017 Webkul Software Private Limited (https://webkul.com)
 * @license https://store.webkul.com/license.html
 */
trait traitCurrency {
    public function convertCurrency($from_currency, $to_currency, $amount) {
      if($from_currency == $to_currency) {
        return round($amount, 2);
      }
      $amount = urlencode($amount);
      $from_currency = urlencode($from_currency);
      $to_currency = urlencode($to_currency);

      $url = "http://www.google.com/finance/converter?a=$amount&from=$from_currency&to=$to_currency";

      $ch = curl_init();
      $timeout = 0;
      curl_setopt ($ch, CURLOPT_URL, $url);
      curl_setopt ($ch, CURLOPT_RETURNTRANSFER, 1);

      curl_setopt ($ch, CURLOPT_USERAGENT, "Mozilla/4.0 (compatible; MSIE 8.0; Windows NT 6.1)");
      curl_setopt ($ch, CURLOPT_CONNECTTIMEOUT, $timeout);
      $rawdata = curl_exec($ch);
      curl_close($ch);
      $data = explode('bld>', $rawdata);
      $data = explode($to_currency, $data[1]);

      return round($data[0], 2);
    }
}
?>
Now, we will use this Trait in our Opencart controller’s class. Here’s the code to that.
<?php
/**
 * Webkul Software.
 *
 * @category Webkul
 * @package JavaScript Concepts
 * @author Webkul
 * @copyright Copyright (c) 2010-2017 Webkul Software Private Limited (https://webkul.com)
 * @license https://store.webkul.com/license.html
 */
include 'catalog/controller/test/trait.php'; // first, including the file

class ControllerTestTest extends Controller {
    use traitCurrency;
    public function index() {
        $converted = $this->convertCurrency('USD', 'INR', 50); //
        print_r($converted);
    }
}
?>
So, here we end up with a few examples of traits and also its application with the Opencart.
↧
JavaScript Scope
JavaScript has a feature called scope. The concept of the scope in not that easy to understand for many new developers but I will try my best to explain them in simple way. Understanding scope will make your code better and key to writing bulletproof code and being a better developer.
What Is Scope?
In JavaScript scope is the set of variables, functions and objects you have accessed to. Scope refers to the current context of your code. scope can be defined globally and locally.
Global Scope
Before writing code in JavaScript, you are in what we call Global Scope. If we declare a variable, It’s considered as Global Variable.

Variables inside the global scope can be accessed and altered in any other scope.

Local Scope
There is typically one global scope and each function defined has its own local scope. Any function defined with in another function has a local scope of the parent function.
If I create function and defined some variables, those variable will be the local variables of that function. Take an example –

Automatically Global
If we assign a value to a variable that has not been declared then that variable will be considered as Global Variable.

I hope you got a better understanding of JavaScript Scope and things around it. Thanks
↧
HTML Style Guide And Code Structure
Coding structure is important for the readability and maintenance of the program. While working on HTML we usually make some mistakes in the style and coding structure. We need to use the consistent style so that the code can easily understand by others. The code should be tidy and clean. In this blog, we will learn about the dos and don’ts of HTML of styling and coding.
Always declare the correct document type:
Document type should always declare at first before the <html> tag and always take care of lower and uppercase of the document type.

Use the elements name in lower case letters:
Lowercase letters are easier to write. Never mix lower case elements with upper case elements.

Close all HTML elements:
Close each and every HTML elements even empty HTML elements also.

There are some elements in which there are no closing tags.

Attributes name in lower case letters:
Attributes name should always be in lower case as it is easier to write and it looks clean and tidy.

Use quotes for the value of attributes:
There should be the use of quotation while defining the value of an attribute.

Use the alt attribute with images:
As alt is used when the image is not getting loaded then whatever the text in alt attribute will show. So, alt attribute should always define with images.
No blank lines and indentation:
Indentation means a space left at the edge of a line of writing or the process of leaving a space. As much as space is left and blank lines are there in code when it is not needed then file size will increase and there will be problem SEO URL.

One should always keep above points in mind while working on HTML as it will be easier for you as well for others.
Thank You for your time.
↧
↧
Namespaces in PHP
Today we are going to learn about Namespace in PHP. Let’s start with definition of namespace So “Namespace are basically a way of organising your PHP classes and preventing from any kind of code conflicts . See this example ,
<?php
namespace Webkul;

//We have here a namespace with name Webkul and a class Name Opencart

class Opencart {

//Your all code will be here for this class

}
In this example we have created a class called Opencart inside of the Webkul namespace. If we did not create namespace for class and we have another class with the same name of ‘Opencart’ included in this file we would get an error stating we cannot re-declare class. Namespace will allow us to create two class name with same name and we can include both in same file.So we can create another class with same name like this-
<?php

namespace Demo;
//We have here a namespace with name Demo and a class Name Opencart
class Opencart {
//Your all code will be here for this class
}
Here we have created same class Opencart in another namespace Demo .Now we can include both file in our application and easily we can differentiate and use both class Opencart from both namespace. As i have given a example how we can use both class in same file
<?php

// include both of our Opencart classes
require "Demo/Opencart.php";
require "Webkul/Opencart.php";

// create a new instance for Opencart in the Demo namespace
 $Opencart1 = new Demo\Opencart();
 // create a new instance for Opencart in the Webkul namespace
 $Opencart2 = new Webkul\Opencart();
Both of these classes are different from each other and also have different code , different functionality . But here we are using both and namespace allow us to use same class name and differentiate them by there namespaces. Also we can make these code more readable by using PHP use function. For example, let’s say we want to just use Opencart in place of Demo\Opencart. Then by using PHP use function we can do like this
<?php

 require "Demo/Opencart.php";
 require "Webkul/Opencart.php";
// included both of our Opencart classes

use Demo\Opencart as Opencart;
//this is to tell our code that i will use Opencart in place of Demo/Opencart

//Now use of Opencart for Demo namespace
 $Opencart1 = new Opencart();
We have used use PHP function to tell our code that i want use Opencart in place of writing Demo/Opencart. Now also we can use another namespace class for that we have to do like this .
//This will change the Opencart class from demo to webkul namespace

use Webkul\Opencart as Opencart;
// Now if you will create a instance for opencart class
$Opencart2 = new Opencart();

//This is new intance of class Opencart from Webkul namespace
Now if you will use Opencart class then you are using it form Webkul namespace . and you can create instance which will belongs to Opencart class from Webkul namespace. Thats all from this blog.
↧
Magento 2 PayPal Mass Vendor Payment Benefits
This article describes the benefits of new add-on of Marketplace Module ie; Marketplace Mass PayPal Payment For Magento 2.
Mass Payouts is an online facility that allows businesses to make payments to multiple individuals instead of doing it for particular individuals. Similarly, this module Marketplace Mass PayPal Payment For Magento 2 allows the admin to easily make the seller’s payouts using the mass PayPal payment option. This enables the admin to make hundreds of payments in a short span of time. This Module saves on:
- Time – as admin can do a mass PayPal Payment to 250 sellers in one attempt.
- Possible Errors – admin and seller can save their details.
- Allow business to provide better service to their customers.
- Payment convenience – short and hassle free payment process.
- Security – require no financial details.
Admin Details
Admin can easily configure the Seller Mass Payment once, the admin is done with the installation part. For this, the admin needs to navigate through the Stores>Configuration>Webkul>Marketplace>Seller Mass Payment Configuration.

Here, admin will
- Select the Sandbox mode as Yes(Testing Mode) or No(Production Mode).
- Feed the Merchant PayPal Id(Which will be used to send the payout to the sellers).
- Entering the PayPal Application Id, PayPal API User Name, PayPal API Password and the PayPal API Signature.
The admin can receive the App Id, Username, Password and Signature via your PayPal account. As this Marketplace Module supports PayPal payment only.
Seller Details
A seller also can configure his details from his seller panel. After installation, the seller will get ‘Manage PayPal Details’ option under ‘Marketplace block’.

Mass Seller Payouts
This module provides an innovative payment solution to help admin to disburse payments online to sellers. The admin can at a time make the payout to a maximum of 250 sellers which is an absolute advantage.
So, to make mass seller payout the admin will navigate to Marketplace>Manage Sellers.
Here, the admin can select the multiple sellers from the list and the PayPal mass payment option.

This module allows fund transfer to as many people as users want up to 250 without hassle. It is a fast, secure and convenient way to send funds to a large number of individuals. This helps in growing business with transparency, integrity, and simplicity.
Payout Transaction Details
This module also helps users by giving a quick view of the transactions through a list. The admin can check to whom he has made payments by navigating to Marketplace Management>Sellers Transactions.

Even sellers also can check the payout made by the admin by navigating to ‘My Transaction List’ menu option under the ‘Marketplace block’.

The seller can have a detailed view of the payout information by clicking on the ‘view’ link.
Inference
Marketplace Mass PayPal Payment For Magento 2 offers:
- Send payments to many recipients at once.
- Faster and easier than writing checks.
- Recipients get paid quickly online.
- Track payments easily.
That’s all for the Magento 2 Marketplace Mass PayPal Payment. Still, have any issues please mail us at support@webkul.com else you can generate a ticket at https://webkul.uvdesk.com/en/
↧
Joomla Virtuemart Bulk Price Update
Joomla Virtuemart Bulk Price Update:
Joomla Virtuemart Bulk Price Update is a very useful component, it provides a functionality by which store admin can update(increment/decrement) the price of the “N” number(s) of product in one go. The changes will be made to the base price of the product rather on the special price specified (if any) for any particular time period.
FEATURES-
- Admin can update price based on fixed increment/decrement.
- Admin can update price based on percentage increment/decrement.
- Admin can set direct prices on product(s).
- Admin can filter product(s) based on category and status.
- admin can search/sort product(s).
- Only applicable on the base price rather than any special price for any particular time period.
FLOW OF INSTALLATION AND CONFIGURATION
Step1.
Browse the ‘Joomla Virtuemart Bulk Price Update’ zip file and then upload and install.
Browse the ‘Joomla Virtuemart Bulk Price Update’ zip file and then upload and install.

Step2.
Now, click on ‘Components’ and move to ‘Virtuemart Bulk Price Update’ in the drop-down and click on it.
Now, click on ‘Components’ and move to ‘Virtuemart Bulk Price Update’ in the drop-down and click on it.

Step3.
Now, select the product(s) those prices you want to update and proceed as mentioned in the below image.
Now, select the product(s) those prices you want to update and proceed as mentioned in the below image.

In this pop-up area you can made the changes, you can increment/decrement product price of the selected product(s) in percentage or fixed value.

Step4.
click on option.
click on option.


Let us go through a practical example so show how price is update
1.

2.

3.

WEBKUL SUPPORT
That’s all for the Joomla Virtuemart Bulk Price Update still, have any issue feel free to add a ticket and let us know your views to make the component better http://webkul.uvdesk.com
↧
jQuery Traversing
In this blog we will learn about jQuery Traversing.
jQuery traversing are used to find or select HTML elements. For example if you want to select data just after the selector, or select grand data of selector, or select children data of selector or if you want to select children element of selector then you can select by the use of traversing.
There are many types of traversing but basically there three types of traversing:-
1) Parent
2) Children
3) Siblings
Lets see example:
In this example we have made some colorful div assigned as Great grand parent, Grand parent, Parent, children. In this example we will see how by selecting one div we will select other div. Check output after each example.
<html>
	<head>
		 <title>JQuery Traversing</title>
		 <script type = "text/javascript"
				src = "https://ajax.googleapis.com/ajax/libs/jquery/2.1.3/jquery.min.js"></script>
				<script type = "text/javascript" language = "javascript">
				   $(document).ready(function() {
				      $(".children").append('(Selected Selector)');
				      //here you have selected children as your selector. check the effect below
				   });
				</script>
		 <style>
				.traversing {
				 background: gray;
				 padding: 10px;
				 width:300px;
				 height:300px;
				}
				.grandparent_parents {
				 background: yellow;
				 padding: 10px;
				 width:250px;
				 height:250px;
				}
				.grandparent {
				 background: green;
				 padding: 10px;
				 width:200px;
				 height:200px;
				}
				.parent {
				 background: white;
				 padding: 10px;
				 width:150px;
				 height:150px;
				}
				.children {
				 background: brown;
				 padding: 10px;
				 width:100px;
				 height:100px;
				}
		 </style>
	</head>
	<body>
		 <div class="traversing">
				<div class="grandparent_parents">Great Grand Parent
					<div class="grandparent">Grand Parent
						<div class="parent">Parent
						 <div class="children">Children
						</div>
						</div>
					</div>
				</div>
		 </div>
	</body>
</html>

Above we have selected children as the selector therefore the text is coming inside the Children div.
Now change only script section from above written code for next example.
<script type = "text/javascript" language = "javascript">
  $(document).ready(function() {
     $(".children").parent().append('(Selected Selector)');
     //here your selector is $(".children").parent(). check the effect below
  });
</script>
 Here we have selected parent of children and parent of children is white section therefore the text is coming inside the white section.
Now change only script section from above written code for next example.
<script type = "text/javascript" language = "javascript">
 $(document).ready(function() {
  $(".children").parents().append('(Selected Selector)<br>');
  //here your selector is $(".children").parents(). check the effect below
 });
</script>

Here we have selected selector as parents of children and parents of children are white,green,yellow,gray and even main div therefore the text is coming inside the all the section.
Now change only script section from above written code for next example.
<script type = "text/javascript" language = "javascript">
 $(document).ready(function() {
  $(".children").parents('.grandparent_parents').append('(Selected Selector)');
  //here your selector is $(".children").parents('grandparant_parents'). check the effect below
 });
</script>
![]()

Here we have selected selector as $(“.children”).parents(‘.grandparent_parents’) means children parents whose class is grandparent_parents therefore the text is coming inside yellow section because yellow section class is grandparent_parents.
Now change only script section from above written code for next example.
<script type = "text/javascript" language = "javascript">
   $(document).ready(function() {
      $(".children").parentsUntil('.grandparent_parents').append('(Selected Selector)');
      //here your selector is $(".children").parents() now check the effect untill you get the parent whose calss is grandparent_parents the effect will come
   });
</script>

Here we have selected selector as $(“.children”).parentsUntil(‘.grandparent_parents’) means all the parent will be selected Until you get the Grand parent.
So here we ends with some example of jQuery traversing.
↧
↧
Display ‘Not Visible Individually’ Product Into Mini Cart In Magento 2
Display “Not Visible Individually” Product Into Mini Cart In Magento 2 – Here I am going to explain you how to display “not visible individually” products into mini cart in your custom module.To display “Not Visible Individually” products into mini cart you need to follow following steps-
Step-I
Set preference for “Magento\Checkout\CustomerData\Cart” in di.xml
<config xmlns:xsi="http://www.w3.org/2001/XMLSchema-instance" xsi:noNamespaceSchemaLocation="urn:magento:framework:ObjectManager/etc/config.xsd">
     <preference for="Magento\Checkout\CustomerData\Cart" type="Webkul\TestModule\CustomerData\Cart" />
</config>
Step-II
Make a Cart.php file on location Webkul\TestModule\CustomerData then copy all the codes of Magento\Checkout\CustomerData\Cart.php to your custom module file Webkul\TestModule\CustomerData\Cart.php
Step-III
Edit in method getRecentItems()
    protected function getRecentItems()
    {
        $items = [];
        if (!$this->getSummaryCount()) {
            return $items;
        }

        foreach (array_reverse($this->getAllQuoteItems()) as $item) {
            /* @var $item \Magento\Quote\Model\Quote\Item */
            if (!$item->getProduct()->isVisibleInSiteVisibility()) {
                $product =  $item->getOptionByCode('product_type') !== null
                    ? $item->getOptionByCode('product_type')->getProduct()
                    : $item->getProduct();

                $products = $this->catalogUrl->getRewriteByProductStore([$product->getId() => $item->getStoreId()]);
                if (!isset($products[$product->getId()])) {
                    if ($product->getId() === 4){ // set your condition
                        $items[] = $this->itemPoolInterface->getItemData($item); // "not visible individually" product having id 4 added into items array
                    }
                    continue;
                }
                $urlDataObject = new \Magento\Framework\DataObject($products[$product->getId()]);
                $item->getProduct()->setUrlDataObject($urlDataObject);
            }
            $items[] = $this->itemPoolInterface->getItemData($item);
        }
        return $items;
    }


In this way you can display “not visible individually” products into mini cart.
↧
Xtremo Responsive Theme for Magento 2
Xtremo is a premium theme for Magento 2 store. The theme is responsive, beautiful, and customizable. Xtremo theme is suitable for any type of store including the Marketplace. On the homepage, you can view a multi-image banner slider with URLs. Display carousel style products – featured, top-rated, tailored, discount & sale.
The Xtremo theme looks amazing on any type of devices – desktop, laptop, tablet, or mobile. Due to its responsive nature, the theme will adjust itself on any device resolution.
Note – If you have Magento 2 Multi-Vendor Marketplace module installed then, please follow Marketplace-patch Step 1: (b).
Features
- Responsive to every device resolution.
- Show the multi-image banner slider with embedded URL.
- Product carousels – featured, discount & sale, top- rated, tailored.
- Customizable header menu links.
- Mega Menu for categories.
- Select categories for product search.
- Add social media links in the footer.
- Popular categories on the homepage.
- Retina based product zooming.
- Social media sharing options included.
- Upload default placeholder image for the category.
- Customize homepage is using CMS blocks and widgets.
- Works very well with Multi-vendor Marketplace.
- The module source code is open for customization.
- Supports multiple languages translations.
Installation
To install this extension, please follow each and every step carefully as follows:
Step 1: (a) – Non-Marketplace Store
After extracting the downloaded zip file and you will get the src folder. Inside src folder, you will find two folders. One app folder and other will be Marketplace-patch folder, copy the app folder to the Magento 2 root directory. Please view the below screenshot.

Step 1: (b) – Marketplace Store
After opening the src folder, go to Marketplace-patch folder and copy the app folder to the root directory of Magento 2 directory. Please Note – This app folder will only work for the marketplace.

Step 2:
After copying the app folder, you need to run the commands in the Magento2 root directory. Please view the below screenshots:
php bin/magento setup:upgrade

php bin/magento setup:static-content:deploy

Step 3:
After running the commands, you need to flush the cache and reindex all from the Magento2 admin panel. Navigate through System>Cache Management. Click Flush Magento Cache button as shown below:

Multi-Lingual Configuration
For Multilingual support, please navigate. Store>Configuration>General >Locale Options. And select your desired language from the Locale option.

Language Translation
If you need to do the module translation, please navigate the following path in your system. app/code/Webkul/Xtremo/i18n. Open the file named en_US.CSV for editing as shown in below screenshot.

Once you have opened the file for editing. Replace the words after the comma(,) on the right with your translated words.

After editing the CSV file, save it and then upload it to the same folder. Now your module translation is complete.

Module Configuration
After the module installation, the admin needs to go the Xtremo theme module configuration. Go to Stores>Configuration>Xtremo Configuration. The following page will appear.
Header Settings
Phone Number – Enter the store phone number to show on the header menu.
Select CMS Pages – Select which store pages link to show on the header.
Display Category Drop-Down Search Bar – Select Yes to allow customers to search according to the categories.
Select Categories for Top Search – Select which categories will appear in the drop-down search menu.

Footer Settings
Add social network links for the footer. The store owwner can external links for Twitter, Google Plus, Facebook, LinkedIn, and Instagram.

Homepage Settings
Category Placeholder Image – Upload default placeholder image for the categories which have no image.

CMS Content Settings
Blocks
The admin can customize the homepage and footer content of the theme using the following blocks. Go to Content>Blocks, and select and edit the block as visible in the screenshot.

Widgets
To customize the widgets of the Xtremo theme, go to Content>Widgets and edit following widgets.

Product Carousel
Go to Products>Catalog, select and Edit any product. The following options will be visible, select Yes to include the product in the carousel, else select No.

Category Settings
Go to Products>Categories, select and Edit any category. Select Yes/No options for the homepage.

Front-End View
Home Page View
This is how home page will appear on the front-end. The homepage will show the banner slider, header links, category menu, various product carousels, and popular categories of the store.

Category Page (Grid View)
The category page showing various products in grid view layout. The customers can use filters and sort by options for searching the products. Advanced layer navigation allows the customers to find products easily.

Category Page (List View)
The customers can view the category in list layout for more detailed product information.

Product Page View
The product page is completely redesigned, the customers can view product information, reviews, images, and, ratings.
Product Compare Page View
The customers can do the comparison between the two or more products of the store. Following is the product comparison page.

My Wishlist Page View
Here’s the customer wishlist page, the customer can edit the quantity, add the product to cart, update wishlist, and share the wishlist with friends. The customers can also add a comment for their wishlist products.

Shopping Cart View
The shopping cart page of the store showing summary for shipping and tax.

Login and Sign Up Page View
Here is the Login and Sign Up page will appear for the customers.

Xtremo Marketplace
The Xtremo theme for Magento 2 works very well with the Marketplace. Please view the following screenshots to see how the marketplace will appear in Xtremo theme.
Seller Profile Page View
The seller profile page showing lots of details about the seller.

Seller Collection Page View
Seller collection page for viewing all the products of a seller at one page.
 Marketplace Dashboard Page View
Amazing looking marketplace dashboard page for the sellers showing all the basic information about their store.

Mobile View
Responsive Theme
The Xtremo theme is compatible with all the devices resolutions. The layout, banners, carousels, menu, and everything adjust itself according to the viewing user device.
Homepage View

Product Page

Category Grid View

Category List View

Sort By Options

Filter Options

Login Page

Sign Up Page

Header Menu

Account Menu

Category Menu

Shopping Cart View

My Wishlist

Thank you for viewing this blog. If you have any query or need more information, please visit webkul.uvdesk.com
↧
WordPress WooCommerce Marketplace Multi Language Translation (Old Poedit Verison)
Multi language translation is very simple, just need to follow below steps:
1.) Download and install Poedit. You can download Poedit from here.
2.) Open “.pot” file in Poedit. You can find this file under language folder of the plugin.
3.) Translate all the keywords in the desired language as below snapshot.

4.) Save the file in the “Language folder of the plugin” or “Language folder of WordPress”. Give a name to the file as per the predefined format. The format will be as “language code_country code”.
EX : For Italian, it will be “it_IT”.
You can find language code and country code in last of this user guide.
5.) Change the language in WordPress under “Settings > General > Site Language” as below snapshot.

Multi Language Translation Codes
| Country | Code | Language | Code |
| Andorra | AD | Afar | aa |
| United Arab Emirates | AE | Abkhazian | ab |
| Afghanistan | AF | Avestan | ae |
| Antigua and Barbuda | AG | Afrikaans | af |
| Anguilla | AI | Akan | ak |
| Albania | AL | Amharic | am |
| Armenia | AM | Aragonese | an |
| Angola | AO | Arabic | ar |
| Antarctica | AQ | Assamese | as |
| Argentina | AR | Avaric | av |
| American Samoa | AS | Aymara | ay |
| Austria | AT | Azerbaijani | az |
| Australia | AU | Bashkir | ba |
| Aruba | AW | Belarusian | be |
| Aaland Islands | AX | Bulgarian | bg |
| Azerbaijan | AZ | Bihari | bh |
| Bosnia and Herzegovina | BA | Bislama | bi |
| Barbados | BB | Bambara | bm |
| Bangladesh | BD | Bengali; Bangla | bn |
| Belgium | BE | Tibetan | bo |
| Burkina Faso | BF | Breton | br |
| Bulgaria | BG | Bosnian | bs |
| Bahrain | BH | Catalan | ca |
| Burundi | BI | Chechen | ce |
| Benin | BJ | Chamorro | ch |
| Saint Barthelemy | BL | Corsican | co |
| Bermuda | BM | Cree | cr |
| Brunei Darussalam | BN | Czech | cs |
| Bolivia, Plurinational State of | BO | Church Slavic | cu |
| Bonaire, Sint Eustatius and Saba | BQ | Chuvash | cv |
| Brazil | BR | Welsh | cy |
| Bahamas | BS | Danish | da |
| Bhutan | BT | German | de |
| Bouvet Island | BV | Divehi; Maldivian | dv |
| Botswana | BW | Dzongkha; Bhutani | dz |
| Belarus | BY | Éwé | ee |
| Belize | BZ | Greek | el |
| Canada | CA | English | en |
| Cocos (Keeling) Islands | CC | Esperanto | eo |
| Congo, The Democratic Republic of the | CD | Spanish | es |
| Central African Republic | CF | Estonian | et |
| Congo | CG | Basque | eu |
| Switzerland | CH | Persian | fa |
| Côte d’Ivoire | CI | Fulah | ff |
| Cook Islands | CK | Finnish | fi |
| Chile | CL | Fijian; Fiji | fj |
| Cameroon | CM | Faroese | fo |
| China | CN | French | fr |
| Colombia | CO | Western Frisian | fy |
| Costa Rica | CR | Irish | ga |
| Cuba | CU | Scottish Gaelic | gd |
| Cape Verde | CV | Galician | gl |
| Curaçao | CW | Guarani | gn |
| Christmas Island | CX | Gujarati | gu |
| Cyprus | CY | Manx | gv |
| Czech Republic | CZ | Hausa | ha |
| Germany | DE | Hebrew (formerly iw) | he |
| Djibouti | DJ | Hindi | hi |
| Denmark | DK | Hiri Motu | ho |
| Dominica | DM | Croatian | hr |
| Dominican Republic | DO | Haitian; Haitian Creole | ht |
| Algeria | DZ | Hungarian | hu |
| Ecuador | EC | Armenian | hy |
| Estonia | EE | Herero | hz |
| Egypt | EG | Interlingua | ia |
| Western Sahara | EH | Indonesian (formerly in) | id |
| Eritrea | ER | Interlingue; Occidental | ie |
| Spain | ES | Igbo | ig |
| Ethiopia | ET | Sichuan Yi; Nuosu | ii |
| Finland | FI | Inupiak; Inupiaq | ik |
| Fiji | FJ | Ido | io |
| Falkland Islands (Malvinas) | FK | Icelandic | is |
| Micronesia, Federated States of | FM | Italian | it |
| Faroe Islands | FO | Inuktitut | iu |
| France | FR | Japanese | ja |
| Gabon | GA | Javanese | jv |
| United Kingdom | GB | Georgian | ka |
| Grenada | GD | Kongo | kg |
| Georgia | GE | Kikuyu; Gikuyu | ki |
| French Guiana | GF | Kuanyama; Kwanyama | kj |
| Guernsey | GG | Kazakh | kk |
| Ghana | GH | Kalaallisut; Greenlandic | kl |
| Gibraltar | GI | Central Khmer; Cambodian | km |
| Greenland | GL | Kannada | kn |
| Gambia | GM | Korean | ko |
| Guinea | GN | Kanuri | kr |
| Guadeloupe | GP | Kashmiri | ks |
| Equatorial Guinea | GQ | Kurdish | ku |
| Greece | GR | Komi | kv |
| South Georgia and the South Sandwich Islands | GS | Cornish | kw |
| Guatemala | GT | Kirghiz | ky |
| Guam | GU | Latin | la |
| Guinea-Bissau | GW | Letzeburgesch; Luxembourgish | lb |
| Guyana | GY | Ganda | lg |
| Hong Kong | HK | Limburgish; Limburger; Limburgan | li |
| Heard Island and McDonald Islands | HM | Lingala | ln |
| Honduras | HN | Lao; Laotian | lo |
| Croatia | HR | Lithuanian | lt |
| Haiti | HT | Luba-Katanga | lu |
| Hungary | HU | Latvian; Lettish | lv |
| Indonesia | ID | Malagasy | mg |
| Ireland | IE | Marshallese | mh |
| Israel | IL | Maori | mi |
| Isle of Man | IM | Macedonian | mk |
| India | IN | Malayalam | ml |
| British Indian Ocean Territory | IO | Mongolian | mn |
| Iraq | IQ | Moldavian | mo |
| Iran, Islamic Republic of | IR | Marathi | mr |
| Iceland | IS | Malay | ms |
| Italy | IT | Maltese | mt |
| Jersey | JE | Burmese | my |
| Jamaica | JM | Nauru | na |
| Jordan | JO | Norwegian Bokmål | nb |
| Japan | JP | Ndebele, North | nd |
| Kenya | KE | Nepali | ne |
| Kyrgyzstan | KG | Ndonga | ng |
| Cambodia | KH | Dutch | nl |
| Kiribati | KI | Norwegian Nynorsk | nn |
| Comoros | KM | Norwegian | no |
| Saint Kitts and Nevis | KN | Ndebele, South | nr |
| Korea, Democratic People’s Republic of | KP | Navajo; Navaho | nv |
| Korea, Republic of | KR | Chichewa; Nyanja | ny |
| Kuwait | KW | Occitan; Provençal | oc |
| Cayman Islands | KY | Ojibwa | oj |
| Kazakhstan | KZ | (Afan) Oromo | om |
| Lao People’s Democratic Republic | LA | Oriya | or |
| Lebanon | LB | Ossetian; Ossetic | os |
| Saint Lucia | LC | Panjabi; Punjabi | pa |
| Liechtenstein | LI | Pali | pi |
| Sri Lanka | LK | Polish | pl |
| Liberia | LR | Pashto; Pushto | ps |
| Lesotho | LS | Portuguese | pt |
| Lithuania | LT | Quechua | qu |
| Luxembourg | LU | Romansh | rm |
| Latvia | LV | Rundi; Kirundi | rn |
| Libya | LY | Romanian | ro |
| Morocco | MA | Russian | ru |
| Monaco | MC | Kinyarwanda | rw |
| Moldova, Republic of | MD | Sanskrit | sa |
| Montenegro | ME | Sardinian | sc |
| Saint Martin (French part) | MF | Sindhi | sd |
| Madagascar | MG | Northern Sami | se |
| Marshall Islands | MH | Sango; Sangro | sg |
| Macedonia, The Former Yugoslav Republic of | MK | Sinhala; Sinhalese | si |
| Mali | ML | Slovak | sk |
| Myanmar | MM | Slovenian | sl |
| Mongolia | MN | Samoan | sm |
| Macao | MO | Shona | sn |
| Northern Mariana Islands | MP | Somali | so |
| Martinique | MQ | Albanian | sq |
| Mauritania | MR | Serbian | sr |
| Montserrat | MS | Swati; Siswati | ss |
| Malta | MT | Sesotho; Sotho, Southern | st |
| Mauritius | MU | Sundanese | su |
| Maldives | MV | Swedish | sv |
| Malawi | MW | Swahili | sw |
| Mexico | MX | Tamil | ta |
| Malaysia | MY | Telugu | te |
| Mozambique | MZ | Tajik | tg |
| Namibia | NA | Thai | th |
| New Caledonia | NC | Tigrinya | ti |
| Niger | NE | Turkmen | tk |
| Norfolk Island | NF | Tagalog | tl |
| Nigeria | NG | Tswana; Setswana | tn |
| Nicaragua | NI | Tonga | to |
| Netherlands | NL | Turkish | tr |
| Norway | NO | Tsonga | ts |
| Nepal | NP | Tatar | tt |
| Nauru | NR | Twi | tw |
| Niue | NU | Tahitian | ty |
| New Zealand | NZ | Uighur | ug |
| Oman | OM | Ukrainian | uk |
| Panama | PA | Urdu | ur |
| Peru | PE | Uzbek | uz |
| French Polynesia | PF | Venda | ve |
| Papua New Guinea | PG | Vietnamese | vi |
| Philippines | PH | Volapük; Volapuk | vo |
| Pakistan | PK | Walloon | wa |
| Poland | PL | Wolof | wo |
| Saint Pierre and Miquelon | PM | Xhosa | xh |
| Pitcairn | PN | Yiddish (formerly ji) | yi |
| Puerto Rico | PR | Yoruba | yo |
| Palestine, State of | PS | Zhuang | za |
| Portugal | PT | Chinese | zh |
| Palau | PW | Zulu | zu |
| Paraguay | PY | ||
| Qatar | QA | ||
| Reunion | RE | ||
| Romania | RO | ||
| Serbia | RS | ||
| Russian Federation | RU | ||
| Rwanda | RW | ||
| Saudi Arabia | SA | ||
| Solomon Islands | SB | ||
| Seychelles | SC | ||
| Sudan | SD | ||
| Sweden | SE | ||
| Singapore | SG | ||
| Saint Helena, Ascension and Tristan da Cunha | SH | ||
| Slovenia | SI | ||
| Svalbard and Jan Mayen | SJ | ||
| Slovakia | SK | ||
| Sierra Leone | SL | ||
| San Marino | SM | ||
| Senegal | SN | ||
| Somalia | SO | ||
| Suriname | SR | ||
| South Sudan | SS | ||
| Sao Tome and Principe | ST | ||
| El Salvador | SV | ||
| Sint Maarten (Dutch part) | SX | ||
| Syrian Arab Republic | SY | ||
| Swaziland | SZ | ||
| Turks and Caicos Islands | TC | ||
| Chad | TD | ||
| French Southern Territories | TF | ||
| Togo | TG | ||
| Thailand | TH | ||
| Tajikistan | TJ | ||
| Tokelau | TK | ||
| Timor-Leste | TL | ||
| Turkmenistan | TM | ||
| Tunisia | TN | ||
| Tonga | TO | ||
| Turkey | TR | ||
| Trinidad and Tobago | TT | ||
| Tuvalu | TV | ||
| Taiwan, Province of China | TW | ||
| Tanzania, United Republic of | TZ | ||
| Ukraine | UA | ||
| Uganda | UG | ||
| United States Minor Outlying Islands | UM | ||
| United States | US | ||
| Uruguay | UY | ||
| Uzbekistan | UZ | ||
| Holy See (Vatican City State) | VA | ||
| Saint Vincent and the Grenadines | VC | ||
| Venezuela, Bolivarian Republic of | VE | ||
| Virgin Islands, British | VG | ||
| Virgin Islands, U.S. | VI | ||
| Viet Nam | VN | ||
| Vanuatu | VU | ||
| Wallis and Futuna | WF | ||
| Samoa | WS | ||
| Yemen | YE | ||
| Mayotte | YT | ||
| South Africa | ZA | ||
| Zambia | ZM | ||
| Zimbabwe | ZW |
That’s all for the WordPress WooCommerce Multi Language Translation, still, have any issue feel free to add a ticket and let us know your views to make the plugin better at webkul.uvdesk.com
↧
Shopify Product Auction SMTP configuration
Here we are with Shopify Product Auction SMTP configuration where you can configure your own SMTP to send mails to the customers from your own mail engine.

Clicking on SMTP configuration, you will redirected to configure your own SMTP by entering all the relevant details.
On the below given screenshot you will have to enter the details of your own SMTP like host,SMTP type SMTP post and other relevant details.
DEMO
Frontend : Click here for Frontend
Backend : Click here for backend
- Username : johndoe@webkul.com
- Password : demowebkul
Support
For any kind of support/Consultancy then please raise a ticket at http://webkul.uvdesk.com/ or drop a mail at support@webkul.com
Thanks For reading this blog!!!
↧
↧
Prestashop Multi Product Manager
Prestashop Multi Product Manager : With the help of this module, admin can now assign categories, shipping methods, tax rule, custom fields and suppliers to multiple products with ease. Admin can also assign various groups to multiple customers. Multi-Product Manager makes it very convenient and time saving for the admin to assign all these features to the products and groups to customers as well in bulk. With a lot of features, this module surely brings a new process of assigning products and customers in the back office with so much ease.
Features
- Assign products to multiple categories at once.
- Set default category for products.
- Edit/delete products assigned to categories.
- Assign shipping to products.
- Add multiple shipping carriers to products at once.
- Delete products added to a shipping method, individually.
- Assign tax rules to multiple products at once.
- Delete products assigned to a tax rule.
- Assign customization fields to multiple products at once.
- Option to add text field or file field to products.
- Define labels for text fields and file fields.
- Add multiple fields at once on products.
- Option to set field as required.
- Edit/Delete products on which customization fields are applied.
- Edit customization fields and labels added to a product.
- Assign suppliers to multiple products at once.
- Set and edit default supplier.
- Edit/Delete a product assigned to a supplier easily.
- Assign groups to multiple customers.
- Option to set and edit default customer group.
- Edit/Delete customer assigned to a particular group.
Installation
- Go to back office > module
- Upload the module zip file
- Search “Multi-Product Manager” in module search box then go to module and click on install.

Configuration
After successful installation, admin can configure the module.

Set default no. of items in list and fetch next no. of items to successfully configure this module.
Workflow
A new tab Multi-Product Manager is added in back office. There would be 6 sub tabs under this tab, namely:
1. Manage Category
2. Manage Shipping
3. Manage Tax Rule
4. Manage Customization
5. Manage Supplier
6. Manager Customer Group
Now, Lets see how we could use these features to our benefit.
Manage Category
Admin can assign multiple categories to products at once here.
To open manage category settings, Go to back office > Multi-Product Manager tab > Manage category

Assign category to products

Select categories to assign multiple products. Admin can also set default category from here. Click to save.

List of categories assigned to products is displayed. Admin can view all the products assigned to a particular category from here as well.

While viewing a category, list of all the products assigned to it is displayed. Admin can edit or delete a product assigned to the selected category here..

Admin can also edit the default category of the product from here.

Click save to make the necessary changes.
This is how admin can assign categories to products using Multi-Product Manager module.
Manage Shipping
In Manage Shipping settings, admin can assign multiple shipping carriers to products.
To open manage shipping settings, Go to back office > Multi-Product Manager tab > Manage Shipping

Admin can now select one or more shipping carriers to be assigned to multiple products.

Here admin needs to select the shipping carriers that have to be assigned to products. Select the products that have to be added to these shipping carriers and save.

After shipping carriers have been assigned to respective products, list of all those shipping carriers would be shown.
From here admin can also view the products that are applied to a shipping carrier.

On viewing a shipping carrier from this list, all the product that have been added to this carrier would be shown in a list. Admin can also delete a product from this shipping carrier from here.

In this way one or more than one shipping carriers can be assigned to multiple products at once.
Manage Tax Rule
Tax rule can be assigned to multiple products under this feature.
To assign tax rule to products, Go to back office > Multi-Product Manager tab > Manage Tax Rule

Here admin can assign a tax rule to multiple products easily.

Admin can choose the tax rule that have to be assigned to products. Now admin needs to select the products that would be assigned to this tax rule. Click save to apply the selections.

List of all tax rules assigned to the products is shown. Admin can view the products added to a particular tax rule here.

On viewing any of the tax rule from this list, admin would be able to see all the products on which this tax rule has been applied.

If any product have to be removed from this tax rule, admin can simply delete that product using the delete button.
This is how admin can apply tax rule to multiple products.
Manage Customization
Customization fields can be added to multiple products easily using this manage customization feature in Multi-Product Manager.
To add customization fields to products, Go to back office > Multi-Product Manager tab > Manage Customization.

Admin can apply customization fields i.e. text fields and file fields to multiple products here.

Admin can here add a number of text fields and file fields to be applied to selected products, also define labels in multi-language as well.

Click to save.
List of customization and the number of products added to them is shown.

Admin can view all the products on which custom fields have been applied on clicking the view button.

Also admin can edit/delete any product that has been applied to this custom field.
Admin can add or remove custom fields added to the selected product, also edit labels from here.

Click to save changes.
That’s how admin can add custom fields on multiple products.
Manage Supplier
Admin can easily assign one or more supplier to multiple products here.
To assign suppliers to products, Go to back office > Multi-Product Manager tab > Manage Supplier

Admin can assign supplier to products from here.

Now admin needs to select the suppliers which have to be assigned to products. Select the products that would be associated to the selected suppliers. Choose default supplier and click on save.

Once the suppliers have been assigned to the products, they will be shown in the list here.

Admin can view all the products that have been assigned to this supplier.

Admin can edit/delete any product that have been assigned to the selected supplier. Also edit default supplier for that particular product.

Following these steps admin can easily assign suppliers to products.
Manage Customer Group
With the help of this feature admin can add one or more groups to multiple customers easily.
To be able to assign groups to customers go to back office > Multi-Product Manager tab > Manage Customer Group

From here admin can assign groups to customers.

Select all the groups that will be assigned to customers. Set the default customer group. Select the customers that would belong to these selected groups.

Save your preferences.
List of the groups assigned to the customers is displayed. Click on view tab to see the list of all customers assigned to the selected group.

Admin can here edit or delete a customer assigned to the selected group.

Admin can edit groups assigned to the selected customer and can change the default customer group. Click save to implement the changes.

This was all about the Multi-Product Manager module and its features. Hope this blog would have cleared all your doubts about this module.
Support
For any kind of technical assistance, just raise a ticket at : http://webkul.uvdesk.com/ and for any doubt contact us at support@webkul.com
↧
Disable payment method programmatically in Magento2
Disable payment method programmatically in Magento2.
Today I am going to explain that how you can disable any payment method programmatically at checkout page in magento 2 in this article. I have done it by using observer.
So lets get started with the process.
First you will need to create events.xml file under app/code/Company/Module/etc/. Then write “payment_method_is_active” event in it. This is the event which hits on checkout page for payment method availability.
<?xml version="1.0"?>
<config xmlns:xsi="http://www.w3.org/2001/XMLSchema-instance" xsi:noNamespaceSchemaLocation="urn:magento:framework:Event/etc/events.xsd">
    <event name="payment_method_is_active">
        <observer name="custom_payment" instance="Company\Module\Observer\PaymentMethodAvailable" />
    </event>
</config>
Now create PaymentMethodAvailable.php under Company/Module/Observer/ and write following code in the file. I am disabling the check money order payment method, you can change payment method code according to your need.
<?php

namespace Company\Module\Observer;

use Magento\Framework\Event\ObserverInterface;


class PaymentMethodAvailable implements ObserverInterface
{
    /**
     * payment_method_is_active event handler.
     *
     * @param \Magento\Framework\Event\Observer $observer
     */
    public function execute(\Magento\Framework\Event\Observer $observer)
    {
        // you can replace "checkmo" with your required payment method code
        if($observer->getEvent()->getMethodInstance()->getCode()=="checkmo"){
            $checkResult = $observer->getEvent()->getResult();
            $checkResult->setData('is_available', false); //this is disabling the payment method at checkout page
        }
    }
}
Now the payment method Check Money Order is disabled from checkout page .
Hope this blog will help you to develop custom functionality in your module in a better way. Try this and if you have any query then just comment below
↧
Handle Exception with Reflection Class in PHP
As PHP has already become the most used programming language on the web, so nowadays, a lot of frameworks are seen to be built in PHP programming language. There are a lot of customizable blogging and e-commerce frameworks that are built in PHP. So, there emerges a need to handle the exceptions that could be caused by the miscoded extensions for a framework. In order to handle those exceptions, we have to use something that can handle the exception and also be showing the proper cause. This is where reflection class come into use.
A ReflectionClass in PHP is something that contains the information about a class as mentioned in PHP documentation. Although, it has many applications we are going to focus on the exception handling.
The syntax of reflection class:
// $class_name is the name of a class
// $reflection contains the information about $class_name class
$reflection = new ReflectionClass($class_name);
We could have a doubt while calling a method of a class, for that we can use this function of reflection class:
// $method_name is the name of the method to be checked
$reflection->hasMethod($method_name)
We can also find out the number of arguments in a method by using the below function.
$reflection->getMethod($method_name)->getNumberOfRequiredParameters()
Although, I have listed a very few, there are much more applications of ReflectionClass. You can learn about other functions of the ReflectionClass in the PHP Documentation.
↧