Quantcast
Channel: Webkul Blog
Viewing all 5488 articles
Browse latest View live

CS-Cart Aramex Shipping Method

$
0
0

CS-Cart Aramex Shipping Method : Integrate Aramex shipping with CS-Cart and calculate shipping rates in real time with this magnificent add-on. This addon also allows store Admin/vendor to use Aramex shipment service to deliver products to customers address. Aramex, a leading global provider of comprehensive logistics and transportation solutions is known for its express delivery and logistics services.

In order to use this module merchant just needs to have an Aramex account and with all its required details configured.

Features

  • Well integrated with CS-Cart Multi-Vendor.
  • Functionality to calculate real time shipping rates.
  • Both admin and vendor can create shipment through Aramex.
  • Functionality to generate Aramex Shipping Label at both admin and vendor end.
  • Shipping methods are available for domestic as well as international customers.
  • Easy to configure and manage at admin end.
  • The codes are open to be further customized easily.

How  To  Upload and Install

After downloading the CS-Cart Aramex Shipping Method, you will get a zip file and install.txt . Read the install.txt carefully and configure it accordingly.

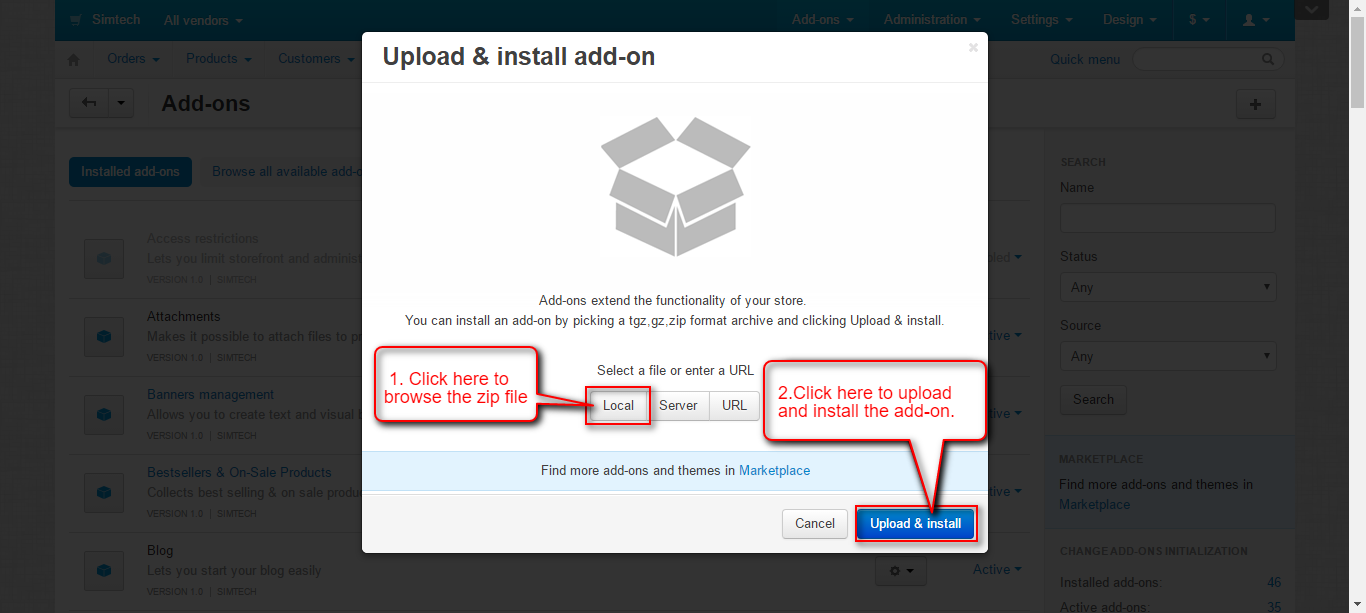
Go to “Manage add-ons”, click on “+” to upload and install the zip file as shown below.
Upload
Click on “Local” to browse the zip file and then click on “Upload & Install” as shown below in snapshot.
Upload CS-Cart Aramex Shipping Method

How To Configure Aramex

Once CS-Cart Aramex Shipping Method is installed successfully, A new Shipping Method for Aramex need to be created. Here’s the flow :
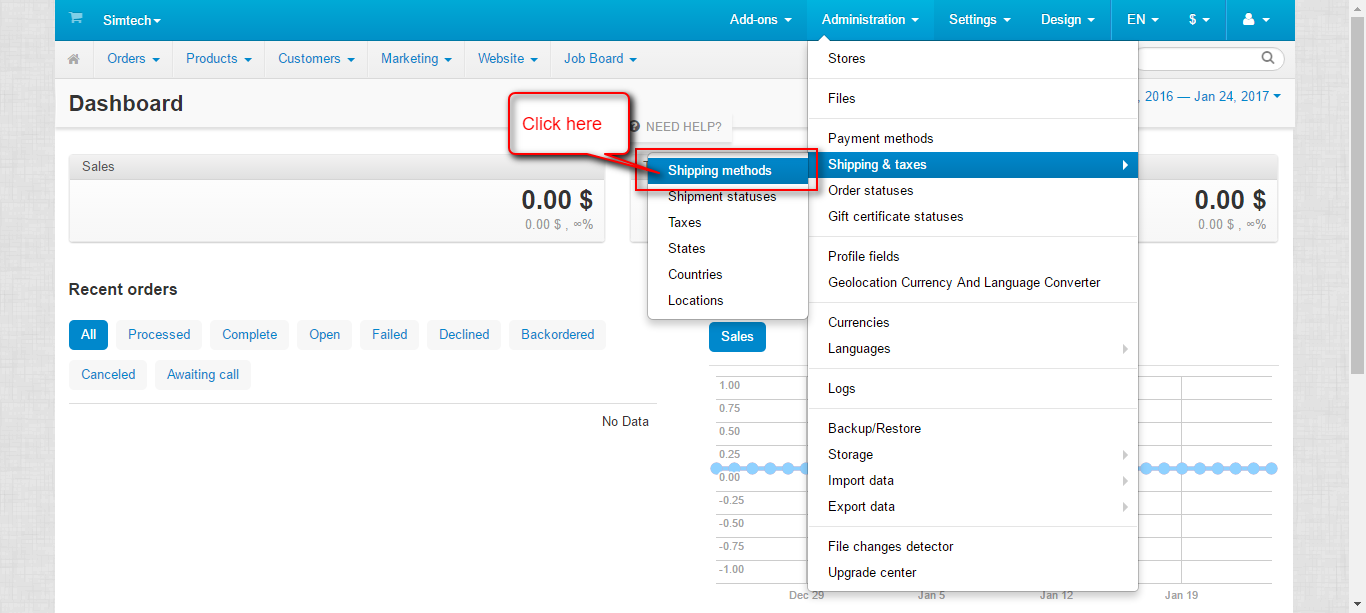
Step 1:

Go to Administration -> Shipping & taxes -> Shipping Methods as per the below screen shot.

shipping

Step 2:

Click on + button to add a new shipping method.

add

Step 3 :

Set the following parameters to add shipping method.

  • Enter the name and description of shipping method.
  • Select for Realtime shipping rates calculation
  • Choose Aramex as a shipping carrier.
  • Set the shipping service as None and fill all the other details accordingly and create shipping method.

Shipping & taxes - Administration panel

Step 4 :

Once the shipping method is created, we need to configure it. Click on Configure tab and enter the Account Details related to Aramex which includes :

  • Email
  • Password
  • Account Pin, Account Number
  • Account Entity
  • Country Code
  • Mode (Test or Live)

The Configuration part includes the Product Group (Express or Domestic) Select the desired group and accordingly set the Product Type for Domestic and Express Group.

configure

Step 5 :

Set the additional shipping charges if required and save.

additional charges

Front End View

Now user can see the Aramex Shipping Method and its shipping cost on front end checkout page as per the below screen shot.

Front End Shipping

Shipment Creation At Backend

Go to order details page to create the shipment for Aramex. Click on Create detailed shipment as shown :

create shipment

The quantity remains selected as per the order. Set the below mentioned options :

  • Select the Aramex shipping method.
  • Select the Product Group (Either Express or Domestic)
  • Choose the Product Type as per the selected Product Group.
  • Enter the global description for this shipment.

Shipment

  • Check the box to Create Real Time shipment label generation at Aramex end.
  • Enter the custom charges if applicable.
  • Choose the Aramex as a carrier.
  • Enter the comments for shipment.
  • Set the order status for this shipment.
  • Check the box to send shipment notification to customer.
  • Click on Create button to create the shipment.

Shipment

Shipping Label Generation

Once the Shipment is created, Tracking id/URL is generated as shown in the snapshot below. Click on the Shipments and then on Shipment Id to view the shipment details.

shipment

Click on the gear button on the top right corner or the Shipment Details page and click on Shipping Label.

shipment done

This is how the shipment label looks like :

Label


Support

This is all about CS-Cart Aramex Shipping Method. Thank you for viewing this blog. For further any query feel free to contact us at http://webkul.uvdesk.com


Opencart Amazon Connector

$
0
0

Opencart Amazon Connector integrates Amazon store with Opencart store. With the help of this extension, the store owner can import products, orders, and customers from Amazon to Opencart. The extension also enables the store owner to export its products from Opencart to Amazon. Opencart Amazon Connector performs real-time updates of synchronized products price and quantity on Amazon store.

Features

  • Connect multiple Amazon seller accounts with Opencart.
  • Set default quantity and weight of imported products.
  • Select default Opencart store for order sync and imported products.
  • Select default Opencart order status of Amazon orders.
  • Update imported and exported products’ price & quantity on Amazon.
  • Provide currency exchange rate of Amazon store.
  • Import Amazon orders according to date or order ID.
  • Import Amazon product using ASIN (Amazon Standard Identification Number).
  • View customer data (name, address, email) from the Amazon orders.
  • The source code is open for customization.

Installation

Upload Files

First, extract the downloaded zip file. After that, open the correct Opencart Version Folder. According to Opencart Version installed in your system. Then, upload admin, lib, and system folders to the Opencart root directory.

Upload XML

Now log in to admin backend and navigate to Extensions>Extension Installer. Click the Upload button and browse the XML file, this file is in the ocmod folder. Please select the correct ocmod folder. According to your Opencart version installed in your system.

Click Continue after uploading the XML file.

Refresh Modifications

After uploading the XML file, please navigate through Extensions>Modifications. Now click Refresh button as visible in below screenshot.

Opencart amazon connector - modifications

Edit User Groups

After that, go to System>Users>Usergroups. And then edit ‘Administrator’. Click Select All for both Access Permission and Modify Permission and Save it.

edit permissions

Install

Now navigate to Extensions>Modules. Find Opencart Amazon Connector from the list. Click the Install button as visible in the screenshot below.

How to Get Amazon Credentials

Amazon Seller Central

The store owner needs to get Seller ID, Access Key, Secret Key, and Marketplace ID from Amazon seller account. Please log in to Amazon Seller Central and go to Settings>User Permissions.

After arriving on User Permissions page, copy the Seller ID. Then, click View your credentials in Action Taken. A small pop-up window will appear.

Now, you can view your Access Key and Secret Key as visible in the screenshot below.

Marketplace ID

Now, to get your Amazon Marketplace ID, please visit this link and find your Marketplace ID according to your region.

Module Configuration

To do the module configuration, go to Extensions>Modules>Opencart Amazon Connector and click Edit button.

The following page will open, set the Status option as Enabled to use Opencart Amazon Connector. Else select Disabled if you do not want to use this module. 

General Options

Choose Default Category – Select the default Opencart category for the Amazon products where they will be imported.

Default Product Quantity – Set the default quantity of Amazon and Opencart products which have zero quantity. After exporting or importing zero quantity products, this value will become the quantity.

Amazon Product Weight (in Grams) – Enter the default weight of those Amazon products which have no weight.

Order Options

Default Store for Order Sync – Select the default Opencart store for importing Amazon orders.

Amazon Imported Order Status – Select the default order status of the Amazon orders.

Product Options

Default Store for Product – Select the default Opencart store where Amazon products will be imported. The selected store will be assigned to all the Amazon imported products.

Product Variation (Option) Choice – Select Option 1 for importing every product from Amazon store including the variations/options. Note – Each variation/option will be created as a separate Opencart product.

Else, select Option 2 for importing only those Amazon products which do not have any variations. The Amazon products which have variations/options will not be imported to Opencart.

Real-Time Update Settings

If the store owner changes the price or quantity in Opencart, it can update on Amazon automatically using following options:

Update Imported Product on Amazon Store – Set On to do a real-time update of imported products’ price and quantity on Amazon.

Updated Exported Product on Amazon Store – Set On to do a real-time update of exported product’s price and quantity on Amazon.

Manage Amazon Accounts

Amazon Accounts List

After doing the module configuration, the store owner needs to add Amazon account credentials. Go to Opencart Amazon Connector>Manage Amazon Accounts. The following page will open showing Amazon accounts list with Account ID, Store Name, Marketplace ID, Seller ID, and Added Date.

Add Amazon Account – Click this button to add a new Amazon account for synchronization.

Delete – Click this to remove an existing Amazon account from the list.

Edit – Click this to manage the Amazon account and do synchronization.

Add Amazon Account

After clicking Add Amazon Account button, the following page will open. The store owner needs to provide the following information:

Store Name – Enter the Amazon store name.

Select Attribute Group – You can choose attribute group for this account.

Marketplace ID – Enter the marketplace ID according to your region.

Seller ID – Enter your Amazon seller account seller ID.

Access Key ID – Enter your Amazon AWS Access Key ID.

Secret Key – Enter your Amazon developer secret key.

Origin Country – Select your Amazon store country.

Currency Rate – Enter the exchange rate of Opencart store currency to Amazon store currency. Enter 1, if both of your stores are in the same country.

Products Mapping

To do the mapping of products, go to Opencart Amazon Connector>Manage Amazon>Accounts>Edit>Map Product. The following page will open showing the imported Amazon product list with Map ID, Opencart Product ID, Product Name, Amazon Product ASIN, Sync Source, Price, and Quantity.

Import Product – Click Import Product button for importing products from Amazon store to Opencart store.

Export Product – Click Export Products button for exporting products from Opencart store to Amazon store.

Delete Product – Click Delete Product button for removing the existing mapped product record from the list.

Import Products from Amazon Store

After clicking the Import Product button, the following page will open. Click Generate Report ID and importing process will start. It will import Amazon product’s name, price, weight, specifications, quantity, shipping cost, main product image, and description.

After generating the report ID, a success message will appear. Now, to import or update products from Amazon, click Import/Update Amazon Store Products button and the products will start importing.

To import or update products using Amazon product ASIN ID (Amazon Standard Identification Number), click Import/Update Amazon Store Products By ASIN button. A small pop-up window will appear.

Import/Update Amazon Store Products By ASIN

Enter the Amazon Product ASIN value and click Import Product button. Only one product at a time can be imported using ASIN.

Export Products to Amazon Store

For exporting products from Opencart to Amazone, go to Opencart Amazon Connector>Manage Amazon>Accounts>Edit>Map Product>Export Products to Amazon. 

Note :-

  1. Disabled Opencart products will not export to Amazon Store.
  2. Exported products must have the ASIN (Amazon Standard Identification Number) including the variations.
  3. When you update exported product in Opencart, only price and quantity will update on Amazon.
  4. Amazon product ASIN will be mapped with Opencart product ID.
  5. If a product has combination or variation in Opencart, then each combination or variation will be exported as an individual product on Amazon.
  6. Opencart Amazon Connector will export the product’s name, price, quantity, sku, description and variations (If Any) on Amazon store.

Action for Export Product to Amazon

Select Product Export Option – Select which Opencart products to export to Amazon store. All Opencart Products or Selected Opencart Product Combination/Variation.

Click Export Product button and the products will start adding to Amazon store.

Update Or Delete Exported Product To Amazon

Select Product Export Option – Select which Opencart products to update on Amazon store. All Exported Products or Selected Exported Product.

Click Update Exported Product button and the products will start updating on Amazon store.

Import Orders

To import orders from Amazon to Opencart, go to Opencart Amazon Connector>Manage Amazon Accounts>Edit>Map Order. The following page will open, showing imported Amazon orders list mentioning Map ID, Opencart ID, Amazon Order ID, Buyer Name, Buyer Email, Amazon Order Status, and Order Total.

Import Order – Click Import Order button to fetch orders from Amazon store to Opencart store.

Delete – Click Delete button, to remove the records of the mapped order from the list.

Import Orders from Amazon

After clicking Import Order button, the following page will open. Click the Generate Report ID Before Sync Orders button.

Note :

  1. It can only import Amazon orders which are either shipped, unshipped, or partially shipped.
  2. It can import only those orders which were created a day before the Report ID was generated.
  3. If the store owner has selected Option 2 for  Product Variation (Option) Choice in Module Configuration, then orders containing product variations will not be imported.
  4. If an Amazon order contains a product which has variations in it, that order will not be imported.
  5. After importing the orders from Amazon, the products in the order will also be imported to Opencart.

After generating the report ID, a success message will appear. Now, click Import Amazon Store Orders button and fetch orders according to the dates. Or, click Import Amazon Store Orders By Order-ID button to fetch orders using the Amazon Order ID.

Enter Order Details

Select from which date to fetch the Amazon orders, the store owner can also mention the maximum records to import.

Sync Amazon Store Order By Order ID

Enter the Amazon Order ID to fetch and click Import Order button. Only one order at a time can be imported from Amazon to Opencart.

Order View

After importing the orders from Amazon store, the admin can view the Amazon orders in the Opencart store-backend. Here’s the sample order imported from Amazon store.

Amazon Customers

The store owner can fetch the customer data from Amazon store to Opencart store by importing orders. To view the Amazon customer data, go to Opencart Amazon Connector>Manage Amazon Accounts>Edit>Amazon Customers. The following page will open showing the list of all the Amazon customers whose orders have been synced with the Opencart store.

Note :-

  1. Amazon customer data is fetched from the orders. So, it is essential to import the orders first.
  2. It will import the customer’s name, email, address, pin code, city, and country.

The store owner can view Amazon customer information in Opencart back-end. It can view the name and e-mail.

It will also fetch the customer’s address, city, pin code, and country from the orders.

Amazon Product Information

After enabling the Opencart Amazon Connector module status, the store owner will Amazon Product Authorization, Amazon Specification, and Amazon Combination/Variation tabs in products.

When the store owner has successfully imported the Amazon products, it will find the Unique Identification Number, Specifications, Variations (If Any). This information will be visible on the Opencart store front-end.

Amazon Product Authorization

To view or edit Unique Identification Number of a product, go to Catalog>Products>Edit>Amazon Product Authorization. The following page will open as visible below:

Unique Identification Number – UIN (Unique Identification Number) helps in identifying the product. Each product will have its own UIN. There are different types of UNI used by different regions such as: –

ASIN – Amazon Standard Identification Number.

EAN – European Article Number.

GTIN – Global Trade Item Number.

UPC – Universal Product Code.

Identification Number –  UIN generally consist of 10-12 digits alpha-numeric code that identifies an item.

Note – Before exporting product any product to Amazon, the store owner must provide a Unique Identification Number for each product.

Amazon Specification

Now, to view or edit the imported products specifications,  go to Catalog>Products>Edit>Amazon Specification. The following page will open. After successfully importing the products from Amazon store, specifications and values will be retrieved. The store owner can edit, add, or remove the specifications and their values.

Note : 

  1. The Amazon Specifications and their values will be visible on the Opencart store front-end.
  2. If the store owner edits or updates any specification in Opencart, it will only reflect on Opencart store front-end.

Amazon Combination/Variation

If the store owner has imported the Amazon products which have variations, it can view or edit the variations by navigating to Catalog>Products>Edit>Amazon Combination/Variation.

Note :-

  1. Before exporting products, the store must mention the each variation – Seller SKU, ID Type, Product ID, Quantity, and Price Prefix(If Any).
  2. Each variation or option will be exported and converted to an individual product on Amazon.

Front-End View

Amazon Store View

Please view the below screenshot, where the store owner is importing the product from Amazon to Opencart store.

Opencart Front-End View

After successfully importing the product from Amazon, it will appear as follows. It will show the product name, image, price, description, specifications, stock, and variations.

Thank you for viewing this blog. If you have any query regarding this module, please contact us webkul.uvdesk.com

ODOO Multi-Vendor Marketplace (seller settings)

$
0
0

Odoo multi-vendor marketplace allows you to set up your own marketplace, where multiple vendors can sign up and register themselves to sell their products on your marketplace. This module is easy to configure, where admin can set different access rights for sellers. Sellers have their own shop page sharing their company profile and products on other shop pages, this page allows customers to differentiate products from different sellers. It facilitates to send e-mail notifications on new seller request, seller request approval, product approval, new order notification. Email notifications don’t let anything goes un-noticed. Marketplace module will prove to be a one stop solution for your buyers who shall be making purchases from different sellers on the visit of a single online store.

Features

  • Admin can easily convert their site into complete advanced marketplace
  • Admin can add terms and condition on seller registration form
  • Admin can also sell its own products on store
  • Only sellers approved by admin can upload their products to store
  • Admin can set manual or auto approval of seller request, products, and their quantity.
  • Only approved products by admin are displayed on store
  • Separate seller’s product collection and management
  • Multi-Vendor Marketplace provide Multi- seller support
  • Seller’s commission management
  • Various invoice generation options
  • Option to view the list of all the sellers of the marketplace at one place
  • Multi-Vendor Marketplace module also helps to manage seller reviews and recommendations.

Installation

After buying this product you will get a zip file, which contains module. Unzip the file and now just copy `odoo_marketplace` module folder into your odoo addons. Now enable developers mode on your OpenERP

  • Go to settings menu and Click on Activate the developer mode.
  • Now Go to Apps menu and Click on‘Update Modules List
  • Click on Installed Modules
  • Remove the installed filter

Now you will be able to see the module, just install it. After installing you will be able to handle different functionality as mentioned in module’s Workflow.

Workflow (seller settings)

Seller dashboard at the admin end

Here admin can check for the summary of the marketplace seller, products, order, and payments.

Sellers on your marketplace with their status defined

Admin can check for the list of sellers according to their status defined whether it is approved, pending or rejected.

Seller’s request form page or information page

All the seller details can be seen or edited here. For every seller, admin can override the default settings of the marketplace.


Seller Payment,  profile and shop policy can be seen here at the admin panel.

Marketplace Seller’s shop list can be seen here.

Marketplace Sellers Review can be seen here.

Marketplace Sellers Recommendation can be seen here.

Marketplace orders can be seen here.

Under Seller Dashboard of the admin panel, all the sales order for the marketplace related products can be seen here for every individual seller.

Tree view of seller payments with their status

Seller product form view

There are three menus for seller products, that is one to create new products, non-approved products for all those products which are yet to be approved or in pending state and other is for approved products on the marketplace.

Tree view of delivery orders for the products sold on the marketplace.

List of request for inventory at admin panel

Sell option on the marketplace for your sellers

Sellers will click here to sell products on the marketplace.
Marketplace approved Seller List.

Seller landing page

On click of the sell button on the marketplace website, sellers will be redirected to this seller landing page for registration or login.MP2(b)

Product view on marketplace website.

On the product page, customers will find the seller information, on the click of the seller profile page customer will be redirected to the seller’s profile and on the click of the visit shop option customer will be redirected to the seller’s shop page where he can find all the products sold by the particular seller.

Seller’s profile page view

Seller’s shop page view

Seller’s marketplace account to go to seller dashboard


Seller dashboard view

The seller can have access to the seller dashboard from the marketplace website front end. A seller can update his profile page, shop page, add products, request for inventory, check for the order for his products, also check for the delivery order of the products.

Seller profile view from the seller account on marketplace


Orders view from the seller account on marketplace end

Seller payments

Seller add products in the marketplace

Seller delivery orders

Seller request for inventory for the products sold on marketplace

Support

For any kind of technical assistance, just raise a ticket at https://webkul.uvdesk.com/ and for any doubt contact us at support@webkul.com

Magento2 Store Emulation

$
0
0

In a system like Magento2, it’s quite difficult to handle some situation while coding like updating the data according to correct scope, people end up with the ideas like changing the store scope by using setCurrentStoreId()  method like below:

$currentStoreId = $this->_storeManager->getStore()->getId();
// Magento\Store\Model\StoreManagerInterface
$this->_storeManager->setCurrentStoreId($storeId);

// ...
// your code 
// ....

$this->_storeManager->setCurrentStoreId($currentStoreId);

and then after doing their work again setting that value back to the old one, but this is not the efficient way since there can be many other things that you need to change to create the store’s environment, so changing them like that does not seem a better solution, that’s why Magento has provided a class to do such things, \Magento\Store\Model\App\Emulation this class provides two methods:

  • startEnvironmentEmulation($storeId, $area= \Magento\Framework\App\Area::AREA_FRONTEND, $force=false)
  • stopEnvironmentEmulation()

An example of how we can use these methods to emulate the store environment:

 /**
  * \Magento\Store\Model\App\Emulation
  */
 protected $emulation;

public function __construct(\Magento\Store\Model\App\Emulation $emulation) {
   $this->emulation = $emulation;
}

/**
 * example function in which we want to emulate a stores environment  
 */
public function example($storeId, $area = 'frontend') {
  
   //starting the store emulation with area defined for admin
   $this->emulation->startEnvironmentEmulation($storeId, 'adminhtml');
   
   //you can update or save a product attributes here with correct scope or anything else you want to do, perform some test
   
   // discard the emulated environment after doing your work
   $this->emulation->stopEnvironmentEmulation();
   
}

Hope this blog will help you in better code implementation. Feel free to ask your doubts in the comment.

Thanks


Opencart The Courier Guy Shipping

$
0
0

Opencart The Courier Guy Shipping extension allows the admin to add the Courier Guy Shipping for his products. Now you can ship the products with the reliable and trusted delivery service of South Africa. Using this shipping module the admin can add the Courier Guy Shipping method for shipping the products in South Africa.

Note: This shipping method works only in South Africa. The Store’s origin and the customer’s destination should always be of South Africa else the extension will not work.

Features – Opencart The Courier Guy Shipping

  • Admin will enter the account details generated from The Courier Guy website.
  • Admin will print the Invoice & Dispatch slips.
  • Buyers can choose this service under delivery methods on the checkout page.
  • Buyers in South Africa will get reliable and trusted delivery service.

Installation – Opencart The Courier Guy Shipping

Installation of this extension is very simple. After extracting the zip file, choose your Opencart Version Folder and in that, you will find folders admin and catalog folders. Now copy the admin and catalog folders into the root directory of your Opencart website as per the snapshot below.
Installation-Folder-Root

Now, under Extension ->Choose the Extension Type(Shipping) install the Webkul The Courier Guy extension. To install the extension click on the install button next to the extension as shown below in the snapshot.
Module Install

Module Translation – Opencart The Courier Guy Shipping

As the module  Opencart The Courier Guy Shipping supports multiple languages, so this section will describe how to make the module work in different languages. Please check the language translation link.

Configuration – Opencart The Courier Guy Shipping

After the successful installation of the module, the admin will navigate through Extensions-> Choose the Extension Type (Shipping)-> Webkul The Courier Guy and click the Edit button to configure the module for use as shown below in the snapshot.
Edit-Install-Extension

After clicking the Edit button another page to configure the module will appear as shown below.

Admin-Configuration

Here the admin will

  • Set the status of the extension as Enabled or Disabled.
  • Enter the User Name and Password for the Courier Guy Shipping Account.
  • Enter the Account(Alpha Numeric) for accessing the server API.
  • Enter the Test Url for accessing the server.
  • Enter the City, Shop Post Code, Shop Phone and the Shop Place(Numeric value).

That’s all for the configuration settings in the admin backend for the extension.

Workflow – Opencart The Courier Guy Shipping

Now when the buyer will place an order for the product, the buyer will be able to see and select The Courier Guy Shipping under shipping methods as per the below screen shot.

Checkout-Customer

Buyers will also be able to see the selected shipping method under Order Review and then they can click on confirm button to complete their purchase.
Checkout-Confirm

After the order has been placed Admin will be able to check the order and can print Invoice slip and dispatch slips at their end as per the screen shot below.
Admin-Check-Customer-Order
Admin will print the Invoice slip for the order here-
Invoice-Slip
Admin will print the Dispatch slip for the order as shown below in the snapshot.
Dispatch-Slip

That’s all for the Opencart The Courier Guy Shipping module Still have any issue feel free to add a ticket and let us know your views to make the module better at webkul.uvdesk.com.

Odoo Web Push Notifications

$
0
0

Introduction

Odoo Web Push Notifications module allows you to send instant web push notifications to the website visitors. It helps to re-engage the users even if they are offsite. It uses the google firebase to send push notifications.

Features

  • Send web push notifications to chrome and firefox users.
  • Send fully customizable templates the users.
  • The module helps to send notifications to the selected users like Website Users, Odoo users, Public users, Some selected users or All users.
  • Users google firebase to send the notifications.
  • Store all the registration ids of all the viewers of your site.

Basic Requirements

  • For using this module your website should start with ‘https://’. Click here for details.
  • It works with only one database but not the list of databases, i.e there should be dbfilter and list_db used in the config file of your server. For any queries contact Webkul Support.

Workflow

Once done with the module installation, visit settings menu.

Under Settings menu> click on push notifications> templates and create notification template.

Now, define notification title name, select logo, define redirect link and message and click on validate button to implement the notification settings.

Click on Send Notifications button to select to whom you want to display the notification message.

Click on Registered browser menu under Push notification menu to check the history of registered users.

Now define the Project API key and Project sender id under configuration menu.

Create Firebase Project


Web Push Notification View

Support

For any kind of technical assistance, just raise a ticket at https://webkul.uvdesk.com/ and for any doubt contact us at support@webkul.com

Shopify Product Auction Bid On Multiple Units feature

$
0
0

Recently launched Shopify Product Auction Bid On Multiple Units feature, where admin can enable it for bidder to bid for number of units of product.
For example a product has 10 units then bidder can bid for more than one unit.
To decide the winner for the auction logic applied will be on the basis of highest price, then quantity then time .

Let’s take this case for instance.
The auction has 50 units.

Bidder #1 makes a bid for 30 units for 4$ each.

Bidder #2 makes a bid for 20 units for 6$ each.

Bidder #3 makes a bid for 20 units for 4$ each.

Bidder #4 makes a bid for 10 units for 5$.

Winner here would be : bidder  #2, #3, #4.

Let us now understand how to enable this feature:

configuration

Go to auction configuration and enable this feature of bid on multiple units.

Once you enable this, there will be another configuration popped up enabling which will allow bidders to bid less than the current bid.

Once it is enabled, click on save button to save this setting.

Front end view

Once the settings are enabled, then on the front end it will get displayed to enter the price per unit and quantity of product you want to place the bid for.


How To Add Category In Opencart Using CasperJS

$
0
0

In Opencart while adding product there is a field of the category. If the category is not selected then the product will not show up under any categories in the front end of the store. We can add the category in our Opencart store using CasperJS. In this blog, we will learn how to admin login in our Opencart store and after that, we will add the category.

Firstly, we will create our script for admin login process and then, we will add the category in our Opencart store.

For admin login and adding category in our Opencart store we have used fill(), casper.cli.get(), getTitle(), then(), getCurrentUrl() and click() methods.

Following script is used to automate the admin login functionality:

var casper = require('casper').create();
 
var url = casper.cli.get(0);
 
casper.start(url, function() {
	this.echo('Login page Title:',"INFO"),
    this.echo(this.getTitle());
});
 
casper.then(function(){
	this.fill('form', { 
	    username: 'admin', 
	    password: 'admin'
	}, true);
	this.echo('Login Completed',"INFO");
});

casper.wait(1000, function() {
	this.echo('Category page Title:',"INFO"),
    this.echo(this.getTitle());
});

In the above script, casper.cli.get() is used to pass parameter while running the script and fill() is used to fill the data on the form.

After successful login, now we will add data about the category. Following script is used to add the details of the category:

casper.then(function(){
	this.fill('form#form-category', {
	    'category_description[1][name]' : 'Demo',
        'category_description[1][description]' : 'Lorem Ipsum is simply dummy text of the printing and typesetting industry.',
	    'category_description[1][meta_title]' : 'Demo',
        'category_description[1][meta_description]' : 'Demo',
        'category_description[1][meta_keyword]' : 'Demo',
        'keyword' : 'demo-category',
        'sort_order' : '2',
        'status': '1'
	}, false);
   
});
 
casper.then(function(){
  this.click(".container-fluid button.btn.btn-primary");
});

casper.wait(1000, function() {
    this.echo(this.getCurrentUrl());
});

casper.then(function(){
    	if (casper.exists('#content > div.container-fluid > div.alert.alert-success')){
		this.echo(this.fetchText('#content > div.container-fluid > div.alert.alert-success'),"INFO");
	}
});

In the above script, all details of the category are filled and then clicking on save button will save the category. When the category is saved we are fetching current URL and successful message of category added.

Here is the full script of login and add category process.

/**
* Webkul Software.
*
* @category Webkul
* @package Webkul_CasperJS
* @author Webkul
* @copyright Copyright (c) 2010-2017 Webkul Software Private Limited (https://webkul.com)
* @license https://store.webkul.com/license.html
*/
var casper = require('casper').create();
 
var url = casper.cli.get(0);
 
casper.start(url, function() {
	this.echo('Login page Title:',"INFO"),
    this.echo(this.getTitle());
});
 
casper.then(function(){
	this.fill('form', { 
	    username: 'admin', 
	    password: 'admin'
	}, true);
	this.echo('Login Completed',"INFO");
});

casper.wait(1000, function() {
	this.echo('Category page Title:',"INFO"),
    this.echo(this.getTitle());
});

casper.then(function(){
	this.fill('form#form-category', {
	    'category_description[1][name]' : 'Demo',
        'category_description[1][description]' : 'Lorem Ipsum is simply dummy text of the printing and typesetting industry.',
	    'category_description[1][meta_title]' : 'Demo',
        'category_description[1][meta_description]' : 'Demo',
        'category_description[1][meta_keyword]' : 'Demo',
        'keyword' : 'demo-category',
        'sort_order' : '2',
        'status': '1'
	}, false);
   
});
 
casper.then(function(){
  this.click(".container-fluid button.btn.btn-primary");
});

casper.wait(1000, function() {
    this.echo(this.getCurrentUrl());
});

casper.then(function(){
    	if (casper.exists('#content > div.container-fluid > div.alert.alert-success')){
		this.echo(this.fetchText('#content > div.container-fluid > div.alert.alert-success'),"INFO");
	}
});
 
casper.run();

After preparing the script, you have to execute the command in terminal. The command for execution is:

casperjs Category.js

Here, Category.js is the Java Script file in which we have written script for login and add a category in Opencart store process.

casperjs


Marketplace Correios Shipping For Magento 2

$
0
0

The Marketplace Correios Shipping For Magento 2 extension provides Correios Shipping method for shipping the products. The Correios shipping manages the Brazilian postal code system. Using this shipping module vendor/seller can manage their shipping and order from vendor panel, print invoices, enter tracking ID, and complete shipping management from their seller panel.

This module is an add-on of Webkul’s Marketplace Module. To use this module you must have installed first Marketplace Module.

Features – Marketplace Correios Shipping For Magento 2

  • The admin can enable/disable the module.
  • The admin can set the Correios Shipping method name that will be shown from front side.
  • The admin can also add delivery time from their end.
  • The admin can set Handling fee as Fixed or Percentage.
  • The seller can enter the tracking ID by which buyer can track their order.
  • The seller can print Invoice of the individual orders.
  • Ability to download Invoice and Shipping Slip easily.
  • The seller can add Invoice & Packing Slip, address, VAT, TAX information.

Installation – Marketplace Correios Shipping For Magento 2

Customers will get a zip folder and they have to extract the contents of this zip folder on their system. The extracted folder has an src folder, inside the src folder you have the app folder. You need to transfer this app folder into the Magento 2 root directory on the server as shown below.
Installation-Marketplace Correios Shipping For Magento 2

After the successful installation, you have to run the command on Magento2 root directory -“php bin/magento setup:upgrade”.

Installation - Marketplace Correios Shipping For Magento 2

Now, run this command in the Magento 2 Root  -“php bin/magento setup:di:compile” as shown below in the snapshot.

Installation - Marketplace Correios Shipping For Magento 2

lastly, run this command in the Magento 2 Root – “php bin/magento setup:static-content:deploy” as shown below.

Installation -Marketplace Correios Shipping For Magento 2

After running the commands, you have to flush the cache from the Magento admin panel by navigating through ->System->Cache management as shown below in the snapshot.
Installation - Marketplace Correios Shipping For Magento 2

Multi-Lingual configuration – Magento 2 Google Plus Wall Feeds

For Multilingual support, please navigate. Store->Configuration->General ->Locale Options. And select your desired language from the Locale option.

Multi-Lingual configuration - Magento 2 Google Plus Wall Feeds

language Translation – Magento 2 Google Plus Wall Feeds

If you need to do the module translation, please navigate the path app/code/Webkul/MpCorreiosShipping/i18n in your system. Open the file named en_US.CSV for editing as shown in below screenshot.

language Translation - Magento 2 Google Plus Wall Feeds

Once you have opened the file for editing. Replace the words after the comma(,) on the right with your translated words.

language Translation - Magento 2 Google Plus Wall Feeds

After editing the CSV file, save it and then upload it to the same folder. Now, your module translation is complete.

language Translation - Magento 2 Google Plus Wall Feeds

Configuration – Marketplace Correios Shipping For Magento 2

After the successful installation of the Magento 2 Marketplace Correios Shipping module, you will be able to see the configuration panel under Stores > Configuration > Sales > Shipping > Webkul Marketplace Correios Shipping as per the below snapshot.
Admin-Configuration

Here the admin will

  • Enable or Disable the shipping method.
  • Set the Title of the Shipping method that will be displayed at the frontend.
  • Set the Account Code and Account Password for the Correios Shipping account.
  • Select the Shipping Methods from the available – Without Contract(If you do not have an account with the Correios Shipping) and With Contract(If you have an account with the Correios Shipping).
  • Add the Delivery Time.
  • Select to Show the Delivery Time(At the frontend).
  • Set to Calculate the Handling Fee as – Fixed or Percentage.
  • Set the Handling Fee.
  • Set the Default Package Height, Length, and the Width(These values will be used if the seller forgets to set his).
  • Lastly, the admin will click the “Save” configuration button to save the settings.

Seller’s End – How To Use Marketplace Correios Shipping For Magento 2

After the successful installation of this module, the seller will have to mention the Product – Height, Width, and Length for Correios shipping under the “Add New Product” section as shown below in the snapshot.

Add-Product-Dimentions

If Magento 2 Marketplace Correios Shipping module is enabled, then the seller can set the Invoice & Shipping address, VAT, TAX information under Marketplace > Manage Print PDF Header Info.

Save-PDF-Header-Info

When Buyer will place an order of seller’s product, the buyer can see Magento Marketplace Correios Shipping method as per the below snapshot.

Checkout-Buyer

During checkout, the buyer can find their selected shipping method under the “Order Review”.

Heading name goes here

Note: In Magento Marketplace Correios Shipping module, the shipping rate will be calculated according to seller’s product weight and seller origin address.

Shipping Management – Marketplace Correios Shipping For Magento 2

When the order is placed, the seller can see the order under “My Order History”.

My-Orders-Seller

If admin sets the “Allow Seller to Manage Order” option as “Yes” then the seller can manage the orders from front-end. Now the seller can generate invoices for their ordered products, generate tracking number and shipment for the orders of their products. Even the seller can notify the customers by sending them emails, cancel/refund the order and even print the order.
Seller-My-Orders

Once the seller generates the shipment and invoice, the seller will able to see complete order details as per the snapshot below.

Complete-Details

Shipping information:

The seller can download the Shipping and Invoice slip very easily. In this Slip, you can also see the company logo and address, vat, tax information which is entered by the seller under Manage Shipping tab.

Shipping Slip:
Shipment-Slip

Invoice Slip:

Invoice-Slip

 My Order History

The seller can also download the PDF of shipping and invoice slip under Marketplace > My Order History.

Order-History

After clicking on Download option a pop-up window will be open up for the invoice and shipping slips. Here you will enter the date up to which you want to download invoice & shipping slips.
Heading name goes here

That’s all for the Marketplace Correios Shipping For Magento 2 Still have any issue feel free to add a ticket and let us know your views to make the module better https://webkul.uvdesk.com/en/

Prestashop Marketplace Bundle Product

$
0
0

Prestashop Marketplace Bundle Product – Product bundling refers to a strategy of offering several products for sale as one combined product. It can effectively increase sales overtime. 

Our Prestashop Marketplace Bundle Product module helps sellers to offer several products for sale as a combined product on their store. Seller can use multiple discount discount application techniques on the bundle product to increase the sale of products giving a kick-start to their business.

Note : This module is an add-on for Marketplace Module. To use this module, you first have to install Prestashop Advanced Marketplace

Features

ADMIN and SELLER BENEFITS : 

  • Allow Sellers to add Bundle product.
  • Admin can decide whether mail has to be sent to customers on the creation of bundle products.
  • Admin can Specify the message to be sent to the customer on mail.
  • Seller can sell the bundle product at a combined price of the products added to the bundle (without any discount)
  • Seller can apply discount rate to the bundle product.
  • Seller can set a specific price at which bundle product will be sold.
  • Seller can set discount rates individually for the products added to the bundle.
  • Seller can provide discount on the bundle product to single or all the prestashop customers.
  • Seller can select single or multiple combination of product which will be available in the bundle.
  • Seller can allow product availability only for the bundle.
  • Seller can upload a bundle cover image.

BUYER BENEFITS : 

  • Buyer can view the list of all the bundle products added to the store in separate category named as “Bundle Products”.
  • Buyer can view the list of all the products added in the bundle product on the product page of bundle itself.
  • Buyer can view the changes in the price due to applied discounts on the bundle product page itself.
  • Buyer can view the list of all the products added in the ordered bundle in the order detail page.

Note

For working this module, you have to add some code on following prestashop file:

File Name – product.tpl

Path – YOUR-PRESTASHOP-FOLDER/themes/YOUR-CURRENT-THEME/product.tpl

In above file just add the following code (near line number 65)

{if isset($bundle_product) && $bundle_product}
    {if isset($HOOK_BUNDLE_PRODUCT_DATA) && $HOOK_BUNDLE_PRODUCT_DATA}
        {$HOOK_BUNDLE_PRODUCT_DATA}
    {/if}
{else}
     // Put your div class ‘pb-left-column’ AND ‘pb-center-column’ content here //
{/if}

Additional Information

  • Seller has to add a minimum of two products to the bundle product.
  • Hook has to be added for product page display (check note)
  • Only standard products are allowed for bundle product.
  • Total available quantity of bundle should be less than or equal to the lowest quantity of selected products.

Installation

  1. Go to back office ->module
  2. Upload the module zip file
  3. Search “Marketplace Bundle Product” in module search box then go to module and click on install.

Module installed with success  !

Configuration

After successful installation of the module, admin has to configure the module.
Here admin can enable/disable sending of mail to customers when any new bundle product is added. Admin can also specif the content to be sent in mail.

Module Configured !

Seller End – Managing Bundle Products

A new tab will be added to the seller account from where bundle products will be added.

On clicking this, seller will be redirected to Manage Seller Bundle Product Page. From here seller can add their bundle products and also see the list of added bundle products.

Create Bundle Product Page  :

Note:-

  • To create a bundle product admin has to add at least two standard products in bundle. Remember that only standard products are allowed for bundle product.
  • Total available quantity of bundle should be less than or equal to the lowest quantity of selected products.

Now, seller can set different discounts on the bundle products as per the need. Seller can even view the change in the price as per the discount is applied on the bundle product in the bundle price section.

Various types of discounts can be set on Bundle Product :

  • No discount
  • Rate of Discount
  • Bundle Specific Price
  • Individual Discount on each content of the Bundle Product

We shall discuss each of them one by one :

No Discount

When there is no discount applied then there will be no change in the price of the bundle product.

The bundle product price will be the sum of all the products added to the bundle product.

Discount Rate

Seller can set the discount rate for the whole bundle itself.

Seller can select the combination of products which will be available in the bundle product. Seller can select single or multiple combinations of products. Seller can even allow the added product availability for bundle only.


Specific Price

Seller can apply specific bundle price on the whole bundle product.

Discount Rate For Each Product

Seller can even apply different discount rates on each of the products added to the bundle product. Accordingly, the price of the bundle will change and displayed to the buyer.


After successfully adding the bundle products, seller can view the list of all the added bundle. Seller can edit/delete the bundle product from the bundle list page itself.

 This is how sellers can add their bundle products and manage them.

Customer End

A new category will be available to buyers to visit the list of bundle products added to the store by the sellers.

When buyers click on this category they will be able to view all seller bundle products.

View of Bundle Product Page :

  • Buyer can see the discounts applied on the bundle.
  • Buyer can select the desired combination of the product available with bundle.

Once purchased, Buyer can visit their order page to view the detail of order placed for bundle product. On order detail page buyer can view the list of products added in the ordered bundle product.

This is how a buyer can order a bundle product.

Admin End

Upon the installation of module, two new tabs will be displayed in the Marketplace Menu :

  • Manage Seller Bundle Product
  • Manage Seller Bundle Product Orders

Lets us check what each of them does :

Manage Seller Bundle Product

The module gives admin the functionality to add bundle products on behalf of sellers. Admin will be shown a list of bundle products added by the seller here. Admin can edit/delete seller’s bundle product as well.

Create Bundle Product Page for Admin :

Admin selects the seller for which the bundle product has to be added and can use all the parameters available to sellers for adding bundle product

Manage Seller Bundle Product Orders

All the orders made for seller’s bundle product are listed here.

This is all for our Marketplace Bundle Product Module.

Thank you for reading this Blog 🙂

We hope this Addon will enhance the functionality of your prestashop store.

Support

For any kind of technical assistance, just raise a ticket at : http://webkul.uvdesk.com/ and for any doubt contact us at support@webkul.com


How to Use Factory Design Pattern

$
0
0

Design Pattern :- Design Pattern is a way to represent your useful code and project in a well defined manner by following some standard pattern  and also used for encapsulating the large data for your project.

Today we will focus on one of the useful and commonly used design pattern i.e Factory Design Pattern.

Factory Design Pattern

Basically, Factory is a way to return the object of other classes. In Factory classes we simply create the the static methods inside these methods we can create object of other class.

In the below example, We create a file cart.php in which we used a class named Cart to get and set the information of customer and products. In cart class we used getName() and setName() functions for customer details,  getProductDetails() and setProductDetails() functioned for product details.

<?php

/**
 * @category Webkul
 * @package Factory Design Pattern
 * @author [Webkul] <[<http://webkul.com/>]>
 * @copyright Copyright (c) 2010-2017 Webkul Software Private Limited
 (https://webkul.com)
 * @license https://store.webkul.com/license.html
 */

  /**
   * Cart Class contains Functions get, set, showCustomerDetails and showProductDetails
   * This class is used for displaying the customer and Product data
   */
    abstract class Cart
    {
      private $customer_name;
      private $product_details = array();

        public function getName(){
            return $this->customer_name;
        }

        public function setName($cust_name){
            $this->customer_name = $cust_name;
        }

        public function getProductDetails(){
            return $this->product_details;
        }

        public function setProductDetails($prod_details){
            if(!empty($prod_details)){
                $this->product_details = $prod_details;
            }
        }

        public function showCustomerDetails(){
            print_r('Customer Name :- '.$this->getName().'<br>');
        }

        public function showProductDetails(){
            foreach ($this->getProductDetails() as $key => $product) {
                print_r('<br>Product : '.$product['name']. ' Price : '.$product['price'].'<br>');
            }
        }
    }
 ?>

We also used showCustomerDetails() and showProductDetails() functions
to print the output of customer name and product details respectively.

We extends the above class i.e. Cart into CartDetails Class, that is defined
in other file named cart_details.php.

<?php
   include 'cart.php';

      /**
       * @category Webkul
       * @package Factory Design Pattern
       * @author [Webkul] <[<http://webkul.com/>]>
       * @copyright Copyright (c) 2010-2017 Webkul Software Private Limited (https://webkul.com)
       * @license https://store.webkul.com/license.html
       */

       /**
        * CartDetails to set the data for Cart class i.e. parent class
        */
      class CartDetails extends Cart
      {
          function __construct()
          {
              parent::setName('John Doe');
              parent::setProductDetails(array(array('name' => 'Mac Book', 'price' => '$65'),array('name' => 'samsung j7', 'price' => '$40'),array('name' => 'Canon EOS 5D', 'price' => '$15')));
          }
      }

      /**
       * CartFactory this is a Factory class for Cart class
       */
      class CartFactory
      {

          public static function createObject(){
              /**
               * Here we create Object of CartDetails Class i.e. new CartDetails(), Inside the createObject() of CartFactory Class
               */
              $cart_obj = new CartDetails();
              CartFactory::printDetails($cart_obj);
          }

          public static function printDetails($cart_obj){
              $cart_obj->showCustomerDetails();
              $cart_obj->showProductDetails();
          }
      }

      // Calling Factory Class Function
      CartFactory::createObject();
 ?>

In CartDetails class, we defined a non parameterized constructor and called
setName() and setProductDetails() functions to set the customer and product
data.

Here we used Factory class named CartFactory Class inside cart_details.php
In CartFactory class we used two static methods named : createObject() and
printDetails()

If you will see in above CartFactory class, we create an object of CartDetails
class like:

public static function createObject(){
    /**
      * Here we create Object of CartDetails Class i.e. new CartDetails(), Inside the createObject() of CartFactory Class
      */
      $cart_obj = new CartDetails();
      CartFactory::printDetails($cart_obj);

}

and by using this object, called the printDetails($cart_obj) function of CartFactory class. Now with the help of $cart_obj object you can call functions of CartDetails and Cart classes.

Like:-

public static function printDetails($cart_obj){
     $cart_obj->showCustomerDetails();
     $cart_obj->showProductDetails();
}

Output:-

   Customer Name :- John Doe
   Product : Mac Book Price : $65
   Product : samsung j7 Price : $40
   Product : Canon EOS 5D Price : $15

Benefits of using Factory Design Pattern:-

1) By using Factory Design Pattern like in above example if you want to change
some code in Cart and CartDesigns classes, then you have to change code only
in Factory class, instead of in complete project where you used Cart and CartDesigns
classes.

2) By using Factory classes you can encapsulate your code/data.

3) You can also reduce the code repetition while creating the object of
other classes.

Thanks 🙂

Understanding currying in javascript

$
0
0

Simply speaking, currying in javascript enhances the reusability of functional code with multiple arguments. It is used to transform your function to one or more arguments. Let us understand with one simple example first.

Normal javascript (not using currying):

/**
 * Webkul Software.
 *
 * @category Webkul
 * @package JavaScript Concepts
 * @author Webkul
 * @copyright Copyright (c) 2010-2017 Webkul Software Private Limited (https://webkul.com)
 * @license https://store.webkul.com/license.html
 */
var set = function (header, site) {
  console.log(header + ' ' + site);
}

set('visit', 'webkul.com'); // visit webkul.com
set('visit', 'store.webkul.com'); // visit store.webkul.com

Now using currying:

/**
 * Webkul Software.
 *
 * @category Webkul
 * @package JavaScript Concepts
 * @author Webkul
 * @copyright Copyright (c) 2010-2017 Webkul Software Private Limited (https://webkul.com)
 * @license https://store.webkul.com/license.html
 */
var set = function (header) {
  return function (site) {
    console.log(header + ' ' + site);
  }
}

var visit = set('visit');
visit('webkul.com'); // visit webkul.com
visit('store.webkul.com'); // visit store.webkul.com

Here, in this example, we have passed an argument first and using that variable for passing the further argument.

Now, I’m providing a better example in which currying is used to a bit more extent and it will also help you understand it better. Here, I’m providing an example for the formatting of currency.

First, I’m providing an example without using currying.

/**
 * Webkul Software.
 *
 * @category Webkul
 * @package JavaScript Concepts
 * @author Webkul
 * @copyright Copyright (c) 2010-2017 Webkul Software Private Limited (https://webkul.com)
 * @license https://store.webkul.com/license.html
 */
var format = function (symbol_place, currency, decimal, value) {
  if (!decimal) {
    decimal = 2; // if decimal in not provided
  }
  if (symbol_place == 'left') {
    return currency + parseFloat(value).toFixed(decimal);
  } else {
    return parseFloat(value).toFixed(decimal) + currency;
  }
}

var currency_format1 = format('left', '$', 2, '50.4343');
console.log(currency_format1); // $50.43
var currency_format2 = format('left', '$', 4, '50.4343');
console.log(currency_format2); // $50.4343
var currency_format3 = format('left', '£', 2, '50.4343');
console.log(currency_format3); // £50.43
var currency_format4 = format('right', '€', 2, '50.4343');
console.log(currency_format4); // 50.43€

Now, the same has been done after applying currying.

/**
 * Webkul Software.
 *
 * @category Webkul
 * @package JavaScript Concepts
 * @author Webkul
 * @copyright Copyright (c) 2010-2017 Webkul Software Private Limited (https://webkul.com)
 * @license https://store.webkul.com/license.html
 */
var format = function (symbol_place) {
  return function (currency) {
    return function (decimal) {
      return function (value) {
        if (!decimal) {
          decimal = 2; // if decimal is not provided
        }
        if (symbol_place == 'left') {
          return currency + parseFloat(value).toFixed(decimal);
        } else {
          return parseFloat(value).toFixed(decimal) + currency;
        }
      }
    }
  }
}

var currency_left = format('left');
var currency_right = format('right');

var usd = currency_left('$');
var pound = currency_left('£');

var usd_decimal2 = usd(2);
var usd_decimal4 = usd(4);
var pound_decimal2 = pound(2);

console.log(usd_decimal2('50.4343')); // $50.43
console.log(usd_decimal4('50.4343')); // $50.4343
console.log(pound_decimal2('50.4343')); // £50.43

var currency_format = format('right')('€')()('50.4343');// we can pass empty arguments as well
console.log(currency_format); // 50.43€

Here, you have noted that we have made a better use of functional code by using it for multiple cases. You can do a lot more with the currying. Hope, this blog helps you to learn something about currying.

How to edit the XML attributes in PHP

$
0
0

Today we will learn , how to edit the xml element attributes in PHP.

First of all, we need to create a sample xml file. So we have created the demo.xml file as follows

/**
 * Webkul Software.
 *
 * @category Webkul
 * @package xml
 * @author Webkul
 * @copyright Copyright (c) 2010-2017 Webkul Software Private Limited (https://webkul.com)
 * @license https://store.webkul.com/license.html
 */

 <?xml version="1.0" encoding="utf-8"?>
 <appSettings>
   <add key="Id" value="0"/>
   <add key="Name" value="Test"/>
 </appSettings>

After creating the xml file, we have created the php file as follows:

/**
 * Webkul Software.
 *
 * @category Webkul
 * @package api
 * @author Webkul
 * @copyright Copyright (c) 2010-2017 Webkul Software Private Limited (https://webkul.com)
 * @license https://store.webkul.com/license.html
 */

 <?php

 $xml = simplexml_load_file('demo.xml');

 print_r("<pre>");
 print_r($xml);
 print_r("</pre>");

 if ($xml->xpath('//appSettings/add[@key="Id"]')[0]) {

     $xml->xpath('//appSettings/add[@key="Id"]')[0]->attributes()['value'] = 1;
 }

 if ($xml->xpath('//appSettings/add[@key="Name"]')[0]) {

     $xml->xpath('//appSettings/add[@key="Name"]')[0]->attributes()['value'] = 'Demo';
 }

 $xml->asXML('demo.xml');
 ?>

Function Description:

simplexml_load_file : The function is used to convert the xml file into SimpleXMLElement object. In this function first parameter is file path where we pass the path of our xml file. Syntax for the function is :

SimpleXMLElement simplexml_load_file ( string $filename  string $class_name , int $options , string $ns , bool is_prefix)

xpath : The function searches the XML element for children matching the XPath path. Like in the example it will search the add element with in the appsetting that has an attribute key and their value is Id or Name.

asXML : The function is just reverse of simplexml_load_file and converts the xml object to the xml format.

When we execute the php file for the first time it will produce the following output.

We can see the changes in the demo.xml file or we can execute the php file again, we will see the changed values in the xml file as follows :

Glimpses Of Security Testing

$
0
0

The prime objective of Security testing is to find out ways to identify a vulnerability in the system and to ensure that data is protected from hackers. As more and more vital data is stored in web applications, proper security testing of web applications is becoming very important. We should do it during test environment. To implement security testing approach in our application we can ensure that our application is free to following vulnerabilities.

SQL Injection:

Many testers are unaware of how SQL queries can be tampered with and assume that an SQL query is a trusted command.SQL injection is a code injection technique that might destroy your database. A successful SQL injection attack can read sensitive data from the database, modify database data (Insert/update/delete), also execute administration operations on the database. The data we input in our application are moved to database queries. If any malicious data would be typed, it would be moved to a database query, too. In that case, if SQL Injection is possible, any damage could be done to your system’s data.

The Following things can be done from SQL Injection:

1.) The user could log in to the application as another user, even as an administrator.

2.) The user could view private information of users like details of other user’s profiles, their transaction details etc.

3.) The user could change application configuration information and the data of the other users.

4.) The user could modify the database, even delete the database.

5.) The user could take control of the database server.

Since the consequences of allowing the SQL injection technique could be very severe, so we should be tested it during the test environment.

How your website can be checked for any SQL Injection vulnerabilities?

It is very simple to find out that your website is SQL injection protected or not. To check the vulnerable page for sql injection vulnerability add a [ ‘ ] to the URL.  To check the vulnerable page for sql injection vulnerability add a [ ‘ ] sign.  If the page is vulnerable to SQLI it will throw My SQL error. As we got vulnerable url, we can any tool to check the level of exploitation. So anyone can dump the complete data with available data. Let’s take an example-

// a user name
$name = "John doe"; 
$query = "SELECT * FROM customers WHERE username = '$name'";
echo "Normal: " . $query . "<br />";

// user input that uses SQL Injection
$name_bad = "' OR 1'"; 

// our MySQL query builder, however, not a very safe one
$query_bad = "SELECT * FROM customers WHERE username = '$name_bad'";

// display what the new query will look like, with injection
echo "Injection: " . $query_bad;

It will display like-
Normal: SELECT * FROM customers WHERE username = ‘John doe’
Injection: SELECT * FROM customers WHERE username = ” OR 1″

From Normal query MySQL statement will just select everything from customers that has a username equal to John doe.  Whereas, the injection attack will change our query behavior. This OR clause of 1 will always be true and so every single entry in the “customers” table would be selected by this statement. You can learn more from this link- SQL Injection

What can be done to Prevent SQL Injection attacks?

For preventing SQL injection we should validate and sanitize every data. We can validate the data with (int). Using (int) forces the data to be an integer.

PHP has a specially-made function to prevent these attacks. All you need to do is use this function mysqli_real_escape_string.

mysqli_real_escape_string take a string that is going to be used in a MySQL query and return the same string with all SQL Injection attempts safely escaped. Basically, it will replace those troublesome quotes(‘) a user might enter with a MySQL-safe substitute, an escaped quote \’. So please do use the mysqli_real_escape_string() function to help prevent SQL Injection attacks on your websites.

So we can check our application’s code that is it validated/sanitized or not.

Cross Site Scripting: 

XSS (Cross-Site Scripting) is a widespread vulnerability that affects many web applications. XSS enables attackers to inject client-side scripts into web pages viewed by other users. The XSS scripts injected into a site can leak out sensitive data and information.

How does it work? 

On a web page, we generally interact with input boxes however, there are text areas that act as the document objects. They take input from the users and these are easily vulnerable.

An XSS attack can execute malicious script anywhere in the web app. Here’s a quick example:

<input type="text" name="firstname" value="<script>alert('Script Injected');</script>" >


We can understand it using different scenarios like-

A script is sent as a request in an input and this is then shown as a response on the web page.

The script is executed when the user runs the application.

How to prevent XSS?

We can overcome from XSS attack using HTML escape/decode before inserting untrusted data into HTML element. Using html_entity_decode() function we can convert all HTML entities in the string to their applicable characters.

We will learn more on Security testing in another blog.


Opencart Recurring Profile

$
0
0

Opencart Recurring Profiles allow the admin to set up subscription-based products in which a customer places an order only once and is charged regularly based on the subscription frequency. It can also be used for setting up the installment payment schemes. The recurring payments are available for daily, weekly, monthly, semi-monthly or yearly. Admin can set up the recurring profile for each frequency from the back end of the Opencart. After setting up the recurring profiles, you can assign it to the product.

Set up a Recurring Profile from the back end


From Catalog -> Recurring Profiles, the admin can view and manage the recurring profiles.


Add – To create a new recurring profile click the Add New button and the following options will appear for adding a new recurring profile:

Name – This will be the name of the subscription or payment plan.

Recurring Profile

Price – This is the price of the subscription plan.

Duration – This field is used for the number of times you would like to charge the customer. For unlimited set it to 0 (zero). If unlimited, the customer will be charged for the subscription plan until the plan will be canceled by the admin or the customer.

Cycle – This is the number that will be applied to your frequency option.

Frequency – This option allows the admin to choose how often the customer will make a payment.For example, the cycle is “1,” and the frequency is “year,” causing the customer to be billed yearly.

Status – Select status to enable or disable the recurring profile.

Trial Profile

Trial price – This is the price of the subscription plan during the trial period.

Trial duration – This field is used for the number of times you would like to charge the customer before the trial expires.

Trial cycle – The number that will be applied to your trial frequency option.

Trial frequency – This option allows the admin to choose how often the customer will make a payment during the trial period.

Trial status – Select status to enable or disable the trial profile

Sort order – Here you can set the order of this recurring profile.

To assign the recurring profile to a product. Navigate to Catalog->Products, select an existing product and click Edit. Click the Recurring tab and select the recurring profile.

User front end view

The customer can select the recurring payment options under Payment Profile. Details about the selected recurring profile including Trial are also visible. After selecting the preferred payment profile, click the Add to Cart button to do the checkout process.

The customer can view the recurring order by navigating to Recurring Payments and the admin can view the recurring order by navigating to Sales->Recurring Orders.


In Opencart at the product page, Add To Cart button fire the onclick event which calls the add method of the catalog/controller/checkout/cart.php file to add the recurring profile to the cart.

if (isset($this->request->post['recurring_id'])) {
	$recurring_id = $this->request->post['recurring_id'];
} else {
	$recurring_id = 0;
}
	$recurrings = $this->model_catalog_product->getProfiles($product_info['product_id']);

if ($recurrings) {
	$recurring_ids = array();

	foreach ($recurrings as $recurring) {
		$recurring_ids[] = $recurring['recurring_id'];
	}

	if (!in_array($recurring_id, $recurring_ids)) {
		$json['error']['recurring'] = $this->language->get('error_recurring_required');
	}
}
if (!$json) {
	$this->cart->add($this->request->post['product_id'], $quantity, $option, $recurring_id);


At the checkout page in catalog/controller/checkout/payment_method.php file, the following code is used to check that the product is having the recurring profile or not. If the product has the recurring profile then the payment methods which can handle recurring payment will be displayed to the customer.

$method = $this->{'model_extension_payment_' . $result['code']}->getMethod($this->session->data['payment_address'], $total);

if ($method) {
	if ($recurring) {
		if (property_exists($this->{'model_extension_payment_' . $result['code']}, 'recurringPayments') && $this->{'model_extension_payment_' . $result['code']}->recurringPayments()) {
			$method_data[$result['code']] = $method;
		}
	} else {
		$method_data[$result['code']] = $method;
	}
}


Event Loop In JavaScript

$
0
0

As a web developer we have knowledge about the JavaScript because in modern era almost all the dynamic websites use JavaScript for better user interface. But due to complex design it’s a bit difficult to understand the execution process. Event Loop is a most popular process in JavaScript but it is not easy to understand the working process of this.

Today I want to share my knowledge about Event Loop in JavaScript and I hope this blog help you to understand the Event Loop process in JavaScript.

As we know JavaScript runs code step by step means second line code execute just after finish the first line code. JavaScript always adds each line of code in a call stack.

Call stack is like a shopping bag like first item that enters into the shopping bag is the last item to goes out from the shopping bag and vice versa. We can also say call stack is like a Data Structure that defines and identifies our position in the program.


Example

function add(num1, num2) {
   console.log(num1 + num2);
}

function sub(num1, num2) {
   console.log(num1 - num2);
}

function mul(num1, num2) {
   console.log(num1 * num2);
}

function div(num1, num2) {
   console.log(num1 / num2);
}
       
(function () {
   var num1 = 2;
   var num2 = 3;

   add(num1, num2);

   sub(num1, num2);

   mul(num1, num2);

   div(num1, num2);

}) ();

when we execute the above file in which above code is written, then let’s see what happens in the Call stack.

1 . main function (anonymous function) of the file is pushed to the call stack.


2 . Then Self invoking function is pushed to the call stack.


3 . Then div() function will go to the call stack.

Then mul(), sub() and add() functions are entered to the call stack.

After all the functions enter to the call stack now call stack executes all the function one by one from top to the bottom. means add() function will execute first which entered last into the call stack. After execution of add() function it will be removed from the call stack. And this process will continue until completion of all the functions execution. After completion call stack will be empty.

Result will be –

5

-1

6

0.66666

Now let’s bring some twists on this above code

we know very well about setTimeout() function right? In setTimeout() function we can call function. setTimeout() itself is an asynchronous callback function.

Let’s have a look at the below example –

function add(num1, num2) {
   console.log(num1 + num2);
}

function sub(num1, num2) {
   console.log(num1 - num2);
}

function mul(num1, num2) {
   console.log(num1 * num2);
}

function div(num1, num2) {
   console.log(num1 / num2);
}
       
(function () {
  var num1 = 2;
  var num2 = 3;

  add(num1, num2);

  setTimeout(function () {
     sub(num1, num2);
  }, 3000);

  mul(num1, num2);

  setTimeout(function () {
     div(num1, num2);
  }, 3000);

})();

Now let’s see what happens in call stack. All the function will enter into the call stack one by one but at the time of execution there will be some little change.

1 . First add() function will be executed then you must think sub() function will be execute but actually not because sub() function is in callback function, so it will be executed after 3 second. But you can see mul() function will be executed after the add() function.

Here event loop comes in on concurrency.

means some how sub() function is removed from the call stack that’s why mul() function executes because JavaScript executes codes one by one in call stack. But it will execute after 3 seconds.

2 . Then div() function will be removed from the call stack and in the end main function (Anonymous function ()) and after 3 second sub() function will be invoked and then after 3 seconds div() function will be invoked.

Result –

5

6

-1

0.66666

This whole process is called as Event Loop In JavaScript.

Hope, this blog can help you to understand the Event Loop process. Thanks

Magento2 File Download Script

$
0
0

Sometimes you need to create your own file download script in magento, and often people use their own ways to create the script and face problems in executing it, but magento2 has its own script for file download, we can easily use this script for file downloads:


<?php
/**
 * Webkul Software.
 *
 * @category  Webkul
 *
 * @author    Webkul
 * @copyright Copyright (c) 2010-2017 Webkul Software Private Limited (https://webkul.com)
 * @license   https://store.webkul.com/license.html
 */

namespace Webkul\Download\Controller\Download;

use Magento\Framework\App\Action\Context;

/**
 * file download controller.
 */
class Index extends \Magento\Framework\App\Action\Action
{
    /**
     * @var Magento\Framework\App\Response\Http\FileFactory
     */
    protected $_downloader;

    /**
     * @var Magento\Framework\Filesystem\DirectoryList
     */
    protected $_directory;

    /**
     * @param Context     $context
     * @param PageFactory $resultPageFactory
     */
    public function __construct(
        Context $context,
        \Magento\Framework\App\Response\Http\FileFactory $fileFactory,
        \Magento\Framework\Filesystem\DirectoryList $directory
    ) {
        $this->_downloader =  $fileFactory;
        $this->directory = $directory;
        parent::__construct($context);
    }

    public function execute()
    {
        $fileName = $this->getRequest()->getParam('fileName');
        $file = $this->directory->getPath("media")."/FilePath/".$fileName;
        // do your validations

        /**
         * do file download
         */
        return $this->_downloader->create(
            $fileName,
            @file_get_contents($file)
        );
    }
}

In the above code, this class Magento\Framework\App\Response\Http\FileFactory is used for file download, you can open this and check the parameters that can be passed to the create function, you can also pass content type in the create method, by default it is application/octet-stream.

Hope this will help you.

Thanks 🙂 .

Autoloading in PHP

$
0
0

Today we are going to learn how autoloader works in php. Let’s say we have a  file student.php which have a class name student i want to use this class instance somewhere in other file. For example i am using index.php if i want to create instance of the  student class then first i have to include student.php., These are the functions. we can use this functions to include code from other files..

include
include_once
require
require_once

If we want to use the class student in index, we should do something like this:

<?php
//We are here in index.php

//this will include student.php in current file 
include "student.php";

//here i have created instance for student this class is created in student.php 
$student1 = new student();

So for seems easy to do these stuff .Now if we have to include more than one file then we will write incude function to each and every file to include them inside index file. Now this is normal process without autoloader


<?php

include "student.php";
include "marks.php";
include "teacher.php";
..
. //there are more files to include we will write for each in same way 
//this will take to much time and space if number of files are more
.
.
include "exam.php";

//create instance for each class         
$john = new student();

This is usual way for files to be loaded. Same task we can perform with autoloader in php but we will reduce some code which will save your time. Autoloader does  same as name says, it automatically loads a class whenever they are needed.

Look at this example:

<?php
//create function which will first store the path of that into a file variable 
function auto_loader($class)
{
$file = "{$class}.php";
//this will check if file exist 
if (is_file($file)) {
//finally if file exist then it will include the file
include $file;
}
}

spl_autoload_register("auto_loader");

$john = new student(); // File will be autoloaded here

This is very easy process. I have created a function name auto_loader() and it receives a class name to be load. Inside the this function I have created a variable $file with the full path to the file to be included. Then I have checked  if the file exist . if yes include the file. Then I used the spl_autoload_register() function to let PHP know that it can also
use auto_loader() to find a class. At last i have created a instance of class student now all these process will be take place. It will only load file student which have class name student. Not all the files .


Introduction to JSON-LD

$
0
0

JSONLD, or JavaScript Object Notation for Linked Data, is a method of encoding Linked Data using JSON.

Before talking about JSON-LD let’s first understand what is Linked Data? Linked data is a way of publishing structured data so that; it has more relationship with its conclusive meaning or logic. It is about applying the principles of the web to sharing data and doing so at a deeper level. In linked data, we can give each thing or data an individual identity or URI so that it can be identified uniquely.

Let’s take an example if we want to publish information about each hotel in India then we would need a URI for each hotel by which we can identify it. After that, we will be able to publish information about each hotel in a small set of statements such as its name, address, company etc. If a hotel is operated by a company which is represented by their respective URI then we are creating a web of linked information. The company URI gives us the information about its name, headquarter, budget etc. This helps us in a lot of ways, such as the data is linked and is placed in context with each other which helps in allowing explanation and implication linked directly to data.

When linked data concept is applied with JSON we are able to get encoded linked data. It is an implementation format for structuring data analogous to Microdata and RDFa. JSON-LD is considered to be simpler to implement, due to the ability to simply paste the markup within the HTML document, versus having to wrap the markup around HTML elements.

JSON-LD annotates elements on a page, structuring the data, which can then be used by search engines to remove the uncertainty of meaning from elements and establish facts around surrounding entities, which is then associated with creating a more organized, better web overall.

How to write JSON-LD?

JSON-LD is recommended to be written in <head> tag but it can be used also written in <body> tag. It is written in between script tag having the type defined as application/ld+json. Don’t forget to add curly braces.

<script type="application/ld+json">
{
.
.
.
}
</script>

@context: It defines the settings of an idea in whose term it can be understood.

"@context": "http://schema.org",

@type: It defines the item type that has been marked up.

"@Type": "…",

Attribute-Value pairs: Next item which comes into a role on JSON-LD is attribute value pair that is item property and its value.

Let’s write the JSON-LD for above-taken example of Hotel in India.

<script type="application/ld+json">
{
  "@context": "http://schema.org",
  "@type": "Hotel",
  "name" : "ABC Hotel",
  "description" : "Lorem Ipsum is simply dummy text of 
                   the printing and typesetting industry.
                   Lorem Ipsum has been the industry's standard
                   dummy text ever since the 1500s, when an unknown 
                   printer took a galley of type and scrambled it 
                   to make a type specimen book.",
  "address" : { "@type" : "PostalAddress",
               "addressCountry" : "IN",
               "addressLocality" : "Noida",
               "addressRegion" : "UP",
               "postalCode" : "201301",
               "streetAddress" : "XYZ"
               },
  "telephone" :  "+91 96504 86699",
  "photo" : "http://www.xyz/image.png",
  "starRating" : { "@type" : "Rating",
                   "ratingValue" : "4"},
  "priceRange" : "1000 - 2400"
}
</script>

In context, we are defining the vocabulary which we are using. @type defines the item type which is the hotel. Name, description, address, telephone, photo etc are the properties of the item type that is the hotel. We can also nest item type in JSON-LD. As you can see the hotel has property address and starRating which can be of different type and they have their own attribute value pair.

Hope this blog will help you to understand JSON-LD in a better way.

Magento Salesforce Connector

$
0
0

Magento Salesforce Connector : This module is best known for integrating an e-Commerce platform to Salesforce CRM platform. This connector provides Real time synchronization for Magento store to Salesforce end. With the help of this module, admin can easily sync Categories, Products, Customers, Orders and Contact us(Leads) to Salesforce Org which will help them to track their sales and improve customer services.

Note : Application required to install in Salesforce Org : eShopSync for Magento

Features

  • Acts as bridge between Magento and Salesforce.
  • It gives the concept of “Service-First” approach .
  • Guest User Concept to store Guest checkouts details.
  • Can process bulk amount of data from Magento to Salesforce.
  • Lightning Features supported and provides you an interactive design with brilliant user interface.
  • Able to sync all product types such as Simple, Grouped, Configurable, Bundle, Virtual, Downloadable.
  • Real Time synchronization for Contact us as Leads, Customers, Categories, Products and Orders.
  • Sync Magneto Orders to Salesforce Orders with Shipment and Tax details.
  • Sync Magento Categories and Products to Salesforce as Custom Categories and Products respectively.
  • Sync Magento Contact us as Leads and Customers as Accounts and Contacts to Salesforce.
  • Admin can select default folder to store images of Categories and Products at Salesforce end.
  • Admin can select default price book for product pricing based on selected Price book.

Minimum Requirements

  • Magento 1.9.x
  • PHP version 5.4.x and above
  • PHP SOAP client must be installed on Server
  • API enabled Salesforce Org required to generate Enterprise WSDL file.

Pre-Configuration settings

Once you install “eShopSync For Magento” from appexchange. Go through the links mentioned below to update the required settings.

Update Field Accessibility : Salesforce Field Accessibility 

Generate WSDL fileHow to generate WSDL file from Salesforce

If you want to avail Salesforce Lightning expereince, you need to register your domain first.

Domain Registartion :How to Register Domain in Salesforce

How to Configure

Connector Installation & Setup

  • Extract the downloaded connector zip file.
  • Connect Magento Back end through FTP details. Go to root folder location where Magento setup is installed.
  • In the Magento root folder, there would be two folders as ‘APP’ & ‘LIB’. From the FTP location, browse to system location where extracted connector folder is located as shown below.

  • Upload folder ‘ APP’ & ‘LIB’ directly into Magento Root folder. It will prompt to overwrite both folders, select to overwrite and upload it successfully.
  • Login to Magento Admin Back end panel. Go to System | Cache Management | Flush Cache Storage | Select All | Refresh | Submit

  • Go to System | Index Management | Select All | Reindex Data | Submit

  • Refresh the page, then go to System | Configuration | Salesforce | Salesforce Connector. Prior filling the details, you need make some changes at Salesforce end.
  • Create a Sandbox or a Trail Developer Org to test the connector sync features prior connecting directly with Salesforce Production org. And, click to install eShopSync for Magento from Appexchange into created Org.
  • Once installed successfully, Go to Setup | in the Quick Find search for Installed package and open it, then Click on eShopsync for Magento | View Components | Search for ‘Custom Field’ | Click on Field name | View Field accessibility | Click Hidden next to System Admin profile | Check mark boxes shown in the screen shot and save it.

Synchronization Process

  • Sync Customers : Hover over Salesforce Connector Tab, Click on Customers.
    • Click on Synchronize All Customers  and Contacts to export all existing customers at Salesforce end, it starts the sync process.

  • After synchronization, all synced customer will get listed as shown below.

  • Sync Categories : Hover over Salesforce Connector Tab and click Categories.
    • Click on Export All Categories to export all existing Categories at Salesforce end.

  • After successful synchronization, all details will get listed as shown below.
  • If there is any unsynced record, you can click on Unsynchronized tab to check details. You need to hover over the status check mark to get sync error( if it is red) based on that you need to proceed for resolution.

  • Sync Products : Hover over Salesforce Connector Tab and click Products.
    • Click on Export All Products to export all existing Products at Salesforce end.

  • After successful synchronization, all details will get listed as shown below.

  • Sync Orders :  Hover over Salesforce Connector Tab and click Orders.
    • Click on Export All Orders to export all existing Orders at Salesforce end.

  • After successful synchronization, all details will get listed as shown below.
  • If there is any unsynced record, you can click on Unsynchronized tab to check details. You need to hover over the status check mark to get sync error( if it is red) based on that you need to proceed for resolution.

  • Sync Contact Us (Leads) : Hover over Salesforce Connector Tab and click Sync Contact Us (Leads) .
    • All Contacts Us responses will get list down in this section, if you have enabled Real Time Sync option.

Magento-Salesforce Classic View

  • Synced Customers

  • Synced Categories

  • Synced Products

  • Synced Orders

  • Synced Contact Us( Leads)

  • Synced Documents

Magento-Salesforce Lightning View

Make sure that you have registered your Domain then you need to verify few settings as :

Go to Setup | Manage Users | Profile | Select Concerned User Profile ‘ Ex: System Admin’ | Click Edit | Search for Custom Tab and mark eShop and Magento-Salesforce Tabs as default On as shown below and Save it. Then, switch to Lightning View.

  • Synced Customers

  • Synced Categories

  • Synced Products

  • Synced Orders

  • Synced Contact Us( Leads)

  • Synced Documents 

Support

Viewing all 5488 articles
Browse latest View live