Quantcast
Channel: Webkul Blog
Viewing all 5554 articles
Browse latest View live

Prestashop Amazon S3

$
0
0

Prestashop Amazon S3 –  Amazon S3 (Simple Storage Service) is a cloud based storage system offered by Amazon Web Services.

With our Prestashop Amazon S3 module, the site owner will have access to the highly scalable, reliable, fast, inexpensive data storage infrastructure that Amazon uses to run its own global network of web sites. Using this Most Durable & Reliable Platform you can store all your dynamic data at Amazon end and ensuring an Easy and a Flexible Data Transfer.

Reduce Load on your Website Server and See your Website run smooth ! 🙂 

Features

  • Provides a Reliable Cloud Storage Service where dynamic data from Prestashop can be stored.
  • Admin can upload dynamic data of prestashop on Amazon server.
  • Admin can download this data stored from Amazon server.
  • Helps to Reduce Stress on Prestashop Website Server.
  • S3 is a very reliable service –  Hence no fear of data loss For Prestashop Admin.
  • Admin can Update links of Images entered in TinyMCE while enabling or disabling the module.
  • Admin can also store Downloadable files like that of Virtual products and store it on Amazon end.

Supported Modules

As of now, the module is made compatible with following three prestashop modules.

  • Block store
  • Home slider
  • Theme configurator

Which Images Will be Uploaded ?

Following Images will be Uploaded and will be stored on Amazon end once the Module is Enabled :

  • Product Images
  • Category Images
  • Carrier Images
  • Order Status Images
  • Language Images
  • CMS Images
  • Manufacturer Images
  • Supplier Images
  • Downloadable Products (like Virtual Product files)
  • Uploaded Files (like Attachments)

Installation

  • Go to back office ->module
  • Upload the module zip file
  • Search “Prestashop Amazon S3” in module search box then go to module and click on install

Module Installed Successfully !


Configuration

Admin must have received credentials from Amazon end.  Admin will have to enter the Access Key ID and Secret Access Key.
Admin will select the Region and enter a valid Bucket Name

Note  – bucket is a logical unit of storage on Amazon end.

Once all the valid details are entered by the Admin, Module Configuration is set with success.

Workflow

Now, There are two Steps to be managed here

  • Uploading Prestashop Content
  • Enabling Amazon S3
Upload Prestashop Content for Transfer

Once the Module Configuration has been saved correctly, Admin will have an Upload Button through which he can Upload all Prestashop Content (dynamic data).

Note – :

  1. The Upload Process may take some time depending on the amount of content on your Prestashop Site.
  2.  Make sure you have created a backup of your data before uploading.

Once the Upload Process is completed, a Notification message will be displayed informing the Admin that the content has been uploaded successfully.

Remember –  At this stage the Prestashop Content is Uploaded but it not deleted from Prestashop.

Enable Amazon S3

Once the Content has been Uploaded, A third tab is visible on the Configuration Page Named “Enable/Disable Amazon S3”

When Admin clicks on Enable tab – The Content Uploaded is deleted from Prestashop end and gets stored on Amazon Server.

NOTE –  In case Admin wants to Disable OR Uninstall the Module, it is necessary that the content is first downloaded from S3 Server.

On Upload/Download Content Tab –  Admin gets an option to Download the Content from Amazon Server.

As soon as the Module is Enabled –  A new tab gets added to the Manage Amazon S3 Page –  “Update Image Link

Update Image Link

WHEN MODULE IS ENABLED  :

When the Images are uploaded on Amazon S3 server, the images used in the TinyMCE will generate links from amazon sever.

DURING DISABLE  :

Now when we are disabling or uninstalling the module, we can update the image links and rewrite it with prestashop URL.

Thank you for reading this Blog 🙂

We hope this Addon will enhance the functionality of your prestashop store and ensure its smooth operation !

Support

For any kind of technical assistance, just raise a ticket at : http://webkul.uvdesk.com/ and for any doubt contact us at support@webkul.com. 


Magento Elasticsearch

$
0
0

What’s Elasticsearch?

Elasticsearch is the fastest search engine that returns the results for the entered query in real-time. Elasticsearch is actually a highly scalable open-source full-text search and analytics engine.  It allows you to store, search, and analyze big volumes of data quickly and in near real time.

Why is it used?

Are you running an online web store where you are allowing your customers to search for products that you sell? If yes, you can use Elasticsearch to store your entire product catalog on the server where you have installed the Elasticsearch and provide search and autocomplete suggestions for the customers of your store.

Suppose, that we are searching a word “Apple” on our local SQL database. It will surely be a time-consuming process as all the data will be checked through for finding the word “Apple”. But, if we make use of the Elasticsearch and put all of our catalog data in the Elasticsearch server it would for sure return us with the IDs’ of the products having the “Apple” word associated with them. Thus narrowing-down the search results for us and in turn providing faster search results.

Features

  • The admin can upload all catalog on the Elastic Server.
  • The admin can delete the catalog data from the Elastic server.
  • Catalog product data auto updates on the Elastic server when products update on magento.
  • Catalog search results are fast.

Installation

Installation of the module is super easy, you just need to move the app folder into Magento root folder on the server as shown below in the snapshot.

Installation-Magento-Elasticsearch

After moving the app folder, you just need to flush the Magento cache, by navigating through System->Cache Management.
Installation-Magento-Elastic-Search


Admin – Configuration

After the successful installation of this extension on your web store, the admin will navigate through System->Configuration->Elastic Search Configuration. Here, you have to enable this extension for use, then enter the URL and the Port number of the server where you have installed the elastic search.
Elastic-Search-Configuration

After enabling the extension and entering the Server URL and Port number, you need to run the below command on your server to start the Elastic Server.

“sudo /etc/init.d/elasticsearch start”

After starting the server you will be able to see two options –

      1. Upload data on elastic server

Click this option to upload all the data of your website on to the elastic server.

      2Remove all data from elastic server

Click this option to delete all of the data that you have uploaded on your elastic server.
Magento-Elasticsearch-Configuration

After uploading the data, click the Save configuration button to save this configuration.

Tha’s all for the Magento Elastic Search extension if you have any query or suggestions regarding the extension you can get back to us at webkul.uvdesk.com

Opencart Marketplace Canada Post Shipping

$
0
0

Opencart Marketplace Canada Post Shipping add-on allows the admin and sellers to ship the products to the customers with Canada post shipping method. This add-on will work on API. The admin and sellers can fill their own API credentials. Both can generate the shipping label of Canada post shipping for their orders. This add-on will show all the services provided by the Canada post shipping. The admin can enable free shipping to Canada, USA, and international for the selected services.

Since it’s an add-on for the Marketplace Module, so marketplace module must be installed before installing the Opencart Marketplace Canada Post Shipping.

Notes:

  1. The estimated delivery time shows for Canada, US, and some other International addresses.
  2. Admin’s or Seller’s address must belong to Canada address.
  3. The shipping rates are based according to the delivery details and product weight.
  4. If the weight of the product is zero, this shipping method will not work.
  5. An active Business Purpose Canada Post account is required for getting the API credentials.

Features

  • The admin can select the option for development or test mode.
  • The seller and the admin can configure the Canada post shipping using API.
  • The admin can choose the tax class and geo zone details for which Canada post shipping will be available.
  • The customer can track the Canada post shipping order from their panel.
  • The admin commission is also applicable on the total cost ie product cost and shipping cost and depends on the backend configuration of the marketplace.
  • Sellers and admin can select the Applicable Countries for Canada Post shipping.
  • The admin and sellers can generate their own shipping label.
  • Both admin and seller can select the shipping service methods for cart products.
  • Show/hide the estimated delivery time to the customers for Canada post shipping.
  • The error message can be hide/show to the customers.
  • The admin can add the offset delivery time.
  • The admin can choose free shipping cost to Canada, USA, and international for the selected services.
  • Sellers can enable/disable the Canada post shipping status.
  • The admin can configure handling fee – fixed or percent based.
  • The admin can set the minimum order amount to avail free shipping.

Installation

To install this add-on please follow each and every step carefully. First, you need to upload both admin and catalog folders into the opencart root folder directory as shown in below screenshot:

filezilla

Upload Ocmod File:

Once you have uploaded the file then login to admin and go to Extensions> Extension installer and upload the XML file. The XML file can be found in the ocmod folder under module directory. In ocmod folder select the folder according to your opencart version. Now upload wk_canadapost.ocmod.xml file.

upload ocmod file

After uploading the XML file go to the Extensions > Modification and click on refresh field.

BS3

After that in Admin panel go to System -> Users -> Usergroup and edit ‘Administrator’ and select all for both Access and Modify Permission and save it.

BS4

Install Module

Now, navigate to Extensions>Shipping. Find Marketplace Canada Post from the list. Click the Install button as visible in the screenshot below.

install canada post shipping module

Module Translation

As this Marketplace module supports multiple languages so this section will describe how to make the module work in different languages. Please check this link for language translation.

Canada Post Shipping API Credentials

Canada Post Shipping Website:

For Canada post shipping credentials, you have to go Canada post shipping website and create an account with them. Click here to go Canada post shipping website. Click on Sign up button for creating a new account with Canada post shipping.canada post shipping website

Profile Information:

Fill all the required details and select account as business purpose account. After that click on continue.

Create a Canada Post profile

Profile Type:

Choose profile type as the small business and click on select and continue.

Choose a type personal small business enterprise Canada Post

Contact Information:

Fill all the contact information of the business and click on continue.

Tell us about your small business Canada Post

Confirmation:

After filling the business information form, a confirmation page will open. You will find customer number here.

Tell us about your small business Canada Post

Developer Program:

After click on continue button, go to business solution >> E-commerce solution >> developer program for find the API key and password.

Join Now:

For the next step, click on join now button.

join now

Agree and Continue:

A pop up will open after clicking on join now button. Now click on agree and continue for the developer program.

agree and continue

API Credentials:

Now you will get API credentials for the development(test mode) and production(live mode) purpose. You will find API keys and API password for both.

api details


Admin Configuration

After the module installation, the admin needs to do the Opencart Marketplace Canada Post Shipping configuration. Navigate to Extensions>Shipping and find Opencart Marketplace Canada Post Shipping from the list. Click the Edit button as visible in the screenshot below:

module configuration

After clicking on the edit button, the admin will see two tabs for configuration.
a) General Shipping Configuration   b) Advanced Shipping Configuration

General Shipping Configuration:

Under this tab, the admin can do the following configuration:

API Key: Enter API key generated from Canada post website.

API Password: Enter API password generated from Canada post website.

Customer Number: Enter API key generated from Canada post website.

Test Mode: Select yes for development mode or test mode else select no for production mode or go live.

Tax Class: Select tax class for which you want to use this shipping.

Geo Zone: Select geo zone for which you want to use this shipping. Only for selected geo zone, the shipping would be applicable.

Services: The admin can choose the service method of Canada post shipping. Only selected shipping services will offer for the customer. Selected methods will be applicable for domestic, united state, and international.

Marketplace Canada Post Shipping Status: Select the status of marketplace Canada post as enable/disable.

Sort Order: Order sequence of the Canada post shipping method for shipping page.

configuration general

Advanced Shipping Configuration:

After the successful configuration of general shipping, the admin has to configure the advance shipping configuration. Under this tab the admin will configure:

Shipping Countries: Select countries for which the admin wants to use this shipping method.

Show Estimated Delivery Time: If the admin wants to show estimated delivery time to customers then select yes else no.

Display Error to Users: Select yes/no to show the errors to customers.

Delivery Time Offset: Enter delivery time offset value for adding more delivery time to original estimated delivery time.

For example: If the delivery time offsets value set as 3 and original estimated delivery time is 3 days then final estimated delivery time would be 6 days.

Free Method for Canada: Select service for which you want to give shipping cost free in Canada.

Free Method for USA: Select service for which you want to give shipping cost free in the USA.

Free Method for International: Select service for which you want to give shipping cost free for international.

Handling Fee Status: Select enable if you want to charge the handling fee on Canada post shipping.

Calculate Handling Fee: Enter the handling fee amount/percentage. If it is set as fixed then enter handling fee amount here else if it is on a percentage basis then enter percentage here without percentage sign.

Handling Fee Amount/Percentage: Select handling fee as Amount/Percentage.

Free Shipping with Minimum Order Amount: Select yes for applying free shipping on minimum order amount.

Shipping Minimum Order Amount: Enter the minimum order amount for which free shipping will be applicable.

 Marketplace-Canada-Post-Advanced-Configuration

Seller Configuration

After configuration of admin, sellers need to configure the Canada post shipping. Under the Canada post shipping tab, they have to configure the API key, password, services, and shipping countries.

The seller will get API key, password, and customer number from the Canada post shipping website. If any seller doesn’t want this shipping method, then the seller can disable this shipping method.

The seller can choose the country in which they want to use this shipping method or not.

Webkul Canada Post Seller Configuration

Customer Front-end View

Check Quotes for Shipping:

At my cart page, the customer can quote the shipping price and method for their cart items. The customer can also see the estimated delivery time for the item.

Checkout Process:

All the shipping services of Canada Post

shipping will be shown on the delivery method page. The customer can select the shipping service from here.

Checkout delivery method canada post

Confirm Order:

The customer can see the shipping service on order confirmation section.

Checkout confirmation

Track Order:

In the order history, the customer can see the track order button.

track order

After clicking on track order button, a popup will open with all the tracking information as shown in below image.

 order tracking

Seller Order View

Order Information:

The seller will find the shipping method in order history. The seller can print the invoice for the order. Shipping service is also mentioned on the invoice.

shipping service

Print Shipping Label:

The seller can print the shipping label of the Canada post shipping. In the order history tab, the seller can view the order. In the order page, the seller needs to click on Print Shipping Label button.

print shipping label seller

Authentication:

After clicking on “print shipping label” button, an authentication pop-up will show from Canada Post shipping website. Sellers need to fill the user name and password for login at Canada post website. Where API key is the username and API password is the password.

authentications

Print Label:

After filling the username and password, the seller will be able to print the shipping label.

shipping label seller

Admin Order View

Order History:

The admin can view the shipping method under orders tab. The admin will see Print Shipping Label button here.

shipping label admin

Authentication:

After clicking on print shipping label button, the Canada post website will ask for authentication. The admin needs to fill the username and the password here and click on login button.

authentications

Print Shipping Label:

After clicking on login button, the admin can view the shipping label. The admin can print the shipping label and ship the order with Canada post shipping.

shipping label

Pay to Sellers: 

When the admin will pay the sellers from the income section. Then the payable amount also includes shipping price of Canada post shipping for the order.

For example: If a customer order a product of amount $200 and shipping charges of Canada post shipping is $20 and commission is set as 10%. Then the payable amount to the seller will be $200+$20-10%=$198. So the admin will pay to seller $198 for the order.

Thank you for viewing this blog. If you have any query or require more information, please contact webkul.uvdesk.com

Protected: Woocommerce Odoo Connector

$
0
0

This content is password protected. To view it please enter your password below:

Assertion in selenium WebDriver using TestNg

$
0
0

A Selenese tells Selenium what to do. Selenium commands (Selenese) are of three types : Actions, Accessors, and Assertions.
Actions generally manipulate the state of the application like “click this link” and “select that option”. If an Action fails, or has an error, the execution of the current test is stops.
Accessors examine the state of the application and store the results in variables, e.g. “Title”.
Assertions verify that the state of the application is same to what we are expecting. Selenium Assertions can be of three types: “assert”, “verify”, and ” waitFor”. When an “assert” fails, the test is aborted. When a “verify” fails, the test will continue execution, logging the failure.
A “waitFor” command waits for some condition to become true. They will fail and halt the test if the condition does not become true within the current timeout setting. Perhaps, they will succeed immediately if the condition is already true.
When, we talk about the assertions used in WebDriver using TestNg framework, we have two types of assertions; hard assertion and soft assertion. Lets see about them briefly:

Hard Assertion in Webdriver using TestNg

A hard assert throw AssertException immediately after a test fails and the test is marked as failed. Perhaps test suite continues with next @Test annotation. A hard assertion can be of following types:

  • assertEquals
  • assertNotEquals
  • assertTrue
  • assertFalse
  • assertNull
  • assertNotNull

assertEquals with TestNg

This is used to compare expected and actual values in selenium webdriver. Whenever the expected and actual values are same, the assertion passes with no exception. But, if the actual and expected values are not just same, the assert fails with an exception and the test is marked as “failed”. The suite continues to run with the next @Test annotation(if any).
Assert.assertEquals(actual,expected);

assertNotEquals

assertNotEquals is just opposite to the functioning of assertEquals assertion. Whenever the expected and actual values matches, the assertion fails with an exception and marks the test-case as “failed”. The particular testcase is aborted and execution continuous with the next @Test annotation.
Assert.assertNotEquals(actual,expected,Message);

assertTrue

When we are dealing with Boolean conditions, we should use assertTrue. This assertion returns true if the applied condition passes. If the condition is false/fails, this assertion skips the current method from execution.
Assert.assertTrue(condition);

assertFalse

Assert.assertFalse checks the Boolean value returned by a condition is false or not. When a condition value is true, the assertion aborts the method by an exception. This is basically opposite to assertTrue. The syntax is given below:
Assert.assertFalse(condition);

assertNull

This assertion checks for a object, if it is null or not. When an object is ‘null’ the assertion returns an exception resulting in aborting the test. The syntax is as follows:
Assert.assertNull(object);

assertNotNull

Assert.assertNotNull is vice-versa of assertNull. When a object has some value, the assertion aborts the method with an exception. The syntax is given below:
Assert.assertNotNull(object);

Now, let’s see a simple program which gives a brief idea to use assertion in selenium script.

package HardAssert;
import org.testng.Assert;
import org.testng.annotations.Test;
public class HardAssertion {
    @Test
    public void assertEquals(){
    	Assert.assertEquals("This assertion will pass","This assertion will pass");
    	System.out.println("This line is executed because assertEquals "
    			+ "passed since both the strings are same");
    	Assert.assertEquals("assertion","This assertion will fail");
    	System.out.println("This line will not be executed because "
    			+ "assertEquals fails both the strings are different."
    			+ "Also the test/method will be declared failed");
    }
    @Test
    public void assertNotEquals(){
    	Assert.assertNotEquals("This assertion will pass","Since the "
    			+ "expected and actual result do not match");
    	System.out.println("This line is executed because assertNotEquals"
    			+ " assertion pass for the given situation");
    }
    @Test
    public void assertTrue(){
    	Assert.assertTrue(3<5);
    	System.out.println("This line will be executed as assertTrue will"
    			+ " pass because the 3<5(which will return true)");
    }
    @Test
    public void assertFalse(){
    	Assert.assertFalse(3>5);
    	System.out.println("This line is executed because assertFalse"
    			+ "assertion passes as the given condition will return false");
    }
    @Test
    public void assertNull(){
    	Assert.assertNull(null);
    	System.out.println("Since we we set null in the condition, the assertion "
    			+ "assertNull will pass");
    }
    @Test
    public void assertNotNull(){
    	Assert.assertNotNull("This assertion will pass because this "
    			+ "string don't returns a null value");
    	System.out.println("This line is executed because assertNotNull have have passed");
    }
}


Soft Assertion In WebDriver Using TestNg

Till now, we have learnt about the hard assertions in WebDriver using testNg framework. In a hard assertion, when the assertion fails it terminates/aborts the test(method). But, what if we want to run the entire program? What if, we want to report fail test in testNg report but do not want to terminate the script at any case? It is not really possible if we use hard assertions. So, to overcome this drawback of hard assertion we can use soft assertions in testNg.
To use a soft assertion in testNg, we have to include it’s corresponding class (as SoftAssert()) in the script. This class prevents the execution to throw any exception (of assertion). Also, the most important context is, now the failed assertions will be reported in the testNg report and not making the test to abort anywhere.
Let’s see an example of soft assertion in testNg. Also, try to look at the difference between the two assertion and which assert should be used when.
package hardAndSoftAssertion;
import org.testng.Assert;
import org.testng.annotations.Test;
import org.testng.asserts.SoftAssert;
public class HardAssertion {
	SoftAssert softAssert = new SoftAssert();
    @Test
    public void hardAssertion(){
    	Assert.assertEquals("pass","pass");
    	System.out.println("This line is executed because assertEquals "
    			+ "passed as both the strings are same");
    	Assert.assertNull("assertion");
    	System.out.println("Since the object under assertion"
    			+ " is not null, the assertion will fail. "
    			+ "This line will not be executed");
    }
    @Test
    public void softAssertion(){

    	softAssert.assertNull("assertion");
    	System.out.println("We are using Soft assertion in this method,"
    			+ " so this line of code will also be executed even if "
    			+ "the assetion fails.Wherever we want to execute full "
    			+ "testcase/method, we should use SoftAssertion");
    	softAssert.assertAll();
    }

}


Odoo Marketplace Ajax Login/Sign-Up

$
0
0

Introduction

Odoo Marketplace Ajax Login/Sign-Up – This module allows you to provide an access to anonymous users to register themselves on your marketplace. Users can easily login/sign-up without being redirected to any other page. This saves their time to search for the product page from where they will be redirected to login/sign-up page. Ajax login with social integration makes it more user-friendly for the users to login/sign-up from their existing accounts, without creating a new account.

NOTE: This Module is dependent on Odoo Website Login/Sign-Up & Odoo Multi Vendor Marketplace

Features

  • Provides Ajax-Based Login/Sign-Up for marketplace environment.
  • Fully Integrated With Social Platforms.
  • One Step Login /SignUp Features Keep User On the Same Page.
  • It provides Full Validation For User Entry.
  • Provides ODOO-Facebook Integration.
  • Provides ODOO-Google+ Integration.

Installation

After buying Odoo Piwik Integration you will get a zip file, which contains module. Unzip the file and now just copy `marketplace_ajax_login` module folder into your Odoo addons. Now enable developers mode on your Odoo

  • Go to settings menu and Click on Activate the developer mode.
  • Now Go to Apps menu and Click on ‘Update Modules List
  • Remove the Apps filter

Now you will be able to see the module, just install it. After installing you will be able to handle different functionality as mentioned in module’s Workflow.

Workflow

Once the module is installed, visit website admin menu> click on Settings menu and define all required web access fields.

When you click on login button, an Ajax login pop-up window will appear where you can directly give your username and password to login.

On Ajax login pop up window> If a visitor needs to signup as a vendor, then he can do so by enabling the option “Do you want to become Seller/vendor?” and click on SignUp button.

Also, a user can login and signup directly using social media(Facebook, Google+, Odoo) website credentials (username and password).

Support

For any kind of technical assistance, just raise a ticket at https://webkul.uvdesk.com/ and for any doubt contact us at support@webkul.com

Magento 2 Marketplace Mercadopago Connect

$
0
0

Magento 2 Marketplace Mercadopago Connect extension allows you to provide Mercadopago online payment method for receiving payments within the marketplace. MercadoPago is the leading online payment solution in Latin America and now it’s integrated with our marketplace extension. This extension will be able to provide split payment for the sellers of the marketplace. The customers will be able to make use of their credit cards for making the online payments.

This extension is an add-on of the Webkul’s Marketplace. To make use of this add-on you must have first installed the Webkul’s marketplace.

Features

  • Provide split payment to all sellers for an order.
  • Enable/disable payment method from the admin panel.
  • Provide split payment to sellers for your Marketplace store.
  • The admin can set the payment method title visible at checkout.
  • The admin can configure his Mercadopago application from the module backend.
  • Seller has to allow his Mercadopago account for receiving payments within the marketplace.
  • The source code is 100% open for customization.
  • Supports multiple language translations.

Installation

Customers will get a zip folder and they have to extract the contents of this zip folder on their system. The extracted folder has an src folder, inside the src folder you have the app folder. You need to transfer this app folder into the Magento2 root directory on the server as shown below.
Installation-Magento2-Marketplace-Mercadopogo-Connect-extension

After the successful installation, you have to run these commands in the Magento2 root directory.

First command- php bin/magento setup:upgrade

Second Command – php bin/magento setup:di:compile

Third Command – php bin/magento setup:static-content:deploy

** For getting the Mercadopago API

Run the command:  /path/to/your-project composer require mercadopago/sdk:0.5.2

After running the commands, you have to flush the cache from Magento admin panel by navigating through->System->Cache management as shown below.

Installation-Magento2-Marketplace-Mercadopogo-Connect-extension

Configuration For Multi-Lingual Support

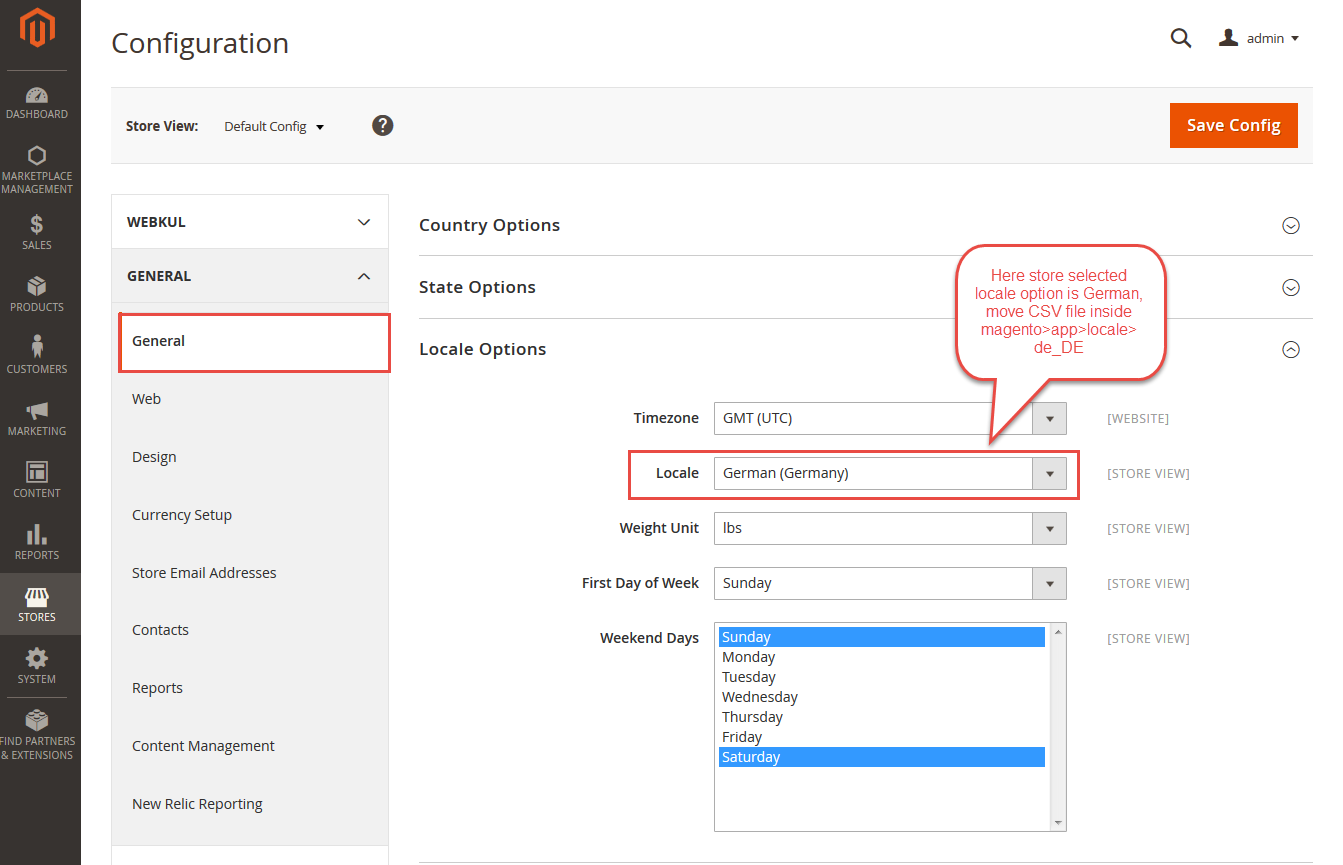
For the multilingual support, the admin will navigate through Store->Configuration->General ->Locale Options and select the locale as German (the language into which admin want to translate his store content).
Multi-Lingual-Support

Language Translation

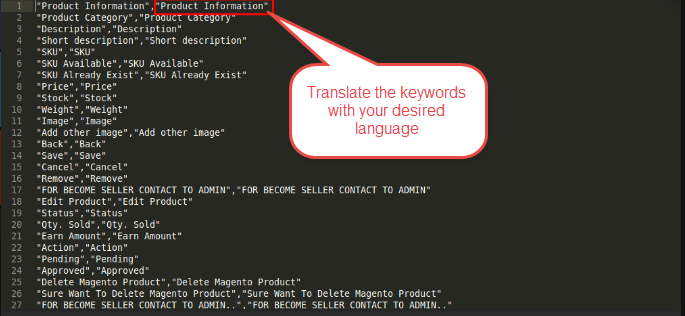
If you need to do the module translation, please navigate the following path in your system. app/code/Webkul/MpMercadopago/i18n. Open the file named en_US.CSV for editing as shown in below screenshot.

language-Translation-Magento2-Canada-Post-Shipping

Once you have opened the file for editing. Replace the words after the comma(,) on the right with your translated words.

language-Translation-Magento2-Canada-Post-Shipping

After editing the CSV file, save it and then upload it to the same folder. Now your module translation is complete.

language-Translation-Magento2-Canada-Post-Shipping

How to Create Your Application

Step 1:

Go to this link – MercadoPago Connect to create your first application and then click the “Create your application” link.
**Note: The admin should have an account at Mercadopago.

Click-Create-Application-Mercadopago
Step2:

Now, select the country in which you are going to manage your application.
Select-Country

Step3:

After selecting the country, tap the enter button.
Tap-Enter

Step4:

Now, enter your email address/username for your Mercadopago account and click continue after that. If you don’t have an account with the MercadoPago you can click here to create one.
Enter-Credentials

After clicking the Continue button, you have to enter the password for the entered email address/username and then click the – Sign In button.
Enter-Password

Step5:

After login, you will now be able to create your application by clicking on the “Create New Application“.
My-Applications

Step6:

Clicking the “Create New Application” brings up a new page to create the application. Here, enter all the required information for creating the application and click “Create Application” to create one for you.
New-Application

After you have created an application you can find it under the “My Applications“.

My-Apps

** To get the App Id and the Secret Key click on the “Details” tab in front of your created application as shown in the image above.
App-Data-Mercadopago

** To get the Public Key and the Access token click here.

If you are using the application in the Sandbox(testing) mode use the SandboxPublic key and the Access token. Else if it’s in the production mode use Production modePublic key and access token.
Credentials

Admin – Configuration

After the successful installation of the extension, the admin will navigate to Stores->Configuration-> Sales->Payment->Marcadopago to configure the extension.
Admin-Configuration-Mercadopago

To configure the extension, the admin will  –

  • Enable the extension by selecting it as “Yes” else select “No” to disable the extension.
  • Choose your country in which you are going to manage your application.
  • Choose the mode as – Sandbox by selecting “Yes” or Production by selecting No“.
  • Set the Title for the payment method which is visible to the customers at the checkout time.
  • Enter the App ID and the Secret Key.
  • Enter the Public key and the Access Token.
  • Set the Seller permission button label text.
  • Set the Minimum and Maximum order total for the payment method.

Seller – Configuration

The seller will find a new menu option under their marketplace block – “Mercadopago Configuration” as shown below in the snapshot.
Seller-Authorization

**Note: The seller should have an account at Mercadopago. To get the Access token click here.

Here, the seller has to enter his own Mercadopago Access Token. Now, click the “Save Access Token” to save his token. After this, click the “Allow For Mercadopago Connect” to authorize your account. Now, the seller will see a success message that your account is successfully authorized.

Workflow – Buyer’s End

After adding products from multiple sellers into the cart and going to the checkout, the buyer can see the Mercadopago payment method under the payment methods.
Checkout-Page
The buyer after making the payment will be able to check the order details where he can see the selected payment method.
Customer-Order-Details

That’s all for this Magento 2 Marketplace MercadoPago Connect extension. If you have any query or suggestion regarding the extension please get back to us at webkul.uvdesk.com

Magento 2 Braintree Payment Gateway Marketplace Add-on

$
0
0

Magento 2 Braintree Payment Gateway Marketplace Add-on allows the seller to add Braintree Payment Gateway for their products. This module is designed to simplify the payment process for online Magento store. Using this module customer can do the transaction with a reliable and secure payment gateway. It will provide an easy refund process to their customers. The admin and the seller both can refund the invoiced amount. And both have the option to partially refund the amount as well.

Note : Online refund by seller and admin will be applicable when the transaction status is “Settled”.

This module is an add-on of Magento2 Marketplace Module. To use this module you must have installed first Magento2 Marketplace.

Features

  • Allow all types of cards supported by the Braintree.
  • Latest Braintree Drop-in UI used for checkout page.
  • Fully PCI Compliant, no card details submitted to the client’s server.
  • The admin can enable vault to store card details.
  • The customer can re-use card details if saved in the vault.
  • The admin can enable escrow seller fund to release in future.
  • The admin can set to release escrow amount automatically (using cron, will execute daily at 1 am).
  • The admin can define when to release escrow amount in the number of days.
  • The admin can also manually release escrowed amount for a particular transaction in the order.
  • The admin can refund the invoiced amount.
  • The admin can partially refund invoiced amount.
  • Enable/disable payment method from admin panel.
  • The seller can refund Braintree transactions online.
  • The seller can also partially refund the order.
  • The payment automatically splits to sellers at the time of checkout
  • The seller can become sub merchant by providing required details, and able to receive funds if payment is done by Marketplace Braintree Payment Method.
  • Braintree hooks are used to check the sub-merchant status and update seller accordingly, and to inform the seller about transaction disbursement, cancel or any dispute.

Installation

Customers will get a zip folder and they have to extract the contents of this zip folder on their system. The extracted folder has an src folder, inside the src folder you have the app folder. You need to transfer this app folder into the Magento2 root directory on the server as shown below.

Installation Of Marketplace Braintree Payment Gateway For Magento2

After the successful installation, you have to run these commands in the Magento2 root directory:

First command – php bin/magento setup:upgrade
Marketplace Braintree Payment Gateway For Magento2

Second Command – php bin/magento setup:di:compile
Marketplace Braintree Payment Gateway For Magento2

Third Command – php bin/magento setup:static-content:deploy
Marketplace Braintree Payment Gateway For Magento2

After running the commands, you have to flush the cache from Magento admin panel by navigating through->System->Cache management as shown below.

Installation Of Marketplace Seller Tax Manager For Magento2

Configuration For Multi-Lingual Support

For the multilingual support, the admin will navigate through Store->Configuration->General ->Locale Options and select the locale as German (the language into which admin want to translate his store content).

Marketplace Braintree Payment Gateway For Magento2

Translation

If a user wants to translate their module from English to German then they need to follow the path app/code/Webkul/MpBraintree/i18n in their unzipped folder and will get a CSV file with name “en_US.csv”. Now they will rename that CSV as “de_DE.csv” and translate all right side content after the comma in the German language. After editing the CSV, save it and then upload it to the path app/code/Webkul/MpBraintree/i18n where they have installed Magento2 on the server. The module will get translated into the German Language. It supports both RTL and LTR languages.

Marketplace Braintree Payment Gateway For Magento2 Translation

Marketplace Braintree Payment Gateway For Magento2 Translation

The user can edit the CSV like the image below.
Marketplace Braintree Payment Gateway For Magento2 Translation

Configuration

After the successful installation of the Marketplace Braintree For Magento2 the admin of the marketplace can configure the plugin. The configuration will be done under “Stores > Configuration > Sales > Payment Methods > Marketplace Braintree Payment Gateway” as per the below snapshot. Braintree configuration

Enabled – Select “Yes” if you want to enable the module. Else select “No”.

Title – Enter the name of the payment method as it will appear in the Payment Information list.

Environment – Here the admin can select the environment of Braintree. Whether it is “Sandbox” or “Production”  as per the requirement.

Account Id – Here the admin will enter the Account Id which is provided by Braintree Payment Gateway.

Merchant Id –  This option sets the Merchant Id which is provided by Braintree Payment Gateway.

Public Key – Here the admin will enter the Public Key which is provided by Braintree Payment Gateway.

Private Key –  Here the admin will enter the Private which is provided by Braintree Payment Gateway.

Tokenization Key – Here admin enter the Tokenization Key collected from the Braintree.

Payment from Applicable Countries – Select which customers can use this payment method. All Allowed Countries means all customers from the default countries list can use this payment method. Admin can also select the payment method for specified country.

Minimum Order Total – This option allows admin to set minimum order total. If Grand total of an order is less than specified Minimum Order Total value then Braintree module will not allow to check out with Braintree payment gateway.

Maximum Order Total – This option allows admin to set maximum order total.

Sort Order – Admin can enter the sort order. This will determine in what order each method is listed in the front-end.

Terms Of Services Link – Link of terms of services.

Vault Enabled – If this option is set as yes then buyer information will be saved in Braintree Otherwise buyer information will not be saved in Braintree. Please check the below image for better understanding.

Braintree Vault

Escrow Settings :

Hold In Escrow –  Using this option admin can enable or disable Hold in Escrow setting. if hold in escrow is enabled then money is distributed to the seller but it will be on hold, when admin will release that money then the seller will get the money. Otherwise, money will be sent directly to sellers.

Auto Release –  It depends on cron. If cron is active amount will be released automatically. Else release amount manually.

Release amount from escrow after days –

Enter days after which amount will be released from escrow.

Note- The admin can’t hold funds in escrow for longer than 30 days according to Braintree escrow guidelines.

All the keys will be collected from the Braintree. Admin can find the same under “Account > My User > API Keys, Tokenization Keys, Encryption Keys > View Authorizations “.

Working Process

If any customer wants to become a sub-merchant seller then he/she has to enter their Business Information and Funding Information under “Braintree Vendor Details”. Refer to the screenshot for the same.

Braintre Details

On top, the seller can see the payment method environment whether it is “Sandbox” or “Live”. In the Sandbox, some fields are prefilled as Braintree do not accept random data in Sandbox mode. The seller can also see his own account status as well.

If Magento Braintree Payment Gateway Method is enabled from admin panel then the buyer can see this payment method inside his “Payment Information” as shown in given screenshot.

Admin Management

The admin can see the transaction list in Braintree account under Transactions”.

Admin can void or cancel the order online by clicking on order id under Sales > Orders”. Refer to the below screenshot for the same.

Admin can find all transaction details of Marketplace Braintree transfer for an placed order, as shown in the below screenshot under “Transactions”.

By clicking on a transaction the admin can find complete details of that transaction as well.


Marketplace Braintree Refund Management

Seller End Refund Management

The seller can do an online refund with the help of Magento Marketplace Braintree Payment method.


The seller can generate credit memo and can enter Adjustment fee, Adjustment shipping and can even refund shipping as well.

Admin End Refund Management

The admin can refund an order by clicking on “Credit Memo”.


The admin can generate credit memo and can enter Adjustment fee, Adjustment shipping and can even refund shipping as well.

Webhooks In Marketplace Braintree

Webhooks are real-time notifications that alert you whenever an automated event occurs in our system. Magento Braintree Payment Gateway provides Webhook i.e “Sub-merchant account approved, Sub-merchant account declined, Transaction disbursed, Disbursement, Disbursement exception, Dispute opened, Dispute lost, Dispute won”.

Transaction disbursed, Disbursement, Disbursement exception– With these Webhooks, there is added an appropriate comment on the order.

Dispute opened, Dispute lost, Dispute won– Using “Dispute opened, Dispute lost, Dispute won”, transaction status will be automatically updated on Magento store.

Sub-merchant account approved, Sub-merchant account declined– Whenever any Braintree sub-merchant is created or updated then using “Sub-merchant account approved, Sub-merchant account declined” webhook notification, the seller will be updated automatically if sub-merchant is declined the seller will become a default user.

How to create Webhooks

From your Braintree Account navigate to “Settings > Webhooks” to view your webhooks.

Click on “Create New Webhook” to create a new Webhook.


That’s all for the Magento 2 Braintree Payment Gateway Marketplace Add-on, still have any issue, feel free to add a ticket and let us know your views to make the plugin better at webkul.uvdesk.com.


@HttpGet Annotation In Saeforce

$
0
0

In this blog we are going to learn about how to expose an Apex method  as a REST resource using @HttpGet annotation.

rest annotation

–> REST annotation enables you to expose an Apex class or an Apex method as a REST resource. In salesforce, there are six REST annotations, that is :

1). @RestResource(urlMapping=’/your url’)

2). @HttpGet

3). @HttpPost

4). @HttpPut

5). @HttpPatch

6). @HttpDelete

–> Classes with REST annotation should be defined as global.

–> Methods with REST annotation should be defined as global static.

@Httpget

–> @HttpGet is used at method level. This method is called when a HTTP GET  request is sent. To expose your apex class as REST resource you should use @RestResource(urlMapping=’/your url’) annotation at class level as shown below.

@RestResource(urlMapping='/your_url')
global class restExample {

    @HttpGet
    global static void exampleMethod() {

        // Write your code here
    }
}

–> Here url mapping is relative to https://instance.salesforce.com/services/apexrest/.

–> If your class is in namespace say ‘abc’, then API  url must be as follows:

  •  https://instance.salesforce.com/services/apexrest/abc/you_url

–> URL are case-sensitive.

Example

Let’s create an account by sending a parameter through API url.

Step 1: Create an apex class  say ‘restExample’.

@RestResource(urlMapping='/example')
global class restExample {
	/**
    * Webkul Software.
    *
    * @category  Webkul
    * @author    Webkul
    * @copyright Copyright (c) 2010-2016 Webkul Software Private Limited (https://webkul.com)
    * @license   https://store.webkul.com/license.html
    */

    // Method to get the Account name from parameter

    @HttpGet
    global static void getAccountName() {
        RestRequest req = RestContext.request;
        RestResponse res = RestContext.response;
        res.addHeader('Content-Type', 'application/json');
        String accountName = req.params.get('account_name');

        // Call the method to create Account
        if(accountName != null){
        	restExample.createAcc(accountName);
        } else {
            restExample.createAcc();
        }

    }

	// Create Account when param is set
    public static void createAcc(String accName) {
        try{

            Account acc = new Account(Name = accName, Description = 'Account is created by REST API');
            insert acc;

        } catch (Exception ex) {
           system.debug(ex.getMessage());
        }
    }

    // Create Account when param is not set
    public static void createAcc() {
        try{

            Account acc = new Account(Name = 'Name is not set', Description = 'Account is created by REST API');
            insert acc;

        } catch (Exception ex) {
            system.debug(ex.getMessage());
        }
    }
}

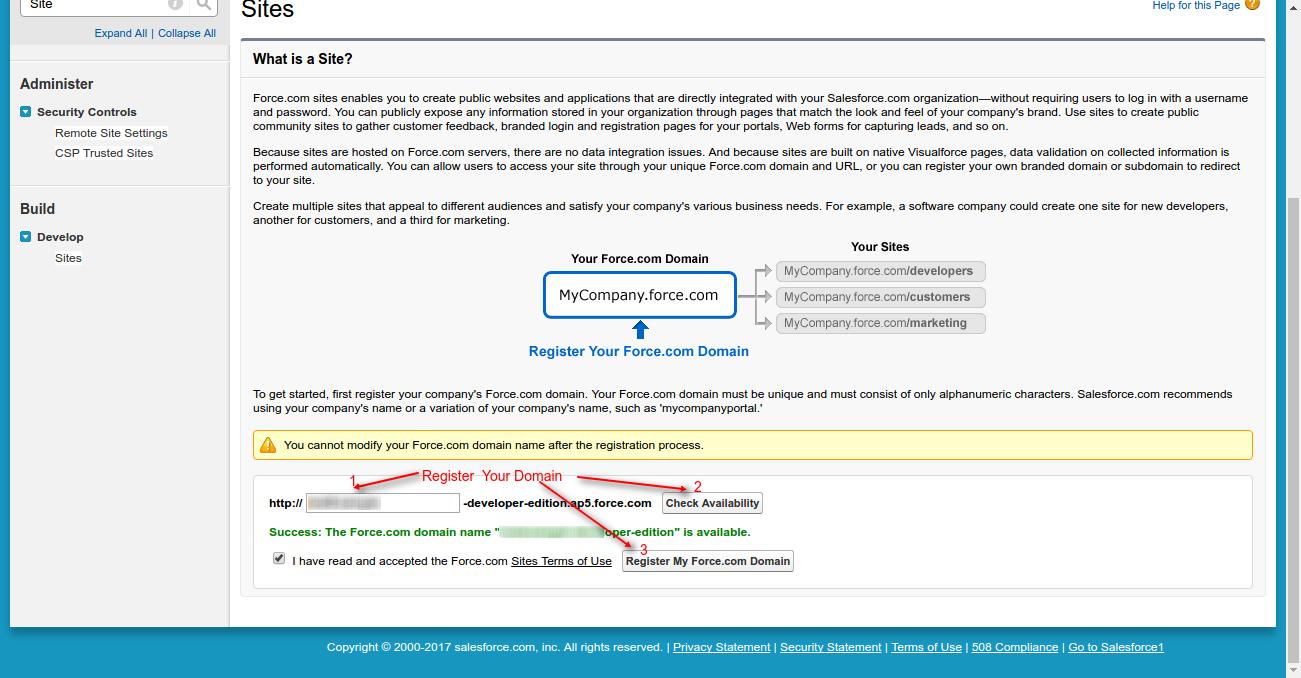
Step:2: Now, to expose above rest class create a site as shown below. Goto>> SetUp>> Develop>> Sites

# Register your domain:

# Create New Site 

# Copy the Default Web Address

# Now goto Public Access Setting :

# Provide Access to object which you want to expose in class.

# Expose Apex class :

That’s all for setting up of site.

Step 3:  Now paste  Default Web Address(which you have copied from site setting) by appending:

1). Without sending any parameter : ‘/services/apexrest/example’ . 

2).  With parameter : ‘/services/apexrest/example?account_name=Webkul’

Now, goto account page and verify your results.

Output


Support

That’s all for @HttpGet Annotation In Salesforce, still if you have any further query feel free to add a ticket, we will be happy to help you https://webkul.uvdesk.com/en/customer/create-ticket/.

Using Cookie Class of APEX

$
0
0

We all are familiar with the word cookie. Cookies are small pieces of data that any website stores on your computer in order to pass that data between pages. Likewise APEX also gives us the ability to use cookies, however APEX cookies are little bit different than the normal cookies that we get in the browser. For APEX the cookie is a class that we can use to set data in a Pagereference variable so that it can be used later on. This is what I will demonstrate, how to use cookie class of APEX.

Cookie Class Functions

The default cookie class gives us multiple functions to use for accessing cookies like:

  • getName() – This function returns the name of the cookie that the class has.
  • getValue() – This function provides the value of the cookie string.
  • isSecure() – Returns true if the cookie can only be accessed by HTTPS, else false.

APEX Code to set the cookie

public class cookieorigin {
    public string toPassData { get; set;}

    public pagereference setData(){
        Pagereference pr = new Pagereference('/apex/cookierecieve');
        Cookie cook = new Cookie('value', toPassData, null, -1, false);
        pr.setCookies(new Cookie[] {cook});
        return pr;
    }
}

In the above class we have a simple pagereference method in which we have created a cookie object and to the constructor we have passed various arguments. The first argument is the name of the cookie, that we will use to access the cookie later on. Second argument is the actual value which will be passed into the cookie. The third variable is the path, which specifies where the cookie will be stored. Setting the path to null will just store the cookie in root. Next argument specifies the lifespan of the cookie. To set a normal lifespan pass any positive value to the cookie. Setting the value to 0 will destroy the cookie. A negative value will make the cookie a session cookie and will end with the session. The last argument specifies whether the cookie can only be retrieved by secure method, i.e. HTTPS or not.

After creating the cookie we have to set it in the pagereference variable by the setcookies method. This method takes a list of cookie type as input so we have passed the object as a list.

VF page Code

<apex:page controller="cookieorigin">
    <apex:form >
    	<apex:outputLabel for="inpdata">
         	Enter Data:&nbsp;
        </apex:outputLabel>
        <apex:inputText value="{!toPassData}"/><br/>
        <apex:commandButton action="{!setData}" value="Go!"/>
    </apex:form>
</apex:page>

The Vf page code is very much general and is used to just call the function setData() to set cookies.

Cookie receiving APEX code

public class cookierecieve {
    public string data { get; set;}

    public cookierecieve(){
        data = apexpages.currentPage().getCookies().get('value').getValue();
        system.debug(data);
    }
}

The cookie data is fetched by the pagereference function getCookies(), which returns a map of all the stored cookies. From that map we get the cookie by the general get() function of the map and then using the getValue() function of the cookie we fetch the cookie value stored.

Once we get it we can show it on the VF page. We can even show it on any page within the org by simply using the above command in apex controller. The cookie will be available for the provided lifespan.

Output

The output of my code will be something like this:

Cookie class input data

Cookie Class Output data

Support

That’s all about using cookie class of APEX, for any further queries feel free to add a ticket at:

https://webkul.uvdesk.com/en/customer/create-ticket/

Or let us know your views on how to make this code better, in comments section below.

How to use the apex:param tag in visualforce

$
0
0

Being a developer we all have thought about calling APEX controller functions from our Visualforce page. Most of us even know about how to do it with the help of either RemoteAction or actionfunction. Each method have their own advantages and disadvantages, like getting a return value from actionfunction is not possible or, calling RemoteAction in onclick event is a trouble. However either way can help us in according to our needs. What we were about to discuss that is it possible to pass values from Visualforce page to apex controller? The answer to this question is, yes, we can pass values from VF page to APEX controller. The next question arises how can we actually achieve this? This is possible with the help of a tag called <apex:param>. How to use it? That is what I am going to demonstrate, how to use apex:param to pass values.

Using apex:param

This tag is always the child of some other tag which is used to call action from apex controller. The tags which support apex:param as a child element are:

  • <apex:actionFunction>
  • <apex:actionSupport>
  • <apex:commandLink>
  • <apex:outputLink>
  • <apex:outputText>
  • <flow:interview>

For apex:param the value attribute must always be specified, and with it, either the assignedto or name attribute is also required. What is the meaning of these attributes and how are they used, that I am going to explain in the next part with an example.

Apex Class

public class paramtest {
    public string value { get; set;}

    public void testdirect(){
        system.debug(value);
    }
    public void testinput(){
        value = apexpages.currentPage().getParameters().get('inpval');
        system.debug(value);
    }
}

This apex class does not have much use and the only important piece of code in it is the first line of the function of testinput(). The getParameters() gets all the parameters and make a map out of them with the key being the name of the parameter. This name is the same name used in the apex:param attribute.

Visualforce Code

<apex:page controller="paramtest" docType="html-5.0">
<apex:form>

<apex:commandbutton action="{!testdirect}" reRender="test" value="Static value">
<apex:param assignTo="{!value}" value="The static value that was set from vf page"/>
</apex:commandbutton><br/>
<input type="text" id="testinput"/>
<input type="button" onclick="testinputJS()" value="Dynamic Value" class="btn"/>
<apex:outputPanel id="test">
<apex:outputText value="{!value}"/>
</apex:outputPanel>
<apex:actionFunction action="{!testinput}" name="passToController" rerender="test">
<apex:param value="" name="inpval"/>
</apex:actionFunction>
</apex:form>
<script>
function testinputJS(){
var str = document.getElementById('testinput').value;
if(str.length >4){
str= str.substring(0,4);
}
passToController(str);
}
</script>
</apex:page>

In the VF page we have used param at two places, one in the commandbutton and the other in actionfunction. The param which is in the command button has a value specified to it and also assigned to a variable in controller. This value will be passed to the variable in the controller if the button is clicked. This type of parameter passing is helpful when you are using it in a table over iterated values.

The other is with actionfunction where the name of the value is specified, however the value is not specified, and it is just left blank. Here we will have to manually get the data and store it in a variable like I had done earlier in the VF page.

Output

The output of both action will be like:

Support

That’s all about using apex:param, for any further queries feel free to add a ticket at:

https://webkul.uvdesk.com/en/customer/create-ticket/

Or let us know your views on how to make this code better, in comments section below.

How to Navigate within Lightning Components

$
0
0

In this blog, we will learn how to navigate within Lightning Components. Let’s get started!

Event Used

We will be using force:navigateToComponent. It allows us to navigate from one component to another. Still, we should keep following points in mind:

  • Through this event we can only navigate to Components.
  • The access of the component should be set to global.
  • It will not work in app.app, the navigation will only work within tab.
  • Also, the URL generated through this event is not permanent, it keeps on changing as we navigate.

Navigating within Lightning Components

Now, let’s get started with the code.

Component 1 :

<aura:component implements="force:appHostable" access="global" >
	<!--
        /**
         * Webkul Software.
         *
         * @category  Webkul
         * @author    Webkul
         * @copyright Copyright (c) 2010-2016 Webkul Software Private Limited (https://webkul.com)
         * @license   https://store.webkul.com/license.html
         */
     -->
    <pre>
		Hello! <br/>
		This is Component 1<br/>
	</pre>

	<lightning:button variant="brand" label="Go to Component 2" onclick="{!c.NavigatetoC2}" />
</aura:component>

Component 1 controller :

({
  /**
    * Webkul Software.
    *
    * @category  Webkul
    * @author    Webkul
    * @copyright Copyright (c) 2010-2016 Webkul Software Private Limited (https://webkul.com)
    * @license   https://store.webkul.com/license.html
    */
	NavigatetoC2 : function(component, event, helper) {

		console.log('Enter Here');
        var evt = $A.get("e.force:navigateToComponent");
        console.log('evt'+evt);
        evt.setParams({
            componentDef: "c:Component2"
            //componentAttributes :{ }
        });

        evt.fire();
	}
})

Controller 2:

<aura:component implements="force:appHostable" access="global" >
	<!--
        /**
         * Webkul Software.
         *
         * @category  Webkul
         * @author    Webkul
         * @copyright Copyright (c) 2010-2016 Webkul Software Private Limited (https://webkul.com)
         * @license   https://store.webkul.com/license.html
         */
     -->
    <pre>
		Hello! <br/>
		This is Component 2<br/>
	</pre>
	<lightning:button variant="brand" label="Go to Component 1" onclick="{!c.NavigatetoC1}" />

</aura:component>

Component 2 controller :

({
  /**
    * Webkul Software.
    *
    * @category  Webkul
    * @author    Webkul
    * @copyright Copyright (c) 2010-2016 Webkul Software Private Limited (https://webkul.com)
    * @license   https://store.webkul.com/license.html
    */
	NavigatetoC1 : function(component, event, helper) {
		var evt = $A.get("e.force:navigateToComponent");
		evt.setParams({
			componentDef : "c:Component1"
			//componentAttributes: {}
		});
		evt.fire();
	}
})

Output

For output, you have to create a Lightning Tab using one of the components, and add it to an app through App Manager.

Component 1:

Component 2:

Support

That’s all for how to navigate within Lightning Components, still, if you have any issue feel free to add a ticket and let us know your views to make the code better https://webkul.uvdesk.com/en/customer/create-ticket/


Design Resource In Lightning Component Bundle

$
0
0

In this blog we are going to learn about Design Resource In Lightning Component Bundle. 

A Lightning component bundle includes following resources:

  • Component
  • Controller
  • Helper
  • Style
  • Documentation
  • Renderer
  • Design
  • SVG

Design Resource

1). By using design resource we can expose attribute to Lightning App Builder.

2). Its extension is .design.

3). We use <design:attribute> node to make lightning component attribute available for administrators to edit in Lightning App Builder.

4).  We use <sfdc:object> tag to define the restriction of object in lightning component.

5). Supported attribute of type : String, Boolean, Integer.

Example

Let’s do a simple example of design resource.

# Component

<aura:component implements="force:appHostable,flexipage:availableForAllPageTypes,flexipage:availableForRecordHome,force:hasRecordId,forceCommunity:availableForAllPageTypes" access="global" >
	<!--
    /**
    * Webkul Software.
    *
    * @category  Webkul
    * @author    Webkul
    * @copyright Copyright (c) 2010-2016 Webkul Software Private Limited (https://webkul.com)
    * @license   https://store.webkul.com/license.html
    */
    -->
    <aura:attribute name = "Name" type = "String" ></aura:attribute> <!-- Define  String Variable -->
    <aura:attribute name = "Phone" type = "String" ></aura:attribute> <!-- Define  Integer Variable -->
    <aura:attribute name = "Position" type ="String" ></aura:attribute> <!-- Define  Picklist Variable -->
   	<p>
        Name: {!v.Name}
    </p>
    <p>
        Number: {!v.Phone}
    </p>
    <p>
    	Position: {!v.Position}
    </p>
</aura:component>

# Design

<design:component >
    <!--
    /**
    * Webkul Software.
    *
    * @category  Webkul
    * @author    Webkul
    * @copyright Copyright (c) 2010-2016 Webkul Software Private Limited (https://webkul.com)
    * @license   https://store.webkul.com/license.html
    */
    -->
	<design:attribute name ="Name" label="Name"></design:attribute>
    <design:attribute name ="Phone" label="Phone Number"></design:attribute>
    <design:attribute name ="Position" label="Position" datasource = "CEO, President, Manager"></design:attribute>

</design:component>

Output

#Configuration Page:

#Home page


Support

That’s all for Design Resource In Lightning Component Bundle , still if you have any further query feel free to add a ticket, we will be happy to help you https://webkul.uvdesk.com/en/customer/create-ticket/.

Shopify Crowd Funding App

$
0
0

Before starting the details about Shopify Crowd Funding App, let’s first understand what does crowdfunding means. Crowdfunding is the concept of ‘money from many’ to complete a project.
A process of raising funds/money from the mass for a project/venture, where the project owner explains and informs about his/her idea of project and then set the budget which will be required for the completion. Then the public contributes towards the project if they feel that the project is worthy enough.

On the similar concept we have created this amazing app called Shopify Crowd Funding App.

So let’s get started with the installation first.

installation

 To install the app Click here on this link, enter your store URL and click on Install button to begin with the Installation.

WORKFLOW

Once your installation is complete, you will be landed here on the home page of the app which will be showing you all the related statistics of your projects.
The app is divided into three major sections:
-HOME
-CONFIGURATION
-PROJECTS

Lets look into them in detail.

configuration

Configuration section manages the configuration of the app. The works totally on the basis of how you enter details here in this section. The configuration section of the Shopify Crowd Funding App if further divided into three sections:
-General Configuration
-Label Configuration
-Theme Configuration
General Configuration

From this section of the configuration you can manage the general settings like configuring your business email id, displaying the donation detail and much more.

Label Configuration

From this section of the configuration you can change all the front end labels and make them as per your requirement.

Theme Configuration

To change the color of theme for frontend display use this theme configuration section .

project

This section of Shopify Crowd Funding App will list and displays all the projects (finished and ongoing). You can view and edit the project from this section.
Also to add new project you have to click on add project button of this section.

how to add a new project?

By clicking on the add project (as shown in the screenshot above) you have to start the process of creating new project.
The add project process involves three stages.
-Project Detail
-Donation & Reward
-Additional Detail
Project Detail

Start creating project from this section. Enter all the details related to selected project like description, image, duration of the project and goal amount and click on save and proceed to proceed further.

DONATION & REWARDS

From this section you can create the rewards for those donors who are contributing towards your projects.
In this section of the Shopify Crowd Funding App fill in all the donation and rewards details that you want to create for your customers for funding the project.

ADDITIONAL DETAILS

Put any additional details about the video to make the public understand more about your project. From this section you can upload any related additional detail of the project here in this section for customer to know more about the project.

You are Done. Congratulations you have just created your project.

configure front-end

You need to configure your theme to make this Shopify Crowd Funding App work. Copy the code given on the homepage of the app as important note and paste it to their respective files as specified.

  • Go To Themes.
  • Click on Customize Theme button.
  • Click on Edit HTML/CSS button.
  • Select respective template or .liquid file as given in instructions.
  • Paste the code and save.

front-end display

Once you have created the project and have configured your app and your theme by pasting the codes, then on front end this is how your project will get displayed.
From here donors can choose the donation amount and click on donate button to make the contribution and can even view other ongoing projects by clicking on view all button.

support

Furthermore if you need any kind of support/Consultancy then please raise a ticket at http://webkul.uvdesk.com/ or drop a mail at support@webkul.com

Thanks For reading this blog!!! 🙂

Using External JavaScript Library And Its Method In Lightning Component

$
0
0

In this blog we are going to learn about how to use external JavaScript and its method in lightning component. First, we learn how to use external JavaScript library in lightning component.

JavaScript Library

Following steps are used to load the external Java Script library in lightning component.

  1. Load your external java script library in static resource. Goto >> SetUp>> Custom Code >> Static Resources
  2. Use <ltng:require> tag to load the Java Script library in lightnig component as follows.
    <!-- For one js library -->
    <!-- Here filename1 is static resource name -->
    
    <ltng:require scripts="{!$Resorce.filename1}"></ltng:require>
    
    
    <!-- For more than one js file -->
    <!-- Here filename1 and filename2 is static resource name -->
    <ltng:require scripts="{!join(',',
                               $Resource.filename1,
                               $Resource.filename2)}"></ltng:require>


Example

In this example we print the list of fruits which is predefined in external JavaScript library.

1). Create a js file as follows:

/**
 * Webkul Software.
 *
 * @category  Webkul
 * @author    Webkul
 * @copyright Copyright (c) 2010-2016 Webkul Software Private Limited (https://webkul.com)
 * @license   https://store.webkul.com/license.html
 */


window._map = (function() {
    var fruits = ["Mango", "Apple", "Banana", "Graps", "Pineapple"];
    return {
        getFruits: function() {
            return fruits;
        }
    };
}());

2). Upload the external js file/library in static resource.  Goto >> SetUp>> Custom Code >> Static Resources


3). Create a lightning component and write following code.

<aura:component >
    <!--
    /**
    * Webkul Software.
    *
    * @category  Webkul
    * @author    Webkul
    * @copyright Copyright (c) 2010-2016 Webkul Software Private Limited (https://webkul.com)
    * @license   https://store.webkul.com/license.html
    */
    -->
    <ltng:require scripts="{!$Resource.fruits}"></ltng:require>
    <aura:attribute name="externalList" type="Array" ></aura:attribute>
    <div>
        <p> Click on button to show the name of fruits...</p>
        <lightning:button label="Show Fruits"
                          variant="brand"
                          onclick="{!c.getFruits}">
        </lightning:button>
        <aura:iteration items="{!v.externalList}" var="el">
            <p> {!el}</p>
        </aura:iteration>
    </div>
</aura:component>

4). Controller code.

({
	getFruits : function(component, event, helper) {
		var fruits = _map.getFruits(); // Get the list of fruits from external Java Script Library
        console.log(fruits);
        component.set("v.externalList", fruits);
	}
})

Output

 # Lightning Component View
# After Clicking Button

Support

That’s all for How To Use External Java Script And Its Method In Lightning Component , still if you have any further query  or seek assistance to make your salesforce classic apps compatible with lightning experience, feel free to add a ticket, we will be happy to help you https://webkul.uvdesk.com/en/customer/create-ticket/.


How To Get All Product Reviews By Product SKU In Magento 2

$
0
0

How To Get All Product Reviews By Product SKU In Magento 2- Here I’m going to explain you how you can get all product reviews by product sku.

    $sku = 'test-product'; // product sku
    $objectManager = \Magento\Framework\App\ObjectManager::getInstance();
    $product = $objectManager->create("Magento\Catalog\Model\Product")->loadByAttribute('sku', $sku); //you can also use load($id) if you know product id
    $rating = $objectManager->get("Magento\Review\Model\ResourceModel\Review\CollectionFactory");
    $collection = $rating->create()
            ->addStatusFilter(
                \Magento\Review\Model\Review::STATUS_APPROVED
            )->addEntityFilter(
                'product',
                $product->getId()
            )->setDateOrder();
    echo "<pre>";
    print_r($collection->getData());

In this way you can get all reviews of a product by product sku or id.
Thanks..

Odoo Marketplace Membership

$
0
0

Introduction

Odoo Marketplace Membership- This module helps to enable marketplace membership plan feature for your marketplace sellers. Using this module admin can restrict product creation for any seller based on the plan purchased by the corresponding seller.

NOTE: This Module is dependent on Odoo Multi Vendor Marketplace

Features

  • Admin can create membership plans from the backend.
  • The admin can manage visibility on the website by publishing/un-publishing membership plan.
  • Admin can set price for membership plans.
  • Membership plan restricts the seller for creating/adding products.
  • Seller will buy the plan as per the requirement and will pay for it.
  • The seller can upgrade the plans according to the requirement.
  • Admin can cancel the membership plan of any seller at any time.
  • Separate page for displaying marketplace membership plan on the website.

Installation

After buying Odoo Marketplace Membership you will get a zip file, which contains module. Unzip the file and now just copy `marketplace_membership` module folder into your Odoo addons. Now enable developers mode on your Odoo

  • Go to settings menu and Click on Activate the developer mode.
  • Now Go to Apps menu and Click on ‘Update Modules List
  • Remove the Apps filter

Now you will be able to see the module, just install it. After installing you will be able to handle different functionality as mentioned in module’s Workflow.

Workflow

Configuration

Once the module is installed, visit seller dashboard> under settings menu> click on product terms. Under Marketplace membership part define the product limit for free membership.
By default module functioning every seller will be registered as free membership seller. It helps to manage product creation limit from both settings and from seller profile.

Under settings menu> Admin can also define the membership plan link label according to his desire. This link label will help to redirect to the membership plan page.

Backend Functionality of the module 

Click on Seller Dashboard menu> now click on My Profile menu. Here, a seller can check his marketplace membership details under MP Membership tab. This tab will contain membership type, the number of products allowed and status of the membership plan of a selected seller. The seller can directly change the plan type by clicking on click here option mentioned in the notification visible on top of the profile page. 

A seller can check his marketplace membership other details under MP Membership tab.

Click on Seller Dashboard menu> now click on Membership plan menu. Here, admin can check the list of all membership plans which are active. By clicking on Create button, Marketplace admin can create membership plans for sellers which can be purchased from the website.

Under Seller Dashboard> membership plan and then click on create button. Now, define the name of the membership plan, its duration, fee, allowed products creation, the display color of the membership plan and all other required information. 

Under Seller’s membership menu> admin can check the list of all purchased membership plans with their respective seller details.


By clicking on the Cancel marketplace membership button> Marketplace admin has right to cancel the membership plan of the seller.

Website View

Once the seller gets redirected to membership plan page, he can see all the plans and can select the desired one by clicking on Buy Now button. 
Now like other products purchase process, selected plan will be added to seller cart and once seller paid for the plan he can avail the facility related to it. 

Support

For any kind of technical assistance, just raise a ticket at https://webkul.uvdesk.com/ and for any doubt contact us at support@webkul.com

Odoo Website Auto Hide Out Of Stock Products

$
0
0

Introduction

Odoo Website Auto Hide Out Of Stock Products – helps to hide all out of stock product from the website. It improves the shop visibility and in stock products search for customers by removing all out of stock product.

NOTE: This Module is dependent on Odoo Website Product Stock

Features

Website Hide out of stock products module helps to hide all out of stock product from the website.

Installation

After buying Odoo Website Auto Hide Out Of Stock Products you will get a zip file, which contains module. Unzip the file and now just copy `website_hide_out_of_stock` module folder into your Odoo addons. Now enable developers mode on your Odoo

  • Go to settings menu and Click on Activate the developer mode.
  • Now Go to Apps menu and Click on ‘Update Modules List
  • Remove the Apps filter

Now you will be able to see the module, just install it. After installing you will be able to handle different functionality as mentioned in module’s Workflow.

Workflow

Once the module is installed, click on Website admin> Webkul website addons and now you can check the module hide out of stock module is installed under stock management part.

Only in stock products will be visible on the website view.

Support

For any kind of technical assistance, just raise a ticket at https://webkul.uvdesk.com/ and for any doubt contact us at support@webkul.com

Protected: FIX: Mixed Content Errors while serving ODOO POSBOX over HTTPS

$
0
0

This content is password protected. To view it please enter your password below:

Prestashop Responsive Redazzled Theme

$
0
0

Looking to revamp your prestashop store !!! What’s better than using a new attractive theme for your store.

The Prestashop Responsive Redazzled  Theme is now available. This attractive theme will give your prestahsop store a complete makeover. Fully responsive, and easy to use. Use it on mobiles, computers and tabs, works fine with all.

New improvised UI for better user experience.

Features

  • Fully responsive prestashop theme.
  • Admin can add/remove items from the website homepage.
  • Admin can add item title and description in multi language as well.
  • Admin can easily edit added item.
  • Completely redesigned homepage.
  • Three types of product view options available on the category page i.e. grid view, list view and table view.
  • Newly improvised filters option on the category page.
  • New navigation tabs to display product information on the product page.
  • Revamped cart with drop down feature.

Installation

  1. Go to Back Office > Design > Themes & Logo

2. Add new theme > Upload the theme > Save

3. Theme will be uploaded. Click use this theme to install the theme.

Theme will be successfully installed.

Theme Configurator

Once the theme is installed, search for Redazzled Theme configurator and click on configure.

Here admin can add items on the homepage from here. Admin can add title, image for the item as well as its description from here. Title and description can be written in multi language as well. Click on save to create an item. Admin can also easily edit or delete an item from here.

To edit an item, click the edit button. It will display all the details saved for the item. Now admin can change the item details and images and save to apply the necessary changes.

Front End

Now that the live configurator is configured, lets take a look at the theme on the Front end.

Home Page

Now the visitor will see a completely revamped site. On the website homepage the items will be displayed as added by the admin in the back office. Also a changed product display block and cart  and categories block can be seen.

Category Page

On the category page, visitors will now see a changed filter menu. Also the product views can be changed to grid, list and table.

Category Page : Grid View

Category Page : List View

Category Page : Table View

Product Page

Apart from the layout, new navigation tabs have been added to display the product information.

Cart

A whole new cart layout can been seen.

This is how Prestashop Responsive Redazzled theme can change the look of your website and make it more attractive for your visitors.

Support

For any kind of technical assistance, just raise a ticket at : http://webkul.uvdesk.com and for any doubt contact us at support@webkul.com

Viewing all 5554 articles
Browse latest View live