Quantcast
Channel: Webkul Blog
Viewing all 5490 articles
Browse latest View live

Composite Resources In Salesforce

$
0
0

In this blog we will learn about Composite Resources In Salesforce. By  using composite resources we can make multiple request in single Rest API call. Let’s take an example: suppose we have to create  a new  product and pricebookentry . If we go step by step, we have to make 3 Rest API call as follows:

1).First Rest API call to create new product.

2). Second Rest API call to get Id of created product.

3). Third, Rest API call to make an PricebookEntry  of this product.

By using composite resources, we can  complete this simple task in single Rest API call with a request body that contains all the logic.

Types of composite resources:

Salesforce provide three types of composite resources:

1). composite/batch(Batch): 

–> Upto 25 subrequest in a single request can be executed.

–> Subrequests are executed independently, means information cannot be passed between subrequest call.

–> Each subrequest count as single request towards API limits.

2). composite/tree(sObject Tree): 

–> An sObject tree is a collection of nested, parent-child records with a single root record.

–> All tree root record must be same type.

3). composite/(Composite):

–> Series of  Rest API call are executed subsequently in single Rest API call.

–> Output of one subrequest can be used as input of subsequent subrequests.

–> Entire request count as single request towards API limits.

Note: The composite resources shouldn’t be used in place of existing APIs that are designed to handle asynchronous uploads or modifications of large batches of records, like the Bulk API.

Example :

Let’s do some example in workbench.

1) Click on the link to open workbench: Workbench
2) Log in to your Salesforce Org, and allow access.
3) Go to Utilities || REST Explorer

Example : #Batch:

Request Body: First we use PATCH method to update the existing Account Name, then we use GET method to get the updated Account detail.

{
"batchRequests" : [
    {
    "method" : "PATCH",
    "url" : "v34.0/sobjects/account/0017F000007zCvC",
    "richInput" : {"Name" : "Webkul"}
    },{
    "method" : "GET",
    "url" : "v34.0/sobjects/account/0017F000007zCvC?fields=Name,BillingPostalCode"
    }]
}

Response Body : 

    “hasErrors”:false,
“results”:[
{
“statusCode”:204,
“result”:null
},
{
“statusCode”:200,
“result”:{
“attributes”:{
“type”:“Account”,
“url”:“/services/data/v34.0/sobjects/Account/0017F000007zCvCQAU”
},
“Name”:“Webkul”,
“BillingPostalCode”:“66045”,
“Id”:“0017F000007zCvCQAU”
}
}
]
}

Output:

Support

That’s all for Composite Resources In Salesforce , still if you have any further query feel free to add a ticket, we will be happy to help you https://webkul.uvdesk.com/en/customer/create-ticket/.


How to use custom settings in salesforce

$
0
0

We have all made a custom app in salesforce, be it a developer or administrator. However developers have also created apps to upload packages on appexchange, Salesforce’s own app store. With custom apps comes custom settings for that object, variables which will be used quite often. The best way to store them is by making another object, and using it as it is to store those settings as records. But then there is the problem of accessibility, various users might not have proper access on those objects, and therefore the app won’t work as expected. Well salesforce has provided us with a solution, and that’s what I’ll demonstrate you, how to use custom settings in Salesforce.
So what are these custom settings? Well the answer is simple, these custom settings are like custom objects, but have an organization wide access. Data can be added in them like any Object, through APEX code, or by creating new record. However the access is available organization wide.

Types of Custom Settings

There are two types of custom settings:

  • List Custom Settings: A type of custom setting that provides a reusable set of static data that can be accessed across your organization.
  • Hierarchy Custom Settings: A type of custom setting that uses a built-in hierarchical logic that lets you personalize settings for specific profiles or users.

Example

For this example we are going to focus on hierarchy type settings. Once created these settings can be used even in formula fields or normally in APEX code to store information which can be only changed by administrators.

First we have to go to Setup| Develop| Custom Settings and create a new setting.

Let’s name this new setting as Org Defaults, and then click on save.

As you can see that the settings is like an object, having a new button for custom fields. You can create as many custom fields as you want and store data in them.

After creating custom fields you can access this from APEX code too. Simply fire a SOQL Query in APEX and use the name of the setting you created in the place of object name.

OrgDefaults__c obj = [select id, Org_Code__c from OrgDefaults__c];
system.debug(obj);

Also You can add this field in other custom formula fields, directly by selecting the field name in insert field. You can also create records in this object with the help of APEX code.

Support

That’s all for how to use custom settings in salesforce, for any further queries feel free to add a ticket at:

https://webkul.uvdesk.com/en/customer/create-ticket/

Or let us know your views on how to make this code better, in comments section below.

How to generate XML in APEX

$
0
0

As we all know that XML is one of the best methods to send or receive files over the internet. And to provide us support for parsing and creating XML files. In one of my previous blogs I have taught you how to parse XML files in apex. However in this example I’ll show you how we can generate XML file in apex.

APEX Code

The Apex code to create an XML file is as follows:


public class XMLgen {
    public string xmlstring { get; set;}

    public XMLgen(){
        DOM.Document doc = new DOM.Document();

        dom.XmlNode products = doc.createRootElement('products', null, null);
        dom.XmlNode body1= products.addChildElement('product', null, null);

        body1.addChildElement('Name', null, null).addTextNode('Xbox One');
        body1.addChildElement('Code', null, null).addTextNode('XBO');

        dom.XmlNode body2= products.addChildElement('product', null, null);

        body2.addChildElement('Name', null, null).addTextNode('PlayStation 4');
        body2.addChildElement('Code', null, null).addTextNode('PS4');

        dom.XmlNode body3= products.addChildElement('product', null, null);

        body3.addChildElement('Name', null, null).addTextNode('WII');
        body3.addChildElement('Code', null, null).addTextNode('Wii');

        xmlstring = doc.toXmlString();
    }
}

We have used a class DOM.Document which is used to create XML files. Next we create a new root node which will be held by a variable called ‘products’. This will be used to create child nodes and attributes of the root node.
Next we will create child nodes, the value returned for these nodes could be held by the individual nodes if we want to create more sub nodes, like I have kept the value saved, so that text nodes could be added to these nodes.
For every addChildElement() function there are three values, the name of the node, the namespace add the prefix for the node. I have kept the last two values as null, you can add it according to your need.
Once it is done, the toXMLString() function returns the corresponding string of the XML file. Save it, and show it in a VF page, like I have done.

OUTPUT

The output of the XML page will be like:


Support

That’s all for how to use custom settings in salesforce, for any further queries feel free to add a ticket at:

https://webkul.uvdesk.com/en/customer/create-ticket/

Or let us know your views on how to make this code better, in comments section below.

Plans & Pricing For WooCommerce Salesforce Connector

$
0
0

Integration must be flexible depending upon business levels. WooCommerce Salesforce Connector widens the limitations of integration to meet specific business requirements effectively. Let me share how different Plans of WWS Connector is going to help you in best possible way.

We have developed connector in following ways:

  • Person Account
  • Business Account
  • Business Account With Field Mapping
  • Person Account With Field Mapping

Purchase Benefits:

  • Open Source Code
  • One Time Pay with 3 Months of Support free
  • Module License valid per Salesforce Org ( For Unlimited Users per Org)

Business Account

It is standard Woocommerce Salesforce Connector especially for B2B deals which provide features listed below.

  • Real Time Order Synchronization
  • Can Process Bulk Data Synchronization
  • Guest Users and Orders Synchronization
  • Product Simple & Variable Synchronization
  • Bi-Directional Sync For Products & Categories
  • Users Sync From WooCommerce To Salesforce as Business account
  • Inventory Management and Shipment Tracking
  • Sync Product & Category Images In Default Folder
  • Module License Valid Per Salesforce Org (Unlimited Users per Org)
  • Option To Choose Standard and Custom Price Book For Synchronization

Connector Settings Page: WWS Connector | SettingsCategory Sync Page: WWS Connector | Synchronize Category 
Product Sync Page:  WWS Connector | Synchronize ProductsUsers Sync Page:  WWS Connector | Synchronize UsersOrders Sync Page:  WWS Connector | Synchronize Orders

Business Account With Field Mapping

It includes all the features available in Business Account plan. Along with it, you can get functionality to map Salesforce standard/custom fields of contacts, products & orders with WooCommerce fields as mentioned below:

  • Manual user field mapping for WooCommerce users with Salesforce Contacts: WWS Connector | User Field Mapping

  • Manual Salesforce products field mapping with WooCommerce products: WWS Connector | Product Field Mapping

  • Manual sales force order field mapping with WooCommerceorders: WWS Connector | Order Field Mapping

NOTE : If you have created WooCommerce custom fields on Users/ Products/ Orders using any third party plug-ins then connector would require customization to make those custom fields available in the drop-down list for mapping. Also, plug-ins such as WooCommerce Subscriptions/ Bookings/ Deposits, etc could be customized easily to get sync working effectively.

To get time-frame and costings for specific customization requirement, go through the link mentioned below under Support section.

Person Account

It is standard WooCommerce Salesforce Connector especially for B2C deals which provide features listed below:

  • Real Time Order Synchronization
  • Can Process Bulk Data Synchronization
  • Guest Users and Orders Synchronization
  • Product Simple & Variable Synchronization
  • Bi-Directional Sync For Products & Categories
  • Users Sync From WooCommerce To Salesforce as Person account
  • Inventory Management and Shipment Tracking
  • Sync Product & Category Images In Default Folder
  • Module License Valid Per Salesforce Org (Unlimited Users per Org)
  • Option To Choose Standard and Custom Price Book For Synchronization

Connector Settings Page:  WWS Connector | Settings
Category Sync Page:  WWS Connector | Synchronize Category
Products Sync Page:  WWS Connector | Synchronize Products
Users Sync Page:  WWS Connector | Synchronize UsersOrders Sync Page:  WWS Connector | Synchronize Orders

Person Account With Field Mapping

It includes all the features available in Person Account plan. Along with it, you can get functionality to map Salesforce standard/custom fields of account & contacts, products & orders with WooCommerce fields as mentioned below:

  • Manual user field mapping for WooCommerce users with person account: WWS Connector | Person Account Field Mapping

  • Manual Salesforce products field mapping with WooCommerce products: WWS Connector | Product Field Mapping

  • Manual sales force order field mapping with WooCommerce orders: WWS Connector | Order Field Mapping

NOTE: If you have created WooCommerce custom fields on Users/ Products/ Orders using any third party plug-ins then connector would require customization to make those custom fields available in the drop-down list for mapping. Also, plug-ins such as WooCommerce Subscriptions/ Bookings/ Deposits, etc could be customized easily to get sync working effectively.

To get time-frame and costings for specific customization requirement, go through the link mentioned below under Support section.

Support

Odoo POS Extra Utilities

$
0
0

INTRODUCTION

Odoo POS Extra Utilities module facilitates the user to modify the default functionality of Point of Sale as per the requirement. Using this module a user can disable some specific features of POS and thus a POS user can manage different features according to his need.

INSTALLATION

After buying this product you will get a zip file, which contains module. Unzip the file and now just copy ‘POS  Extra Utilities’ module folder into your Odoo add-ons. Now enable developers mode on your Odoo.

  • Go to settings menu and Click on Activate the developer mode.
  • Now Go to Apps menu and Click on ‘Update Modules List
  • Remove the Apps filter

Now you will be able to see the module, just install it. After installing you will be able to handle different functionality as mentioned in module’s Workflow.

BACKEND CONFIGURATION

Go to-Point of Sale >under Configuration>Point of Sale and enable the available features under “POS Extra Utilities” Group.

WORKFLOW

1-Enabling “Do not validate order if a customer is not selected” field-

When this option is enabled then the order in Point of Sale screen will not be validated until a customer is selected.

2-Enabling “Disable Price Modification” field –

If the “Price Modification” feature is disabled then a user cannot change the price of any product.

3-“Disable Discounts”– On enabling this field, the “Discount tab” will not work in POS Cart.

4-“Disable Delete”– This option prevents the POS User from deleting any product from POS Cart.

5- “Allow only increase in price”– On enabling this option a user can only increase the price of any product. If the price is less than the original price then a pop up will appear -“New Price must be greater than current price”.(as shown below).


SUPPORT

In a case of any further query feel free to raise a ticket at http://webkul.uvdesk.com/ or drop a mail at  support@webkul.com.

Thanks for reading this blog!!

Credit Europe Bank – Virtual POS Payment Integration For CS-Cart

$
0
0

Credit Europe Bank – Virtual POS Payment Integration For CS-Cart:
Credit Europe Bank – Virtual POS Payment Integration add-on integrates Credit Europe Bank with CS-Cart and allows your customers to pay in installments for the purchase on your store. It makes their checkout experience quite fast and secure as it comes with the 3DS feature. This also lets you have a greater control over the checkout so that you can test and implement the most effective experience for your store. It is one of the most reliable and secure payment solutions for European Countries.

Features

  • Well integrated with CS-Cart Multi-Vendor.
  • Integrates Credit Europe Bank – Virtual POS with CS-Cart & customers can pay via Cards.
  • Admin can enable 3DS payment at his store.
  • Functionality to pay for the goods in installments (If supported by the card).
  • Admin can choose the maximum number of installments to be applicable for the product on his store.
  • Option to show the number of installments on the Credit Europe Bank Pay Page or on the Store  Checkout Page itself.
  • Easy to configure and manage at admin end.

How To Upload and Install

After downloading CS-Cart Credit Europe Bank – Virtual POS, you will get a zip file and install.txt . Read the install.txt carefully and configure it accordingly.

Go to “Manage add-ons”, click on “+” to upload and install the zip file as shown below.
Upload
Click on “Local” to browse the zip file and then click on “Upload & Install” as shown below in snapshot.

Credit Europe Bank - Virtual POS Payment Integration for CS-Cart

Payment Method Configuration At Backend

Credit Europe Bank supports both Inline and Outside payment types. We will configure both. Let’s start with the Credit Europe Bank (Inline).

Go to “Administration” tab and click on “Payment methods”.

add

Click on “+” to create a new payment method.

add payment

Set the parameters as shown below in the snapshot.

  • Set the name of the payment method.
  • For check out, choose the processor as “Europe Payment Gateway (Inline)”.
  • Template for this payment processor will be “cc.tpl”.
  • Configure the other tabs accordingly as shown below in the snapshot.

general


Click on “Configure” and set the parameters as shown below in the snapshot.

  • Enter the Credit Europe bank credentials which include Client Id, User Name, Password, Currency Code and API post URL field.configure inline 1

In continuation with the previous configuration, Admin needs to –

  •  Select the desired Transaction type from the dropdown.
  • Set the order status for the successful transactions.
  • Set the order status for failed transaction.
  • Click the checkbox to enable 3DS and accordingly fill the 3DS credentials which include Store Key, Store Type, 3D Post URL.
  • Select desired Language and create Payment Method.

configure inline 2

This is how Inline Credit Europe Bank payment can be configured.

Let’s now configure the Outside Credit Europe Bank payment method-

Click on “+” to create a new payment method.  Set the parameters as shown below in the snapshot.

  • Set the name of the payment method.
  • For check out, choose the processor as “Europe Payment Gateway (Outside – Card Avantaj with Installment)”.
  • Template for this payment processor will be “cc_europe_payment_outside.tpl”.
  • Configure the other tabs accordingly as shown below in the snapshot.

general outside

Click on “Configure” and set the parameters as shown below in the snapshot.

Enter the Credit Europe bank credentials which include Client Id, Store Key, Store Type, Currency Code and 3D post URL field.

configure outside 1

In continuation with the previous configuration, Admin needs to select the –

  • Desired Transaction type from the dropdown.
  • Select desired Language.
  • Next option is to “Show Installments on pay page” – If selected “Yes”, then the option to choose the number of installments will be on the 3DS pay page of Credit Europe Bank. If selected “No” the number of installments will be visible on the checkout page itself.
  • Admin can select the maximum number of installments allowed for customers.
  • Set the order status for the successful transactions.
  • Set the order status for failed transaction and create Payment Method.

configure outside 2

This is how Outside Credit Europe Bank payment can be configured

Front End View

Once the payment method is configured,  New payment options(Inline/Outside as per the configuration) will be available for customers at the front end. For payment, customer needs to select the option as shown below in the snapshot and enter the necessary details for payment.

For payment (Inline), customer needs to select the option as shown below in the snapshot and enter the necessary details for payment.

inline frontend

If 3DS is enabled at the backend, then it will take the customer to the 3D secure page where corresponding order Id will be mentioned and on order placement, the user will get back to the store.

3DS page

For outside payment, there will be a separate payment option as per the admin configuration. The customer needs to select the payment method, choose the desired number of installments and submit the order.

outside frontend i

Customer will get redirected to the outside pay page of Credit Europe Bank as shown below. Customer need to enter the card details & submit the order.

payoutside

Support

This is all about Credit Europe Bank – Virtual POS Payment Integration For CS-Cart. Still, have any issue, feel free to contact us at http://webkul.uvdesk.com and let us know your views to make the module better.

Magento 2 Canada Post Shipping

$
0
0

The Magento 2 Canada Post Shipping extension will allow the admin to provide Canada Post shipping method for shipping the products. The customers will be able to choose this shipping method at the time of checkout for receiving their products via Canada Post Shipping. This shipping method can be used to receive the shipments within Canada and from Canada to other countries as well.

**Notes:

  1. The estimated delivery time shows for Canada, US, and some other International addresses.
  2. The shipping rates are based according to the delivery details and product weight.
  3. If the weight of the product is zero, this shipping method will not work.
  4. An active Business Purpose Canada Post account is required for getting the API credentials.

Features

  • Admin can enable or disable Canada Post Shipping method.
  • Admin can set the Canada Post shipping method name that will be shown from the front side.
  • Admin can set packages request type.
  • The origin for Canada Shipping Method must be always Canada.
  • Ability to download Invoice and Shipping Slip easily.
  • Provide accurate Canada Post shipping rates to customers for shipping.
  • Multiple selections of Canada Post shipping methods displayed on the checkout page.
  • This module can be used to ship the products from Canada to Canada, Canada to other countries.

Installation

Customers will get a zip folder and they have to extract the contents of this zip folder on their system. The extracted folder has an src folder, inside the src folder you have the app folder. You need to transfer this app folder into the Magento2 root directory on the server as shown below.

Magento2-Canada-Post-Shipping-Move-App-Folder

After the successful installation, you have to run these commands in the Magento2 root directory:

First command – php bin/magento setup:upgrade
Magento2-Canada-Post-Shipping-Command1

Second Command – php bin/magento setup:di:compile
Magento2-Canada-Post-Shipping-Command2

Third Command – php bin/magento setup:static-content:deploy
Magento2-Canada-Post-Shipping-Command3

After running the commands, you have to flush the cache from Magento admin panel by navigating through->System->Cache management as shown below.

Flush-Cache

Configuration For Multi-Lingual Support

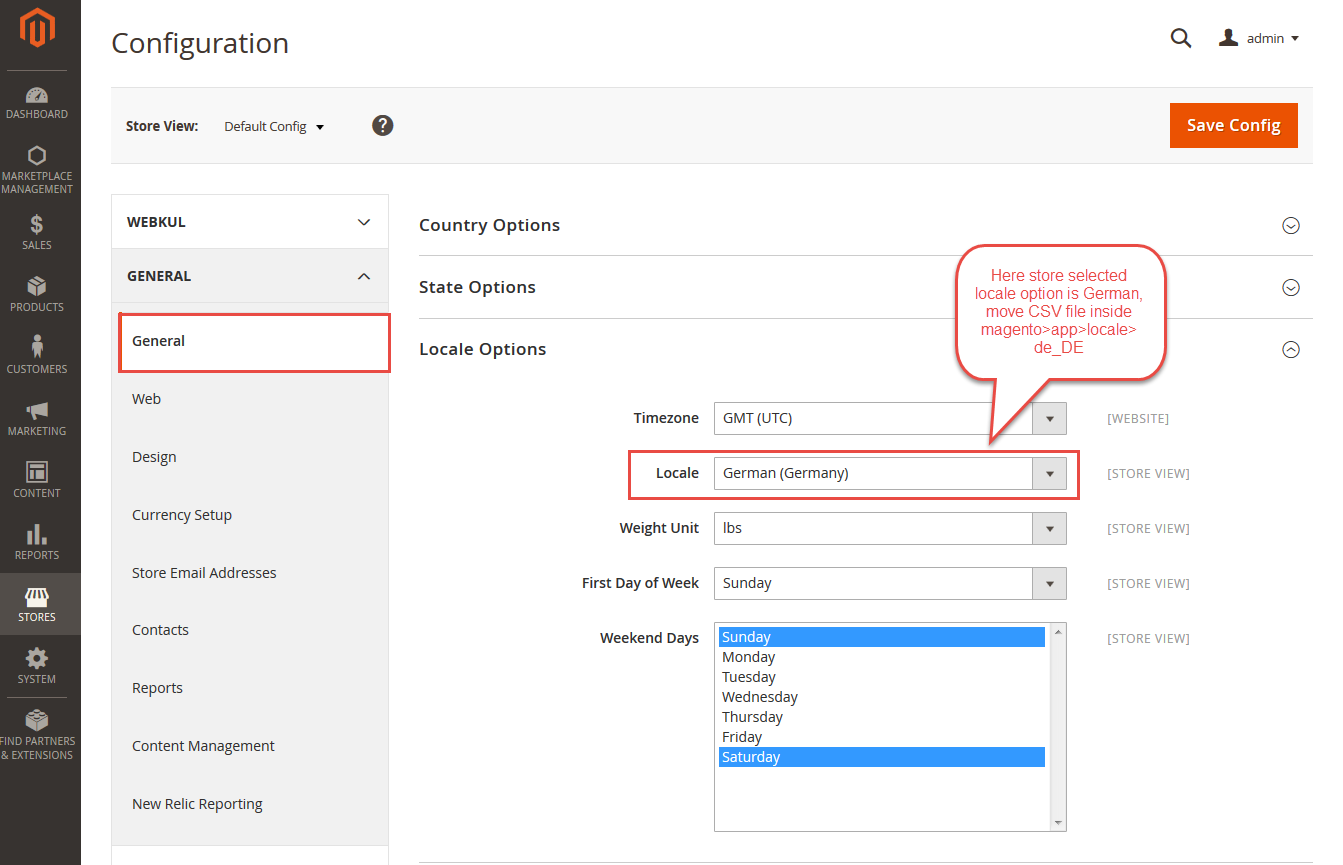
For the multilingual support, the admin will navigate through Store->Configuration->General ->Locale Options and select the locale as German (the language into which admin want to translate his store content).
Multi-Lingual-Support

Language Translation

If you need to do the module translation, please navigate the following path in your system. app/code/Webkul/CanadapostShipping/i18n. Open the file named en_US.CSV for editing as shown in below screenshot.

language-Translation-Magento2-Canada-Post-Shipping

Once you have opened the file for editing. Replace the words after the comma(,) on the right with your translated words.

language-Translation-Magento2-Canada-Post-Shipping

After editing the CSV file, save it and then upload it to the same folder. Now your module translation is complete.

language-Translation-Magento2-Canada-Post-Shipping

Admin Configuration

After the successful installation of the Magento2 Canada Post Shipping module, you will be able to see the configuration panel under Stores>Configuration>Sales>Shipping Methods>Canada Post Shipping.
Admin-Configuration

To generate the API User Id, Password and Client Id click the link give below https://www.canadapost.ca/cpotools/apps/drc/home?execution=e1s1

For proper working of Magento2 Canada Post Shipping, you just need to set Canada shipping origin address from the path Stores> Configuration > Sales > Shipping Settings > Origin. Here admin can enter origin address for Canada shipping.
Canada-post-Shipping

**Note: You need to set up the allowed currency under Stores->General->Currency Setup. Here you will have to select the Canadian Dollar under the Allowed Currencies as per the screenshot below.

Magento2 Marketplace Canada Post Shipping Management

Also you will have to import the currency rates under Stores-> Currency-> Currency Rates as per the below screenshot.

Magento2 Marketplace Canada Post Shipping Management

How to get Canada Post Credentials

Before doing the module configuration, the admin needs to have the Canada Post credentials. The admin needs API Key, API Password, Customer Number, and Contract Id (if any).  Please Note: – You need Business Purpose Canada Post account to get these credentials.

Create Account:

First, click here to visit the Canada Post homepage. The following page will appear, click Sign In and then click Sign Up to create a new account.

canada post homepage

After clicking the Sign Up, the following page will appear. Fill in the information as required. Please make sure to select Yes for Is this account for business purposes?

profile information

Now, Choose Profile Type as Small Business, and click Select and continue button.

profile type

In this step, enter your contact information- business address, phone, first & last name, job title etc. After filling in all the necessary information click Continue.

contact information

After providing the contact information, now you will get your Canada Post Customer Number. Please save this as it will be required for Opencart module configuration.

customer number created

Now, you will arrive at the dashboard page after clicking continue in the previous step. Navigate to Business Solutions>Developer Program.

dashboard

The following page will appear after clicking the Developer Program. Click Join Now for creating API Key and Password.

developer program

A pop-up window will appear about the Canada Post Developer Program Agreement. After reading the document, please click Agree and Continue.

agree and continue

Finally, you can now have your API Key and API Password. There will be two types of credentials, one for the Development (Test/ Sandbox Mode) and other for Production (Live).

api credentials

Customer Frontend View

When a buyer will place an order of admin’s product, the buyer can see the Magento2 Canada Post Shipping method at the shopping cart page where the buyer can select the shipping method.
Shopping-Cart-Page
The buyer can also see the selected method under the Order Review section.
Order-Review-Page
**Note: In Magento2 Canada Post Shipping module, the Shipping rate will be calculated according to the Admin’s Origin Zip Code, Product Weight, and the Buyer’s Destination Zip Code.

Now, after placing the order the customer can find the order details under the “My Orders” section. The customers can see the details of the selected shipping method with the estimated delivery time(If the admin has set to show the estimated delivery time).
My-Orders

Admin Management

Now the admin can view the order details under Sales-> Order and here the admin can generate invoices for the ordered products, generate shipment for the order of the products. Even the admin can notify the customers by sending them emails, cancel/hold the order and even edit/reorder the product order.

Order-Information

After viewing the order, the admin will create the invoice for the order. The invoice will contain all the shipping information and cost of shipping for that particular order.
Admin-Invoice
After creating the Invoice, the admin will create the shipping for the order by clicking the Ship option. Here, the admin can generate the shipment by checking the “Create Shipment” option and then clicking the “Submit Shipment” button.
Create-Shipment

Clicking the Submit Shipment button brings a section to create packages. Click the “Add Products To Package” button to add products to the package.

Add-Products

After clicking “Add Products to Package“, you have to check(select) the products to add to package and then click the “Add Selected Products’ to Package” button to add the products.

Add-Selected

After adding the products to package, just click the Save button to save the configuration as shown below in the snapshot.
Save-Products-Package

Now, the admin can generate the shipment label by navigating to the shipments section for the order and clicking the “View” link.
Print-Option

Here, the admin will click on the “Print Shipping Label” to print the shipping label as shown below.
Print-Shipping-Label

Shipping labels

1. Canada to Canada Shipping label
Canada-To-Canada
2. Canada to US Shipping Label
Canada-To-US

That’s all for the Magento 2 Canada Post Shipping extension. Still, have any query or doubts regarding the extension just get back to us with your views at webkul.uvdesk.com

Odoo Piwik Integration

$
0
0

Introduction

Odoo Piwik Integration: This module allows you to perform Real time data updates. Analytics for your Odoo e-commerce. It also tracks traffic from search engines. It uses Piwik software integration.
“Piwik is a free and open source web analytics application written by a team of international developers that runs on a PHP/MySQL web server. It tracks online visits to one or more websites and displays reports on these visits for analysis.

Features

  • Real-time data updates.
  • Analytics for your Odoo e-commerce.
  • Track traffic from search engines.
  • Accurately measure the time spent by visitors on your website.
  • Geolocation.
  • Pages Transitions of the user.

Installation

After buying Odoo Piwik Integration you will get a zip file, which contains module. Unzip the file and now just copy `piwik_website_analytics` module folder into your Odoo addons. Now enable developers mode on your Odoo

  • Go to settings menu and Click on Activate the developer mode.
  • Now Go to Apps menu and Click on ‘Update Modules List
  • Remove the Apps filter

Now you will be able to see the module, just install it. After installing you will be able to handle different functionality as mentioned in module’s Workflow.

Workflow

Once the Odoo Piwik Integration module is installed, make sure you also using Piwik software than to integrate it with your Odoo go to your Piwik admin panel then move to Settings > Websites > Manage.

From there copy the ID and URL and paste website ID and URL in Odoo Piwik configuration.


After configuring all the required settings now you will be able to track the visitors’ activity on your website in Piwik (installed on your server).

Settings at Odoo end

Once the Odoo Piwik Integration module is installed, Under Website Admin menu> Piwik Analytics menu paste Piwik ID and Piwik URL And select tracking type and click on Save button
Configuration for backend user which will be easily available from Piwik settings.

Support

For any kind of technical assistance, just raise a ticket at https://webkul.uvdesk.com/ and for any doubt contact us at support@webkul.com


Prestashop Product Wise Payment

$
0
0

Ever felt the need to allow only specific payment method on some or all of your products in your prestashop store, but couldn’t find the options to do so.

Well then, Prestashop Product Wise Payment module is exactly what you need. With the help of this module you can add multiple payment methods to multiple products of your choice. In this module admin can assign payment methods to the products. Now, only those payment methods which have been assigned to the products will be shown to the buyers on the payment page during checkout. If no payment methods have been assigned on the products, then all the payment options will be visible for payment.

In case of multiple products selected in the cart with different payment methods applied on them and no common payment method is available, admin can choose whether to allow payment using all the payment methods applied on these products or not to allow payment for these products.

Features

  • Admin can assign multiple payment methods to multiple products at once.
  • Buyers will see only those payment methods which have been assigned to the products.
  • Admin can set the number of products to be displayed in the products list and the view more option on the page where payment methods will be assigned to the products.
  • All the payment methods will be available if no payment method have been assigned to the products.
  • In case of multiple products added to the cart with assigned payment methods, the common payment method will be applicable to complete the payment.
  • Admin can choose to allow all payment methods or disallow payment, in case multiple products are added in cart, which do not have any common payment method available among them.
  • Admin can add/remove products from assigned payment methods.
  • Admin can also edit/delete any assigned payment method.

Installation

  1. Go to Back office > Modules and Services > Upload a Module

2. Drop or select your module zip file

Module would be automatically installed.

Configuration

After successful installation, admin can now configure the module.

Configuration : 

Here admin can set the number of products that will be shown in the products list when assigning payment methods to the products. Also number of products that will be shown when view more is clicked can be set here.

In case of multiple products selected in the cart with different payment methods applied on them and no common payment method is available, admin can choose whether to allow payment using all the payment methods applied on these products or not to allow payment for these products at all.

For example : If, multiple products with different payment options have been added to the cart, without any common mode of payment among them.

Now when following modes have been set in the configuration, let’s see the behaviour of payment methods on the payment page.

Default : When mode is set as default, in this case no payment options will be shown to complete the order as there are no common payment methods  among the products.

All : If mode is set as all, in this case all the payment modes assigned to the products in the cart will be shown and order can be completed using any of the payment methods for the whole order.

This is how the module can be configured.

Workflow

A new tab ” Product Wise Payment ” will be added in the back office.

Admin can assign payment options to the products from here.

Add can enable/disable the payment option assigned to the products. Here admin will find the list of all the payment options and the products that are available in their prestashop store. Admin can assign multiple payment options to multiple products from here.

Once the payment methods have been assigned to the products, a list will be displayed showing all these assigned payment methods. Admin can edit/delete any assigned payment method from here.

From the edit option admin can add/remove products from any of the assigned payment methods.

Once the payment methods have been assigned to the products. Only the assigned payment options will be shown to the buyers for these products, to complete the purchase.

So this how admin can assign multiple payment methods to products using this module.

Support

For any kind of technical assistance, just raise a ticket at : http://webkul.uvdesk.com and for any doubt contact us at support@webkul.com


Odoo POS Order History & Re-Order

$
0
0

INTRODUCTION

Sometimes in Point of Sale, it happens that customer wants to order the same products for which order is already created earlier. Now need not to waste time in adding those products to POS Cart again. Using our module “Odoo POS Order History & Re-Order” a user can easily reorder the previously created order. Also, a POS user can filter the order by customer’s name in order to view the history of orders.

FEATURES

  • A user can reorder previously created orders in the running POS session.
  • A user can view all the orders and can also filter the order by customer’s name.
  • No Backend configuration required.
  • Ease of usage.

INSTALLATION

After buying this product you will get a zip file, which contains module. Unzip the file and now just copy ‘POS Order History & Re-Order’ module folder into your Odoo add-ons. Now enable “Developer mode” on your Odoo.

  • Go to settings menu and Click on Activate the developer mode.
  • Now Go to Apps menu and Click on ‘Update Modules List
  • Remove the Apps filter

Now you will be able to see the module, just install it. After installing you will be able to handle different functionality as mentioned in module’s Workflow.

WORKFLOW

When a POS user reorders the previously created order in Point of Sale then all the products of that order will be added to the POS Cart and then a user can proceed with the further process accordingly.

Apart from that, in order to view the orders of a particular customer, a POS user can filter the order by customer’s name.

SUPPORT

In a case of any further query feel free to raise a ticket at http://webkul.uvdesk.com/ or drop a mail at  support@webkul.com.

Thanks for reading this blog!!


Joomla Virtuemart USPS Shipment

$
0
0

Joomla Virtuemart USPS Shipment:

Joomla Virtuemart USPS Shipment allows you to integrate your Virtuemart store with the USPS shipping services. It is a most reliable and the trusted shipping services across the US. It provides various facility to your customers, one of them is the tracking deliveries using the tracking number provided.USPS methods are available for both domestic and international customers.

FEATURES-

  • Admin can select USPS services to be available for the shopper from available services.
  • Admin can set service request type, API request only make for the services selected by admin
  • Admin can set various USPS fields such as Container, Size, Machinable etc.
  • Admin can select USPS operation mode, use as only Rate calculator or also generate labels and can also select option to request pickup
  • Admin can select order status on which Label and Pickup request is generated.
  • Admin can select order status to cancel pickup request.
  • Admin can apply various validations such as minimum/maximum weight, countries, minimum/maximum cart amount on which USPS shipment will be available.
  • Provide option to define services belongs to Domestic or International.
  • Provide option to set the condition based on zip code ranges and a number of products in the cart.

Important Note:

  • Need proper configuration of the plugin. For example: if the service type is set to All then if container set to flat rate box will give an error. similarly, there is a dependency of one field on other. For reference, please
    Refer to USPS
  • Currently, USPS only provide pickup services for priority, express, international, retail, groung/parcel services for reference please refer API PDF
  • USPS strictly validate address for pickup request so TO and FROM address must be correct.
  • USPS does not provide sandbox API for pickup request, hence even in the sandbox, pickup request is live.
  • Please cancel the pick-up request in case of sand-box mode, otherwise your USPS account may be blocked by USPS.

FLOW OF INSTALLATION AND CONFIGURATION

Step1.
Browse the ‘Joomla Virtuemart USPS Shipment’ zip file and then upload and install.

Browse_upload_and Install

Step2.
Click on Virtuemart “Shipment Methods” and then create a new shipment method.

Click on Virtuemart_shipment_method
Click_on New

Step3.
Now, enter the shipment information of new shipment method.

Shipment_method_information

Step4.
Next one, is the configuration of the shipment method.

Please Note: This is a sample configuration of one of the USPS service, each USPS service has different configuration. Admin has to take care of configuration part and have to match compatibility with the service from back-end while creating a new USPS shipping service.
Configuration jpg

NOTE: Just an example if admin didn’t match the compatibility of the particular USPS service along with its configuration in the back-end then on the cart page an error message would appear with the corrective action that admin has to take. For more details please have a look  USPS
Back-end
USPS_request_setting
Shopping Cart
Error_message_Shopping cart

FRONT-END VIEW & ORDER TRACKING NUMBER

Step4.
This is the front-end view i.e. on the cart page buyer can select the shipment service.

Front-end_Shopping_cart jpg

Step5.
Now, this the last step, here you can see the tracking number of the shipment, for that go to VM orders and then click on any order shipped through USPS and you can see the Tracking Number in the shipment detail area.

Click on Virtuemart_shipment_methodClick on order_Numbertracking_number

WEBKUL SUPPORT

That’s all for the Joomla Virtuemart USPS Shipment still, have any issue feel free to add a ticket and let us know your views to make the Plugin better http://webkul.uvdesk.com

Get All Attribute Group Ids And All Attribute Ids Of A Specific Attribute Set In Magento 2

$
0
0

Get All Attribute Group Ids And All Attribute Ids Of A Specific Attribute Set In Magento 2- Here I’m going to explain you that how to get all attribute groups and all attributes of a specific attribute set in magento 2.

        $attributeSetId = 4;
        $groupIds = [];
        $attributeids = [];
        // \Magento\Eav\Model\ResourceModel\Entity\Attribute\Group\CollectionFactory
        $groupCollection = $this->attributeGroupCollection->create()
            ->setAttributeSetFilter($attributeSetId)
            ->load(); // product attribute group collection
        foreach ($groupCollection as $group) {
            array_push($groupIds, $group->getAttributeGroupId());
            // \Magento\Catalog\Model\ResourceModel\Product\Attribute\CollectionFactory
            $groupAttributesCollection = $this->productAttributeCollection->create()
                ->setAttributeGroupFilter($group->getId())
                ->addVisibleFilter()
                ->load(); // product attribute collection
            foreach ($groupAttributesCollection->getItems() as $attribute) {
                array_push($attributeids, $attribute->getAttributeId());
            }
        }
        print_r($groupIds); // It will print all attribute group ids
        print_r($attributeids); // It will print all attributes ids

In this way you can get all attributes and all attribute group ids of a specific attribute set.
Thanks..

Cross Browser Testing Using Selenium

$
0
0

A web application can be opened in any browser by the user, so we need to ensure that the web application will work as expected in all browsers, that is why we need to do cross browser testing.
Cross browser Testing is a method to test web application with different web browsers.

Selenium supports to run webdriver in  browsers by adding path of the driver for the individual browsers.
Now, we will see the setup and execution of drivers in below-mentioned browsers:
1) Mozilla Firefox
2) Google Chrome
3) PhantomJS
4) HTML Unit

The drivers for the mentioned browsers (except HTML Unit)  can be downloaded from here- SeleniumHQ

Execution Of Mozilla Firefox Driver

When you are using Selenium V_2.xx , then you do not need to install any additional jar files. It is the default driver that selenium webdriver supports.
But If you are using Selenium 3 then to work with Firefox browser , you need to use a separate driver which will interact with Firefox browser i.e GeckoDriver.

package Firefox;

import org.openqa.selenium.WebDriver;
import org.openqa.selenium.firefox.FirefoxDriver;
import org.testng.annotations.AfterTest;
import org.testng.annotations.BeforeTest;
import org.testng.annotations.Test;

public class geckodriver
{
 WebDriver driver;
 String gecko_path = null;

 @BeforeTest
 public void Setup()
 {
// Set the path of firefox driver in 'gecko_path' variable
 gecko_path = "path to gecko driver";

//set the property for gecko driver, specify its location via the webdriver.gecko.driver
 System.setProperty("webdriver.gecko.driver", gecko_path+"geckodriver");
// Declaring and Initializing firefox driver
 driver = new FirefoxDriver();
 driver.manage().window().maximize();
 }
 @Test
 public void TestLogin()
 {
 driver.navigate().to("http://www.webkul.com");
 String PageTitle= driver.getTitle();
 System.out.println("title is ============="+PageTitle);
 }
 @AfterTest
 public void TearDown()
 {
 if(driver!=null)
 System.out.println("Close Firefox browser");
 driver.quit();
 }
}

Now we will run the above  program using TestNG framework, which will first open firefox browser and check ‘webkul Home Page Title’.

OUTPUT CONSOLE-

Execution Of Chrome Driver

Now to run selenium webdriver in Chrome browser, you need to take the help of ‘ChromeDriver’  which selenium webdriver uses to control chrome.Let’s continue it with an example-

package Chrome;

import org.openqa.selenium.WebDriver;
import org.openqa.selenium.chrome.ChromeDriver;
import org.testng.annotations.AfterTest;
import org.testng.annotations.BeforeTest;
import org.testng.annotations.Test;

public class GoogleDriver
{
 WebDriver driver;

 @BeforeTest
 public void Setup()
 {
//Automatically fetches the project path via getProperty method
 String chrome_path = System.getProperty("user.dir");
//set the property for chrome driver, specify its location via the webdriver.chrome.driver
 System.setProperty("webdriver.chrome.driver",chrome_path+"/chromedriver");
 //Declaring and initializing chrome driver
 driver = new ChromeDriver();
 driver.manage().window().maximize();
 }
 @Test
 public void Login()
 {
 driver.navigate().to("http://www.webkul.com");
 String PageTitle= driver.getTitle();
 System.out.println("title is ============="+PageTitle);
 }
 @AfterTest
 public void TearDown()
 {
 if(driver!=null)
 System.out.println("Close chrome browser");
 driver.quit();
 }
}

As we are working on chrome browser,we have imported Statement
‘org.openqa.selenium.chrome.ChromeDriver’ which allows us to access classes
from selenium webdriver packages.

Execution Of PhantomJS Driver

PhantomJs is a lightweight headless web browser(A browser with no visible UI) .It is used for Headless Testing of web applications which comes with in built GhostDriver.

PhantomJSDriver-1.0.x.jar can also be downloaded and configured in Eclipse manually.Let’s continue with an example-

package PhantomJS;

import java.io.File;
import java.io.IOException;
import org.apache.commons.io.FileUtils;
import org.openqa.selenium.OutputType;
import org.openqa.selenium.TakesScreenshot;
import org.openqa.selenium.WebDriver;
import org.openqa.selenium.phantomjs.PhantomJSDriver;
import org.openqa.selenium.remote.DesiredCapabilities;
import org.testng.annotations.AfterTest;
import org.testng.annotations.BeforeTest;
import org.testng.annotations.Test;

public class PhantomDriver
{
 WebDriver driver;

 @BeforeTest
 public void Setup()
 {
  DesiredCapabilities caps = new DesiredCapabilities();
 // not really needed: JS enabled by default
  caps.setJavascriptEnabled(true);
 //Screen Capture
  caps.setCapability("takesScreenshot", true);
 //Declaring and Initializing PhantomJS driver
  driver = new PhantomJSDriver(caps);
 }

 @Test
 public void GetUrl() throws IOException
 {
  driver.navigate().to("http://www.webkul.com");
  String PageTitle= driver.getTitle();
 // Capture the webpage
  TakesScreenshot object = (TakesScreenshot)driver;
  File screen = ((TakesScreenshot) object).getScreenshotAs(OutputType.FILE);
  FileUtils.copyFile(screen,new File("screen.png"));
  System.out.println("title is ============="+PageTitle);

 }

 @AfterTest

 public void TearDown()
 {
  driver.quit();
 }
}

Now Run the above script. You will observe the output is shown in console
and no browser is launched.


Execution Of Html Unit Driver

HTML Unit Driver is similar to PhantomJS. HtmlUnit driver do not have GUI so you can not see your test execution on your screen.So it is most light weight and fastest headless browser for WebDriver.

Also you only have to add the standard selenium library files to the project. No additional jar files are required. Let’s takes an example-

package htmlUnit;

import org.openqa.selenium.WebDriver;
import org.openqa.selenium.htmlunit.HtmlUnitDriver;
import org.testng.annotations.Test;


public class UnitDriver
{
 WebDriver driver;

 @Test
  public void SetUp() throws InterruptedException
 {
 //Declaring and initialize  HtmlUnitWebDriver
  WebDriver driver = new HtmlUnitDriver();

 //open webkul webpage
  driver.get("http://www.webkul.com");
 //wait for 5 second to load the page
  Thread.sleep(5000);
 //Print the title
  System.out.println("Title of the page "+ driver.getTitle());
 }
}

When execution completed, You will see result in console.


JSON Parsing In Salesforce

$
0
0

In this blog we will learn about JSON parsing in salesforce. In salesforce, we use methods of JSONParser class to parse the JSON-encoded string/content that is returned from a call to an external service such that web service(HTTP) callout.

Let’s understand the JSONParser methods by doing an example as explained below.

Dummy Json String:

-> Here we have a dummy  JSON string. We will parse this JSON string and create a record for product and pricebookEntry in salesforce.

{
   "title":"Shirt",
   "body_html":"This is product's description field",
   "variants":[
      {
         "price":"21.00",
      },
      {
         "price":"24.00",
      }
   ]
}

-> For each variant we create a pricebookEntry in salesforce.

Key Points:

Here we have some JSONParser methods, which we are going to use to parse the above string.

1). JSON.createParser(jsonString) : Create new Parser

2). nextToken() : Locate  cursor to next token.

3). getCurrentToken() : To get the current token value.

4). getCurrentName() : To get the current field name.

5). nextValue() :Locate  cursor to next value.

6). getText() : To get the text value of the token.

Note: For more information on JSONParser methods Click Here

Apex Code

1). Create a new pricebook (Name= ‘Demo’) from Pricebook>>New Pricebook>>Name= ‘Demo’>> Save.

2). Create an apex class jsonParserExample to parse the above string.

public class jsonParserExample {

    /**
    * Webkul Software.
    *
    * @category  Webkul
    * @author    Webkul
    * @copyright Copyright (c) 2010-2016 Webkul Software Private Limited (https://webkul.com)
    * @license   https://store.webkul.com/license.html
    */

    public jsonParserExample() {

        Pricebook2 pb = [SELECT Id FROM Pricebook2 WHERE isStandard = true limit 1]; // Get the standard Pricebook Id
        Pricebook2 cpb = [SELECT Id FROM Pricebook2 WHERE Name = 'Demo' limit 1];	 // Get the Custom Pricebook Id
        Product2 prod = new Product2();												 // New Product Object
        PricebookEntry pbe = new PricebookEntry();									 // New PricebookEntry Object
        List<PricebookEntry> list_pbe = new List<PricebookEntry>();                  // List of pricebook Entry

        // Dummy String to Parse

        String jsonString = '{\"title\":\"Shirt\",\"body_html\":\"This is products description field\",\"variants\":[{\"price\":\"21.00\"},{\"price\":\"24.00\"} ]}';

        // Create parser of dummy string

        JSONParser parser = JSON.createParser(jsonString);

        // Parsing of string

        while(parser.nextToken()!= null) {
            if(parser.getCurrentToken() == JSONToken.FIELD_NAME) {
                parser.nextValue();
                if(parser.getCurrentName() == 'title') {
                    prod.Name = parser.getText();
                } else if (parser.getCurrentName() == 'body_html') {
                    prod.Description = parser.getText();
                } else if (parser.getCurrentName() == 'variants') {
                    while(parser.nextToken()!= JSONToken.END_ARRAY) {
                        if(parser.getCurrentToken() == JSONToken.FIELD_NAME) {
                			parser.nextValue();
                            if(parser.getCurrentName() == 'price') {
                                pbe.UnitPrice = Decimal.valueOf(parser.getText());
                            }
                        } else if(parser.getCurrentToken() == JSONToken.END_OBJECT) {
                            if(pbe.UnitPrice != null)
                            {
                             	list_pbe.add(pbe);
                            }
                            pbe = new PricebookEntry();
                            continue;
                        } else if (parser.getCurrentToken() == JSONToken.START_OBJECT) {
                            continue;
                        }
                    }
                }
            }
        }

        // Create the Product in salesforce.
        if(prod.name != null) {
            try{
                insert prod;
            } catch(Exception ex) {
                system.debug(ex);
            }
        }

        // Create the pricebookEntry
        if(prod.Id != null && list_pbe.size()>0) {
            for(PricebookEntry p : list_pbe) {
                p.Product2Id = prod.Id;
            }
            list_pbe[0].Pricebook2Id = pb.Id;
            list_pbe[1].Pricebook2Id = cpb.Id;

            try{
                insert list_pbe;
            } catch(Exception ex) {
                system.debug(ex);
            }
        }
    }
}

2). Now open Execute Anonymous window (Ctrl+E) and execute the following code.

jsonParserExample a = new jsonParserExample();

Now, go to Product and check the created record.

Output


Support

That’s all for JSON Parsing In Salesforce, still if you have any further query feel free to add a ticket, we will be happy to help you https://webkul.uvdesk.com/en/customer/create-ticket/.

Call Ajax request in X-cart(5.3.x) template(Backend)

$
0
0

Trying to use Ajax to pass some data to PHP file from x-cart(version5.3 or above) template is causing an error (403 Forbidden Access ). So, let’s learn that how to fix that types of error in x-cart. Please follow the below example:

Step-1

Like I just want to perform an ajax request in admin view page section of x-cart on a button click that calls a function of same view page controller class. The Ajax request code is as below:

$(document).ready(function() {
        $('body').on('click','.btn_class',function(){
	        var ids = $(this).val();
		var action = $('form').attr('action');
		xyz(ids);
        });
        function xyz(ids){
            core.post(
                URLHandler.buildURL({target: 'controller_class_name', action: 'action_performed'}),
                function(XMLHttpRequest, textStatus, data, valid) {
                    if (valid && data) {
                        console.log('valid data');
                    }else{
                        console.log('Not valid');
                    }
                },
                { Ids: ids }
            );

        }
    });
Step-2

So, if I call such ajax request to target controller class then it throws a 403 Forbidden Access. To solve such types of error we must need to write a function name [ defineFreeFormIdActions()] in that controller then write your action function in that controller as below :

namespace XLite\Module\<YOUR-DEVELOPER-ID>/<YOUR-MODULE-ID>\Controller\Admin;

class ControllerClassName extends \XLite\Controller\Admin\AAdmin {
    /**
     * Define the actions with no secure token
     *
     * @return array
     */
    public static function defineFreeFormIdActions(){
        $list = parent::defineFreeFormIdActions();
        $list[] = 'action_performed';
        return $list;
    }
    protected function doActionActionPerformaed(){
        // Your Code here.
    }
}
Hope that will help you. Thank You 🙂

Working With Database Transactions In Magento2

$
0
0

Introduction

In a structure like magento2, it is very difficult to guarantee the consistency of data, the system of EAV(Entity Attribute Value) makes magento2 highly scalable and modular but every thing comes with a cost, managing the data in these structures can be very difficult. To ensure the consistency of data, magento2 uses database transactions.

Whenever we save a model in Magento, it gets executed as a transaction, when you will dig deeper and check the Magento\Framework\Model\AbstractModel class you will found the save function:

    public function save()
    {
        $this->_getResource()->save($this);
        return $this;
    }

you can see that the save method is calling another save method from resource class, even the delete method calls the delete method of the resource model class, so resource model is responsible for saving, updating, deleting rows from the database.

Let’s check the resource model save method when you will check the resource model parent class, you will find this class:

Magento\Framework\Model\ResourceModel\Db\AbstractDb and the save method is defined in the class, although you can override the save method in the resource model concrete class, you still need to call the parent class “save” method:

public function save(\Magento\Framework\Model\AbstractModel $object)
    {
        if ($object->isDeleted()) {
            return $this->delete($object);
        }

        $this->beginTransaction();

        try {
            if (!$this->isModified($object)) {
                $this->processNotModifiedSave($object);
                $this->commit();
                $object->setHasDataChanges(false);
                return $this;
            }
            $object->validateBeforeSave();
            $object->beforeSave();
            if ($object->isSaveAllowed()) {
                $this->_serializeFields($object);
                $this->_beforeSave($object);
                $this->_checkUnique($object);
                $this->objectRelationProcessor->validateDataIntegrity($this->getMainTable(), $object->getData());
                if ($this->isObjectNotNew($object)) {
                    $this->updateObject($object);
                } else {
                    $this->saveNewObject($object);
                }
                $this->unserializeFields($object);
                $this->processAfterSaves($object);
            }
            $this->addCommitCallback([$object, 'afterCommitCallback'])->commit();
            $object->setHasDataChanges(false);
        } catch (\Exception $e) {
            $this->rollBack();
            $object->setHasDataChanges(true);
            throw $e;
        }
        return $this;
    }

The above code is also very abstract, but still pretty much understandable, thanks to great naming sense by the Magento developers. The methods those are related to transactions are:

  • beginTransaction: this method starts the transaction.
  • commit: this method commits the transaction, we should only call the commit until and unless it is assured that everything is correct because there is no rolling back after commit.
  • rollBack: this is used to roll back all the changes in the tables if any exception arises, as you can see it is called in the catch block of exception handling.

the above save method could be similar to the raw SQL code:

START TRANSACTION

//multiple queries can be defined here to save or update the database tables

COMMIT or ROLLBACK

That’s how Magento uses transactions while you save or update any models. you can even create an observer to make some checks before commit and if your check fails just throw an error and every thing will be rolled back.

If you check the function processAfterSaves:

    protected function processAfterSaves(\Magento\Framework\Model\AbstractModel $object)
    {
        $this->_afterSave($object);
        $object->afterSave();
    }

in the above method, you can see the object’s(this object can be any model class) afterSave method is called, the afterSave method of model resides in class Magento\Framework\Model\AbstractModel\

    public function afterSave()
    {
        $this->cleanModelCache();
        $this->_eventManager->dispatch('model_save_after', ['object' => $this]);
        $this->_eventManager->dispatch('clean_cache_by_tags', ['object' => $this]);
        $this->_eventManager->dispatch($this->_eventPrefix . '_save_after', $this->_getEventData());
        $this->updateStoredData();
        return $this;
    }

in the above method you can see there is an event dispatched, with a dynamic string included in the name:

$this->_eventPrefix this returns the model’s events prefix name that you define in your model class, in the case of order model it is sales_order, so the after saving event for the order model will be:

sales_order_after_save similarly you can predict any model class after save observer event name. Using this event you can put your code before commit and can easily roll back any incorrect updates.

Hope this will help you in solving your issues. If you have any issues or doubts in the above explanation you can ask in the comments, I will try my best to answer you.

Thanks 🙂

How to fetch records through REST API in Visualforce Page using JQuery

$
0
0

In this blog we will learn how to fetch records through REST API in visualforce page using jquery. Let’s get started.

Fetch Records through REST API in Visualforce page using Jquery

The code is mentioned below:

<apex:page>
  <!--
        /**
         * Webkul Software.
         *
         * @category  Webkul
         * @author    Webkul
         * @copyright Copyright (c) 2010-2016 Webkul Software Private Limited (https://webkul.com)
         * @license   https://store.webkul.com/license.html
         */
     -->
  <apex:includeScript value="https://ajax.aspnetcdn.com/ajax/jQuery/jquery-1.7.2.min.js"/>
  <script>
    jQuery(document).ready(function($) {
      // Get Accounts via the REST API
      $.ajax('/services/data/v39.0/query?q=SELECT+Name+FROM+Account+LIMIT+10',
        {
          beforeSend: function(xhr) {
            // Set the OAuth header from the session ID
            xhr.setRequestHeader('Authorization', 'Bearer {!$Api.Session_ID}');
          },
          success: function(response) {
            // Append the records to HTML list
            $.each(response.records, function(index, record) {
              $('#accountList').append('<li>'+record.Name+'</li>');
            });
          },
          error: function(jqXHR, textStatus, errorThrown) {
            // Error
            alert(jqXHR.status + ': ' + errorThrown);
          }
        }
      );
    });
  </script>
  <h1>Test REST API</h1>
  <div>Accounts list:</div>
  <ul id="accountList">
  </ul>
</apex:page>

Output

fetch records through REST API in visualforce page using jquery

Support

That’s all for how to fetch the records through REST API in visualforce page using jquery, still have any issue feel free to add a ticket and let us know your views to make the code better https://webkul.uvdesk.com/en/customer/create-ticket/


How to send Email from APEX code

$
0
0

Being a developer, one would have had felt the need to send an email from their own code. Various platform might or might not offer methods to achieve this task, however APEX provides us classes to compose email messages. This is what I am going to demonstrate you, how to send email from APEX.

APEX Class

The Code for sending Email is as follows:

public class emailSending {
    public string toMail { get; set;}
    public string ccMail { get; set;}
    public string repMail { get; set;}

	public void sendMail(){
        Messaging.SingleEmailMessage email = new Messaging.SingleEmailMessage();
        string[] to = new string[] {toMail};
        string[] cc = new string[] {ccMail};

        email.setToAddresses(to);
        if(ccMail!=null && ccMail != '')
	        email.setCcAddresses(cc);
        if(repmail!=null && repmail!= '')
        	email.setInReplyTo(repMail);

        email.setSubject('Test Mail');

        email.setHtmlBody('Hello, <br/><br/>This is the test mail that you generated. <br/>The Email Id for which this mail was generated by '+toMail+'<br/><br/>Regards<br/> Developer');
        try{
            Messaging.sendEmail(new Messaging.SingleEmailMessage[] { email });
        }catch(exception e){
            apexpages.addmessage(new apexpages.message(apexpages.severity.error,e.getMessage()));
        }

        toMail = '';
        ccMail = '';
        repMail = '';
    }
}

In this class we have used the standard email class of APEX for single messaging, i.e. Messaging.SingleEmailMessage. This class contains most of the functionality required to send a single email message to one or more than one person.

The setToAddresses() function sets the to field of the email. This function takes a string list as an input and hence we have created a string list object and added the to address to that string. In this example I have provided only one email address. You can take multiple address as input separating them with semi-colon and then adding all the addresses to list.

The setCcAddresses() function works in the same way, however it sets the CC field of email instead of to field. Same goes for setInReplyTo() function with only one difference that it takes a string as argument.

The setSubject() function sets the subject of the mail and the setHtmlBody() sets the body of the mail in HTML form. If you want to set body in text form then use the function setPlainTextBody() function.

To send the mail simply use the sendEmail() function of the Messaging class.

VF Page Code

The Code for my VF page is something like this:

<apex:page controller="emailSending">
    <p>
        Test Email Sending:
    </p>
    <apex:form>
        <apex:outputLabel value="Send Mail To: " for="To"/>
        <apex:inputText value="{!toMail}" id="To"/><br/>
        <apex:outputLabel value="CC Mail To: " for="CC"/>
        <apex:inputText value="{!ccMail}" id="CC"/><br/>
        <apex:outputLabel value="Reply Mail To: " for="rep"/>
        <apex:inputText value="{!repMail}" id="rep"/><br/>
        <apex:commandButton action="{!sendMail}" value="Send Email"/>
    </apex:form>
</apex:page>

As you can see that the VF page has normal tags and will be used only to get the data from the user.

Output

Support

That’s all for how to send email from APEX, for any further queries feel free to add a ticket at:

https://webkul.uvdesk.com/en/customer/create-ticket/

Or let us know your views on how to make this code better, in comments section below.

How to create custom exception class in APEX

$
0
0

Now and then every developer might have had faced the need to use an exception class which is not normally provided by the platform they are working on. Luckily, these days every platform provides inheritance features and hence we have the power to inherit the standard exception class of every platform. Same is the case with APEX which has a standard exception class that we can extend to create our own exceptions. This is what I am going to demonstrate, how to create custom exception class in APEX.

Exception Class

The exception class is easy to extend and does not have any abstract methods, hence you do not actually need to create any method in the extended class. However it is always a good practice to override at least the getMessage() function, so that when you use those classes, you’ll have an idea about why the exception is occurring.

Exception Class gives these following methods to use, by overriding them:

  • getLineNumber() – Returns the line number of the origination of exception.
  • getStackTraceString() – Returns the trace string of the origination of exception.
  • getTypeName() – Returns the type of the exception like, DML exception, list exception or Math exception.

Example

public class InvalidInputException extends Exception {
    public override string getMessage(){
        return 'Error Parsing: The character that you entered in invalid';
    }
}

As we can see that in this example we have simply created a new public class which extends Exception class. For every class that has been extended the methods which will be overridden have override keyword right after the access specifier. We have a method getMessage() which is overridden in this case and this message will provide the error string for the exception.

Output

The output of the error string will be something like this:

Support

That’s all for how to create custom exceptions, for any further queries feel free to add a ticket at:

https://webkul.uvdesk.com/en/customer/create-ticket/

Or let us know your views on how to make this code better, in comments section below.

Relationship Query In Salesforce

$
0
0

In this blog we will learn about how to build relationship query in salesforce.  In salesforce,  every object and field has a default Label, a Name, and an API Name. 

  • Lable: Object or filed name which is shown to user.
  • Name: Developer-/Admin-defined internal field name in custom objects.
  • API Name: It is unique name which is used by developers in code to perform various operation. In custom Object, it is derived from  name and a suffix while in standard object label and API name are same.

We use the API name in query to fetch the desired records. Let’s see the various suffix used in salesforce for custom objects.

Suffix

1). __x : For external object (Not in Salesforce multitenant database but still support the SOQL).

2). __Share: The sharing object.

3). __Feed: The chatter feed.

4). __latitude__s/__longitude__s: Geolocation Latitude/Longitude coordinate fields.

5). __r : To represent relationship between object.

6).  __tab : For custon tab

7). __c : Suffix used for custom object name.

.

Relationship query

Now let’s see some SOQL for parent-child relationship.

1). SOQL for two standard object. Let’s say Account as parent object and Contact as child object .

-> Query to fetch the all Contact which is associated with Account ‘Webkul’.

// When record is fetch from Contact

SELECT Name, Account.Name FROM Contact where Account.Name = 'Webkul'

// When record is fetch from Account.
// Contacts is child relationship name of Contact object.
SELECT Name, (SELECT Name FROM Contacts) FROM Account where Name = 'Webkul'

# Output

2). When one is standard object and one is custom object.

-> Let’s say we have a custom object with name Product_Variant__c and standard object product with name product2 which is parent of variant. Suppose we want to know the name of the variant where product name is shirt.


// When record is fetch from product
// Product_Variants is child relationship name of Product_Variant__c
// __r relationship suffix of custom object

SELECT Name, (SELECT Name FROM Product_Variants__r) FROM Product2 WHERE Name = 'Shirt'

// When record is fetch from Product_Variant__c
// Product__r is relationship name of custom field Product__c

SELECT Name,Product__r.Name FROM Product_Variant__c
 WHERE Product__r.Name = 'Shirt'

#Output

3). SOQL for two custom objects. Let’s say we have two custom object  Variant with name Variant__c (Parent)  and Product Variant with name Product_Variant__c(Child). As shown in above example Product Variant  is also the child of product.

-> Query for the name of Variant where product name is Shirt.

// When record is fetch from Product Variant.
// Variant_c is the name of custom field Variant__c which is lookup of custom object Variant_c

SELECT Name, Variant__r.Name FROM Product_Variant__c WHERE Product__r.Name = 'Shirt'

#Output

Support

That’s all for Relationship Query In Salesforce, still if you have any further query feel free to add a ticket, we will be happy to help you https://webkul.uvdesk.com/en/customer/create-ticket/.

Viewing all 5490 articles
Browse latest View live