Opencart B2B Marketplace module converts your Opencart site into complete Business to Business marketplace with customer groups, separate seller product collection, and many more. Using this module admin can create customer group according to their need, and seller and customer can create sub-user under their supervision and all the sub-users will work in the name of its administrator. The Sub-users will not have their own identity. This module can create a platform where businesses can communicate and transact with other businesses along with various other important features.
Features
- Admin can create user groups with some group rights according to their need.
- The seller or customer can create sub user and see the group user list if they have “create user” right.
- If the customer has no rights to order the product, then they will send the product for review and admin will approve that product after that customer can buy that particular product.
- The Seller or customer can see the group user list.
- The child group contains only their parent group rights.
- Admin can create template-based emails for Marketplace which will be used, according to Admin selection.
- Seller can add Simple and Downloadable product.
- Admin can select the shipping method for the seller. So that shipping amount will be transferred to seller’s account.
- Catalog module configuration through admin.
- Admin can toggle Account Menu sequence as per their need.
- Admin can create mail template using relevant mail keywords.
- Admin can track the seller’s income, total order, total buyers, and latest order using dashboard field under edit partner page.
- With transaction status, seller will know whether the seller has been paid by the admin or not.
- Seller will have own dashboard to manage orders.
Installation
Installation of the Opencart module is very simple. You just need to move Admin and Catalog folder into Opencart root.

You can also install the Marketplace module by uploading the zip and XML file through Extension Installer.

After uploading the file go to the Extensions > Modification and click on refresh field.

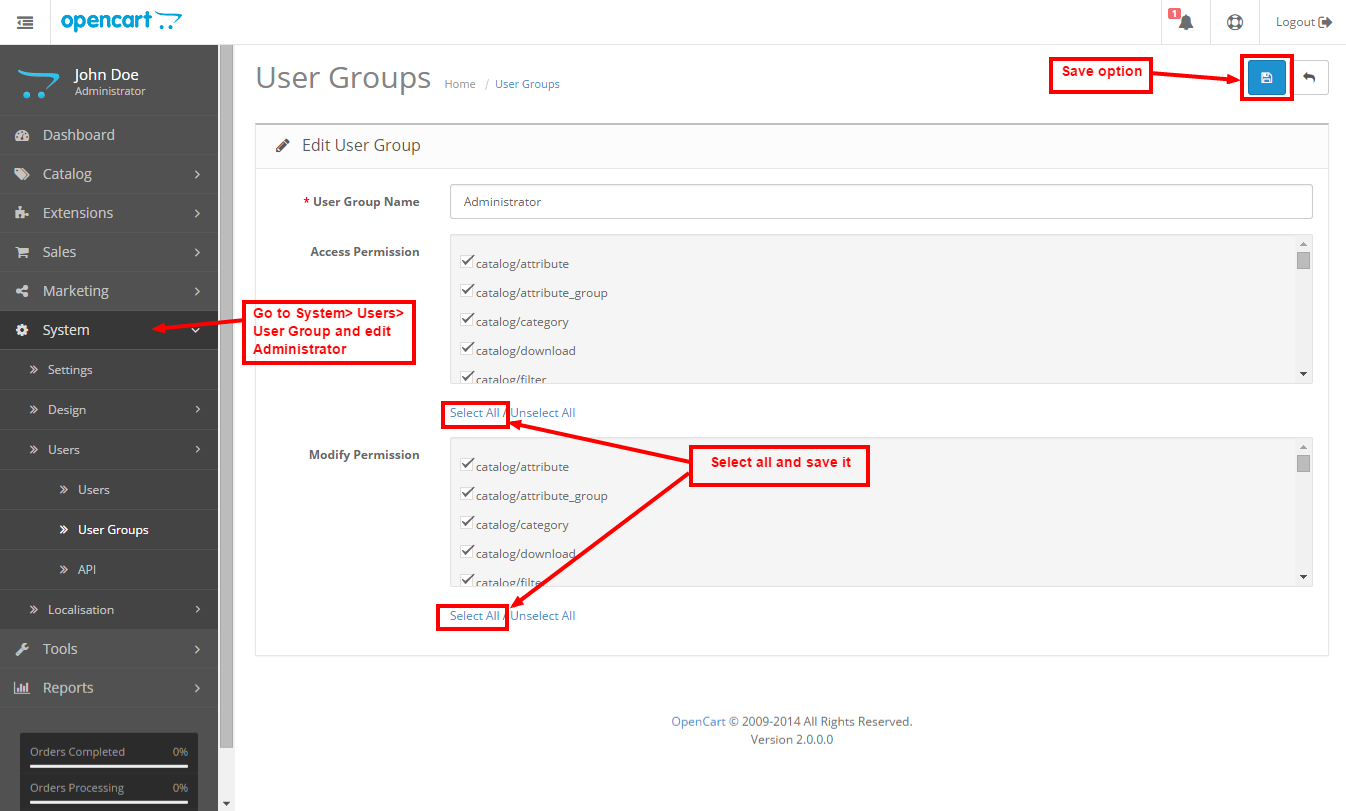
After that in Admin panel go to System -> Users -> Usergroup and edit ‘Administrator’ and choose select all for both Access and Modify Permission and save it.
After that under Extension > Module, install the B2B Marketplace module like this way.

Admin can edit B2B Marketplace configuration setting by clicking on edit option and below page will be open. Admin can set the B2B Marketplace Module status Enable or disable.

Admin / Default mail will use to send the emails if admin wants privacy for your store. Admin can receive all notification on this Email-Id.
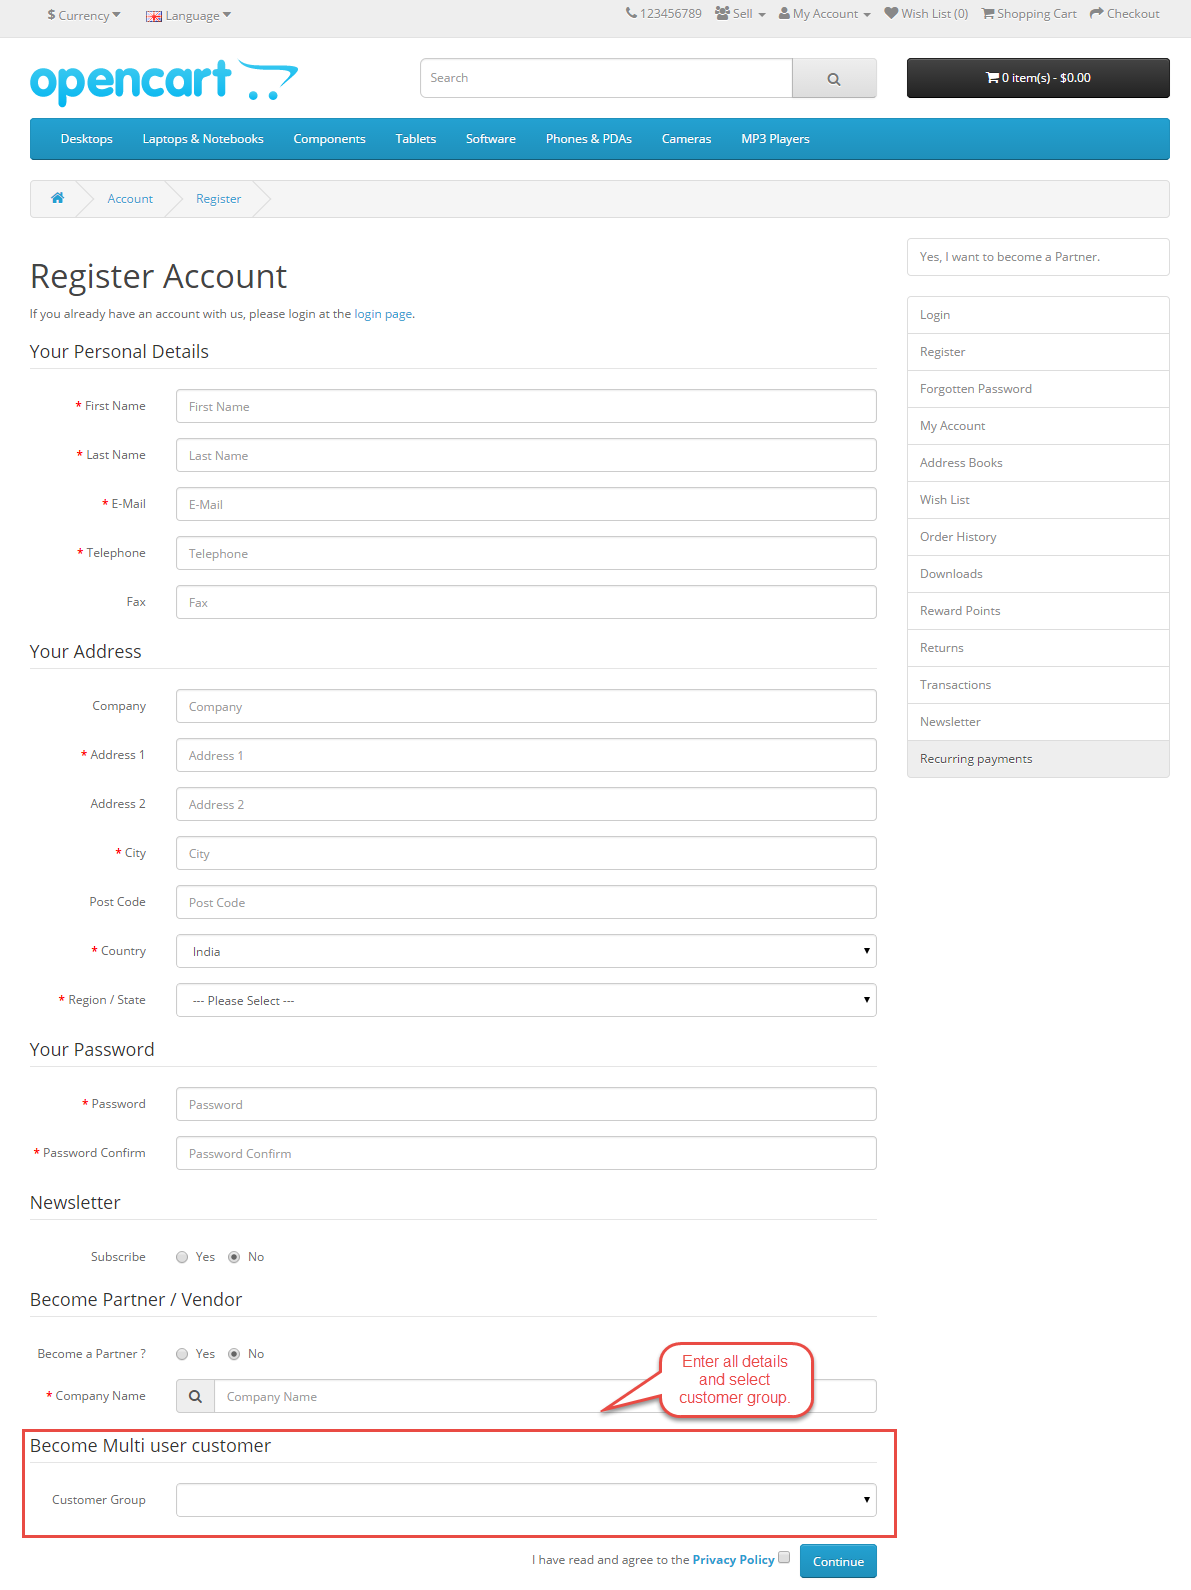
Using this option, Admin can visible Become partner/vendor option for customer at registration page.
Using this option, Admin can show “Become multi-user customer” option for the customer at registration field. Select “Enable” if you want to show customer group option on the registration page. Else select “Disable”.
If “Customer Group Disable Action” is disabled by the admin, then admin can disable the group member.
Using this option admin don’t have to approve partners manually. If Admin will enable this option, customer will become the partner automatically.
If the admin will enable this option, product will be approved automatically and vice versa.
Using this field, mail will send to partners when customer will buy their products.
If the admin will enable this field, the partner can change order status of their products. Otherwise, Partner can add order history with status added by admin.
If the admin will enable this option, Customer can contact the seller.
When the customer will contact to the seller, same mail will be sent to the admin.
If seller will not upload any image then this default image will appear in profile or other places.
Admin can set the Complete order status that will be considered as completion of product and it will be used to the transaction.
Admin can select shipping method for the Seller. If the buyer will purchase their product using these shipping methods then shipping amount will be transferred to seller’s account. It is only applicable when buyer will purchase the products of the single seller.
For Commission
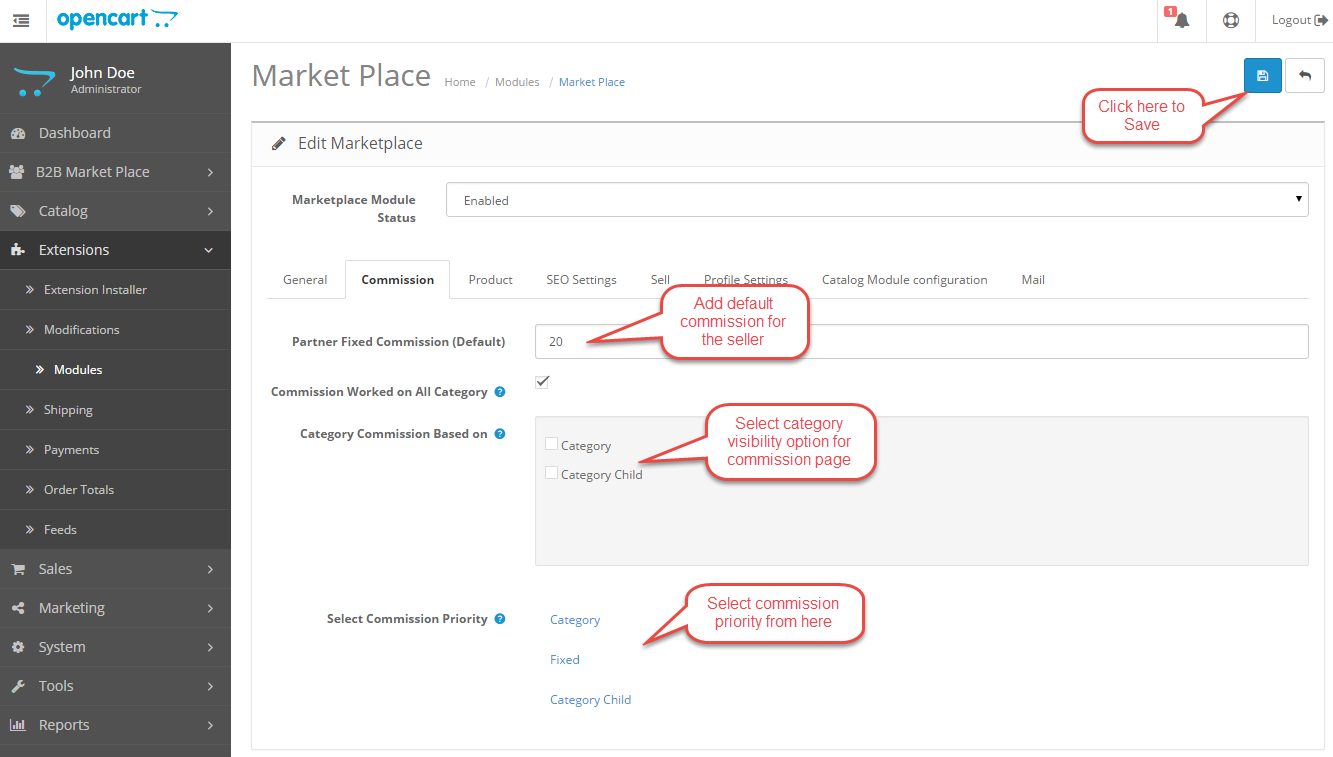
Admin can set fixed + percentage based commission, which will be charged from seller income for admin, according to products in orders and also edit the Category commission. Admin can choose the commission based on categories. If admin will select category wise commission then fixed and percentage commission both will be added to commission.
For Product
Using this field admin can allow product fields, category commission, and product information. Only selected product fields will show on Seller’s profile. Admin can also transfer product to another seller using single selection.

SEO Setting
Using this Option you can manually Add SEF URLs for Site URLs. Select URL link and then type its SEF keyword.

Under this field admin can do product SEF settings. Like what do you want to show with product name, how SEF should be displayed etc.

Admin can select from the drop down which they want to display with the SEF settings. Like seller name, company name, screen name.
Under this field, admin can select from drop down, how SEF should be displayed.
Default name will be used as seller’s info if seller’s info doesn’t exist as per above selection (seller’s details, display format).
Product name will be used if SEO keyword is not found for product.
From this field, admin can add extension with SEO URL. Don’t use .tpl extension.
For Sell
Admin can manage the Sell page and display information to the customer in the form of tabs. If the admin can enable Seller’s list and product list, on that case Seller and product list will be visible in Sell page.

For Profile Settings
Admin can manage the Seller Profile Details using this field.

Catalog Module Configuration
Admin can configure the catalog setting under this field. Like admin can select the options which they want to show at front end Account Menu and toggle the Account Menu sequence.


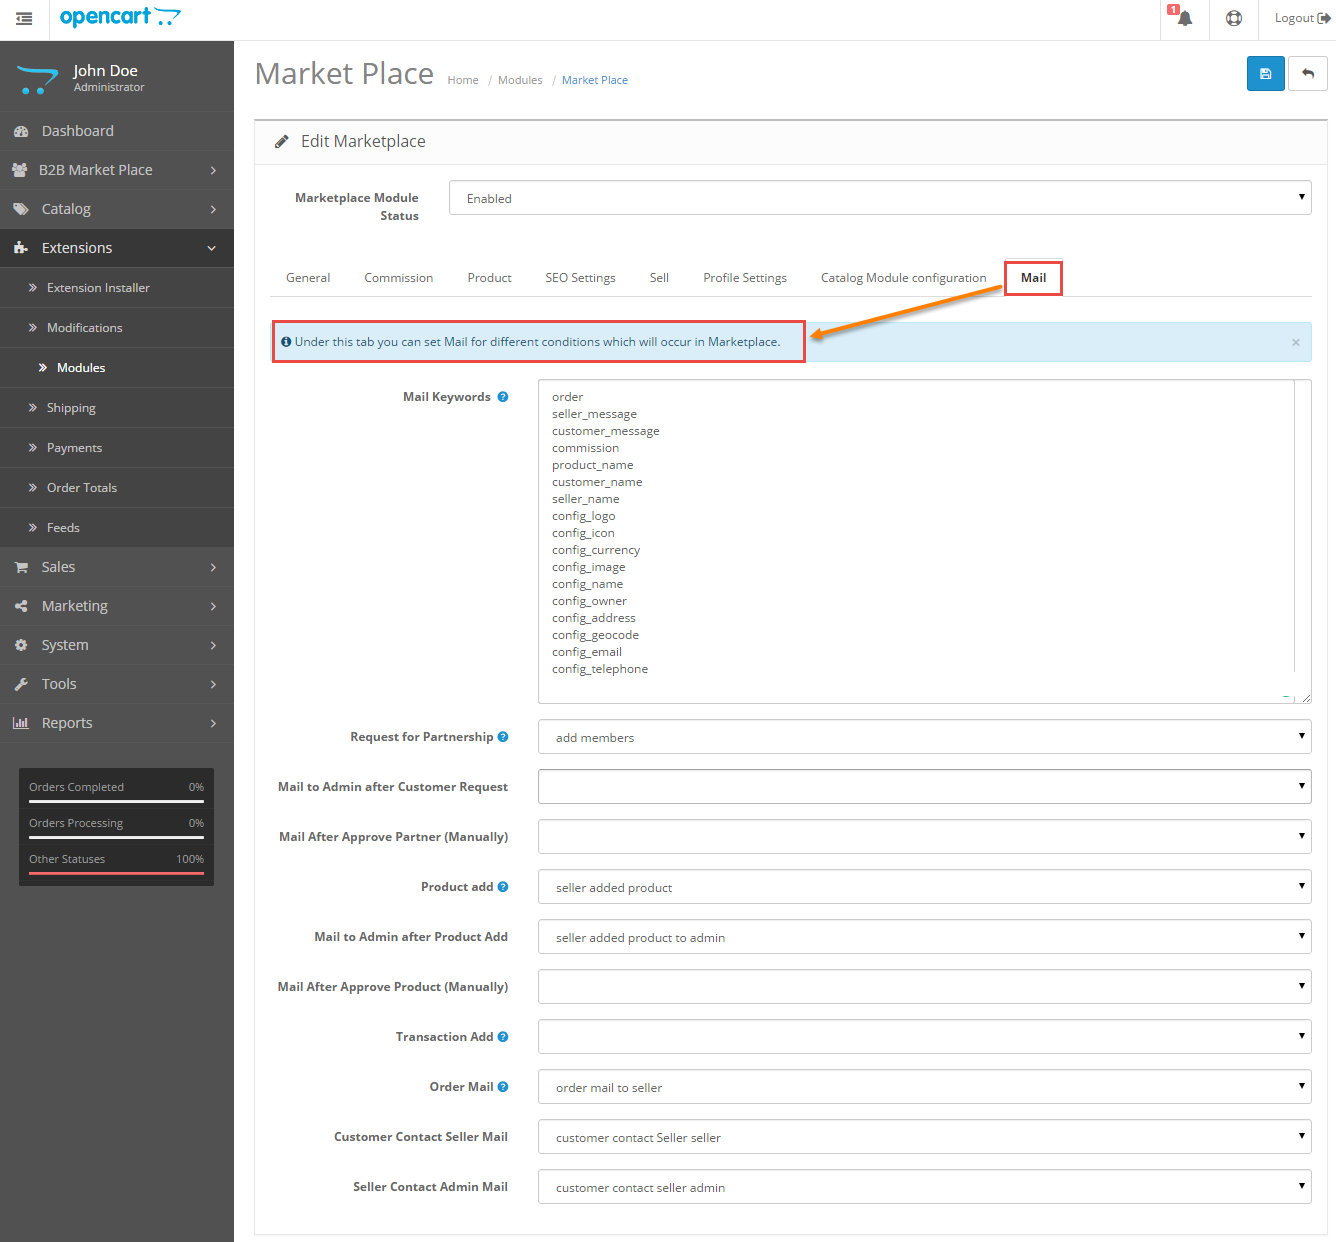
For Mail
Admin can set mail for the different condition which will occur in Marketplace and also create mail template using mail keywords. Admin have to add relevant mail keywords in creating mail messages.This mail keyword is more useful when customer will use marketplace addons. The customer can create template based mail by creating mail keywords from here.
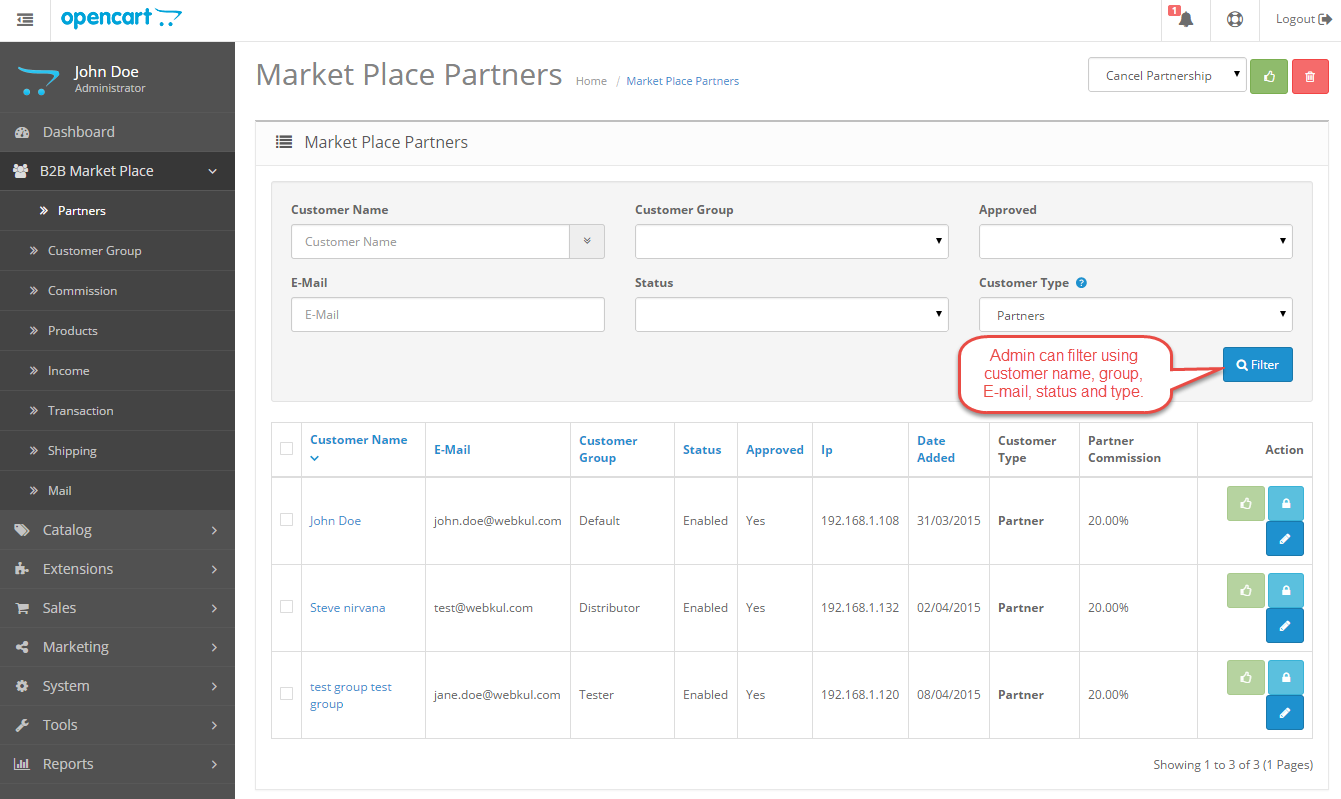
Marketplace Partners
Admin can manage all the partners/customers like approve and disapprove them. Admin can view/edit their profile and also view latest order, payment details, add more products to the seller. Admin can filter the Seller using Customer name, Email-id, Group, status and customer type.
Using Dashboard admin can track seller’s income, total order, total buyers, and latest order.

Customer Group
Opencart B2B Marketplace module allows the admin to create customer groups. These customer groups can create sub customer groups. This B2B marketplace module is right dependent. That means Group user will able to do things based on their rights. Child group doesn’t have more than parent group right. Let’s understand it using below flow chart.

In the above flow chart, the admin has created two customer groups named as “Supplier” and “Distributor”. These customer groups (Supplier, Distributor) have two sub customer group which is named as “Sub supplier” and “Sub distributer”. All customer groups and sub customer groups are connected to the admin. Here Supplier and Distributor are parent group and Sub Supplier and Sub Distributors are their child. So Sub Supplier doesn’t contain rights more than Supplier. Maximum rights of child group are equal to the total rights of the parent group.
Using Marketplace Customer Group, admin can create new Customer group and also edit existing groups. By clicking on Customer Group tab, admin can find customer group list with their right.

After clicking on Add new tab, below page will open. From here admin can create new group.
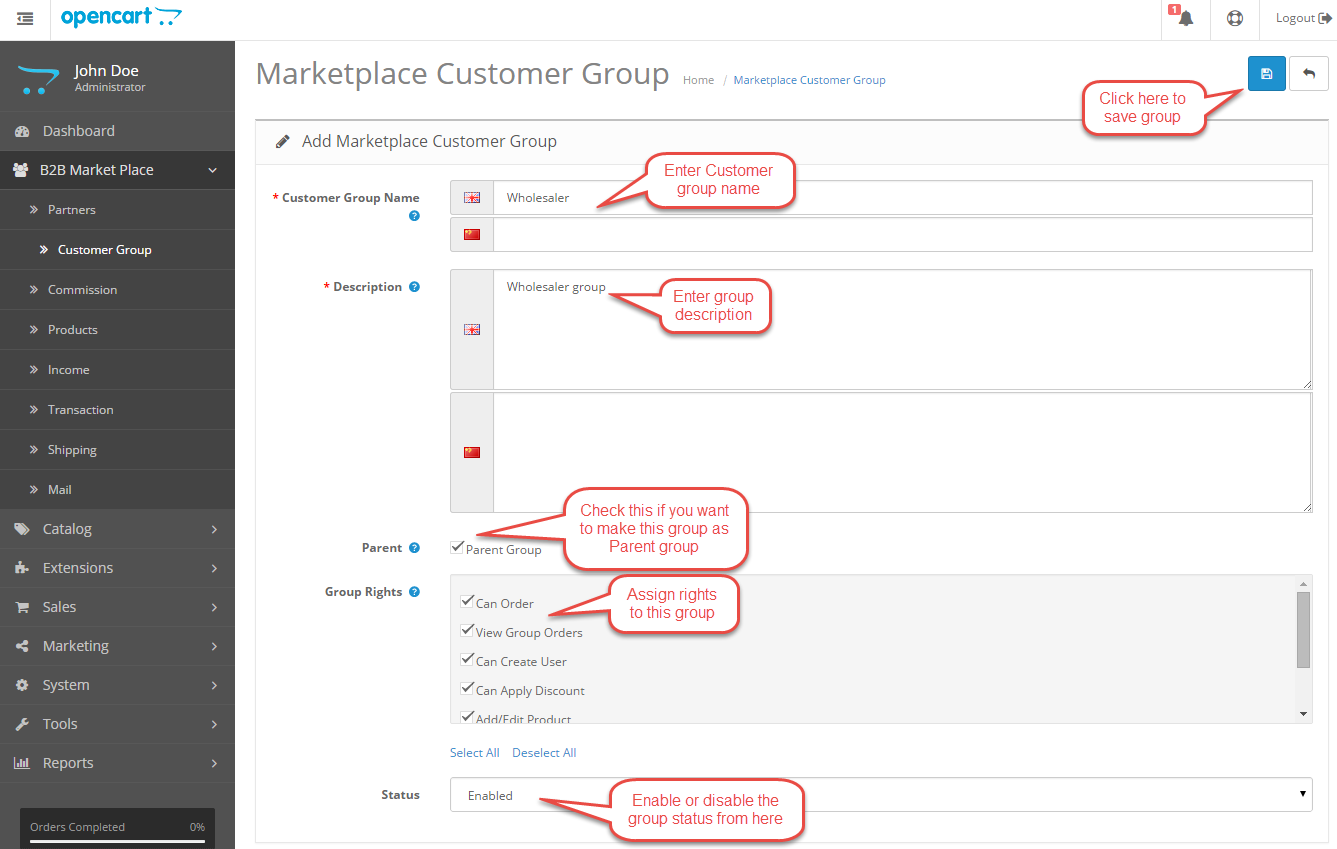
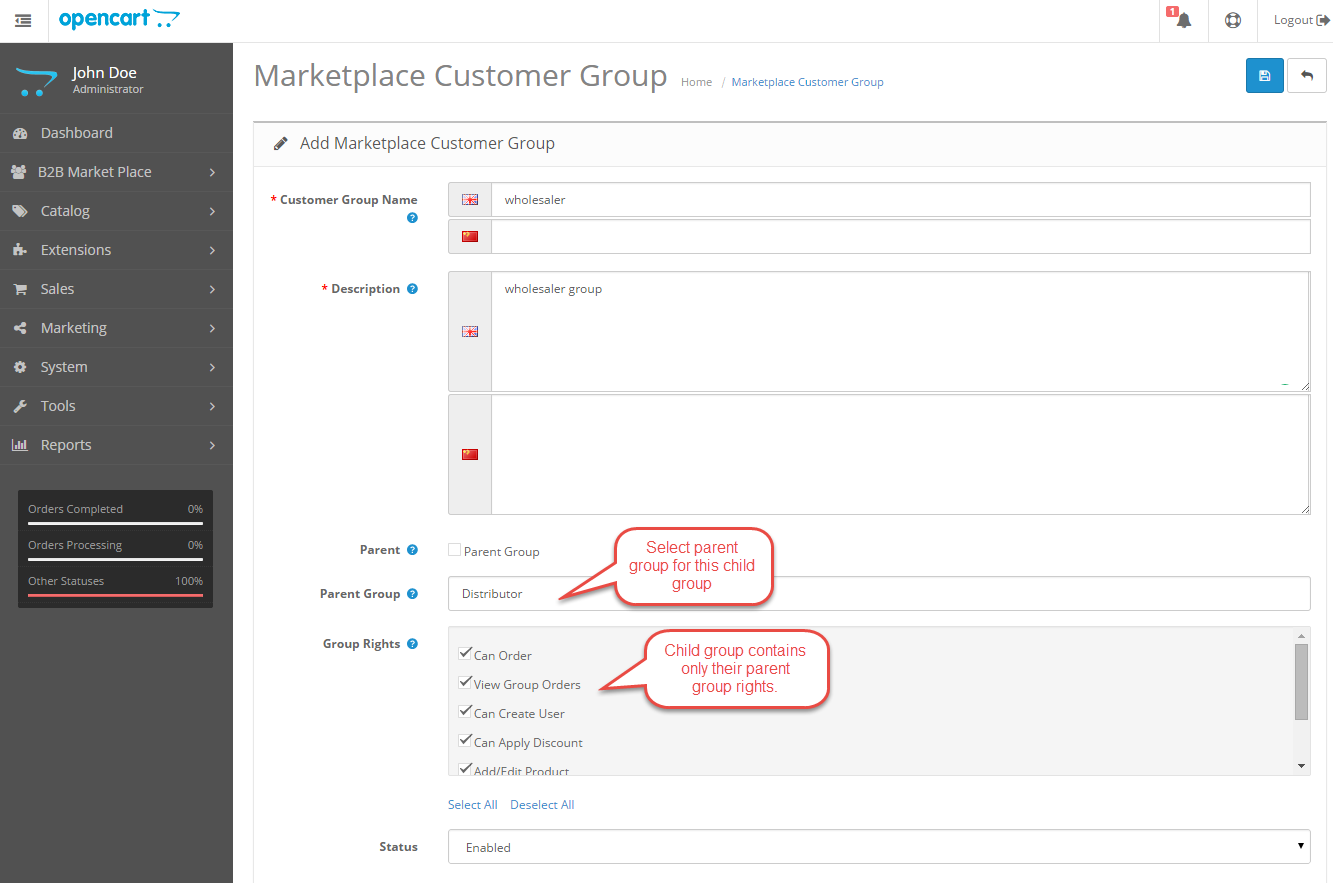
Parent- With check this option, admin can create parent group. If this option is not checked then a text box will open where the admin has to select parent group. Child group doesn’t have more rights than the parent group. Child group contains only their parent group rights. Refer to the below screenshot for the same.
Group Rights
Can Order- Using this right customer group member can do order for any product.
View Group Order- With the help of this right, group member will able to see all group orders.
Can Create User- Using this right, group member can create users.
Can Apply Discount- Using this right, seller can apply discount on their products.
Add/Edit Products- With the help of this right, group member can add/edit the products.
Product List Access- By checking this right, group member can access the product list.
Profile Access-Using this right, user can access the profile.
Status
If “Customer Group Disable Action” is disabled by the admin, then admin can disable the group member.
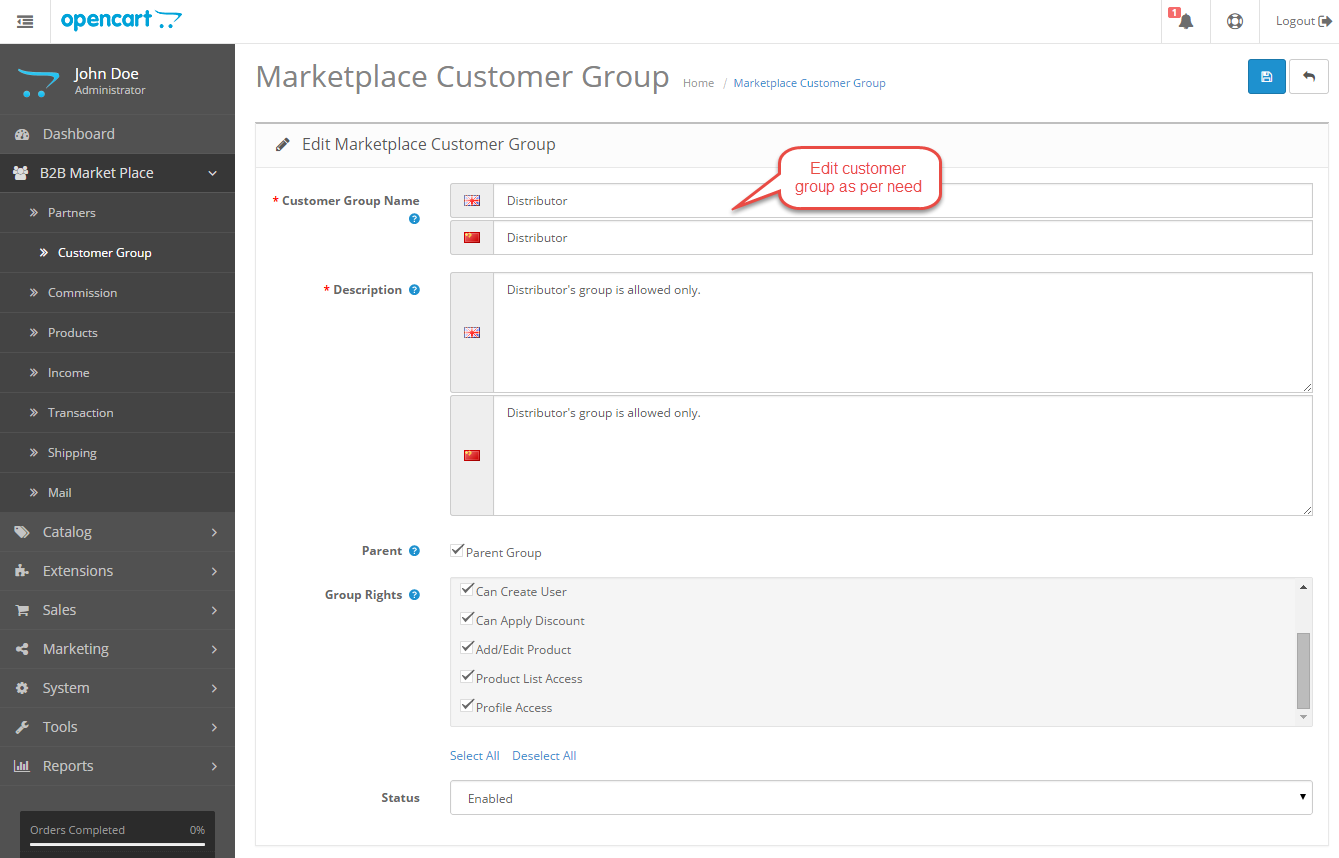
Admin can also edit the existing customer groups.
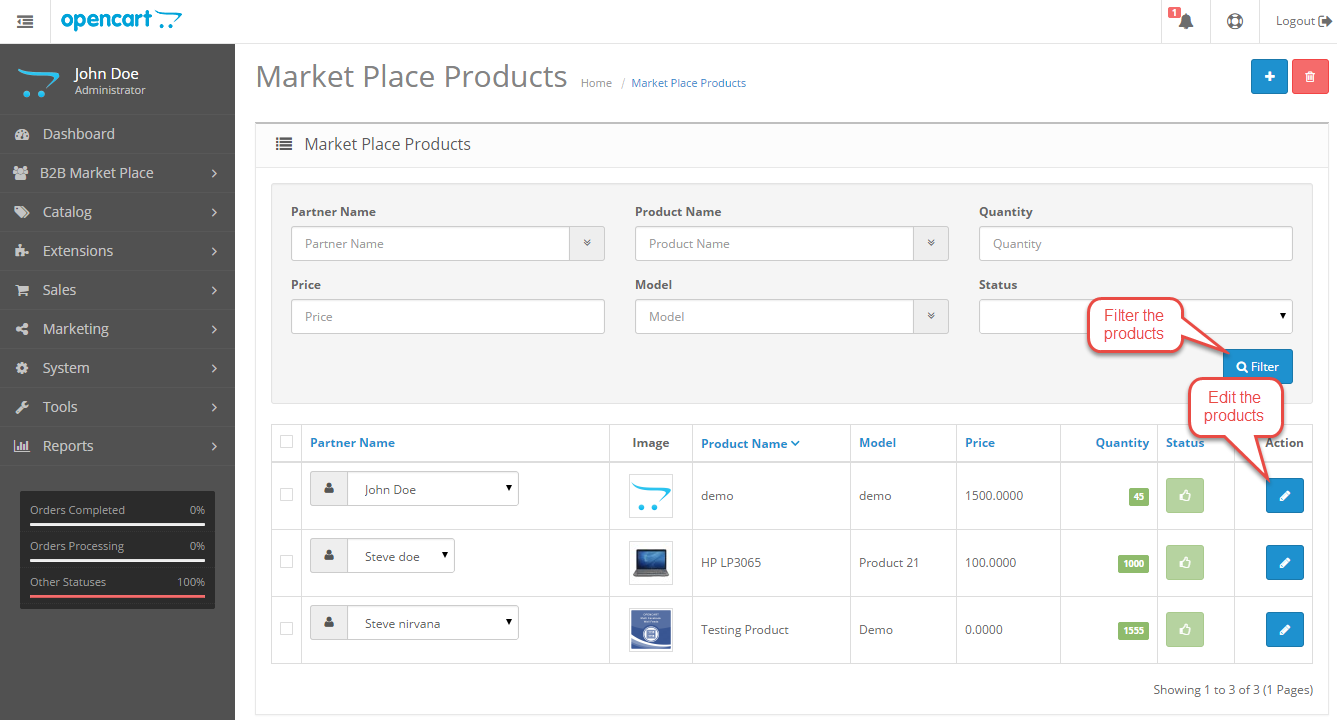
Marketplace Products
Admin can manage or edit the Seller’s product and also filter the product using partner name, product name, quantity, price and many more.
Marketplace Income
Admin can find seller’s income under Marketplace Income and also pay to the Seller. Here Admin can see total sale by each seller, commission, admin amount, remaining amount to pay and the grand total of each amount. There is filter option by which admin can filter the income details.
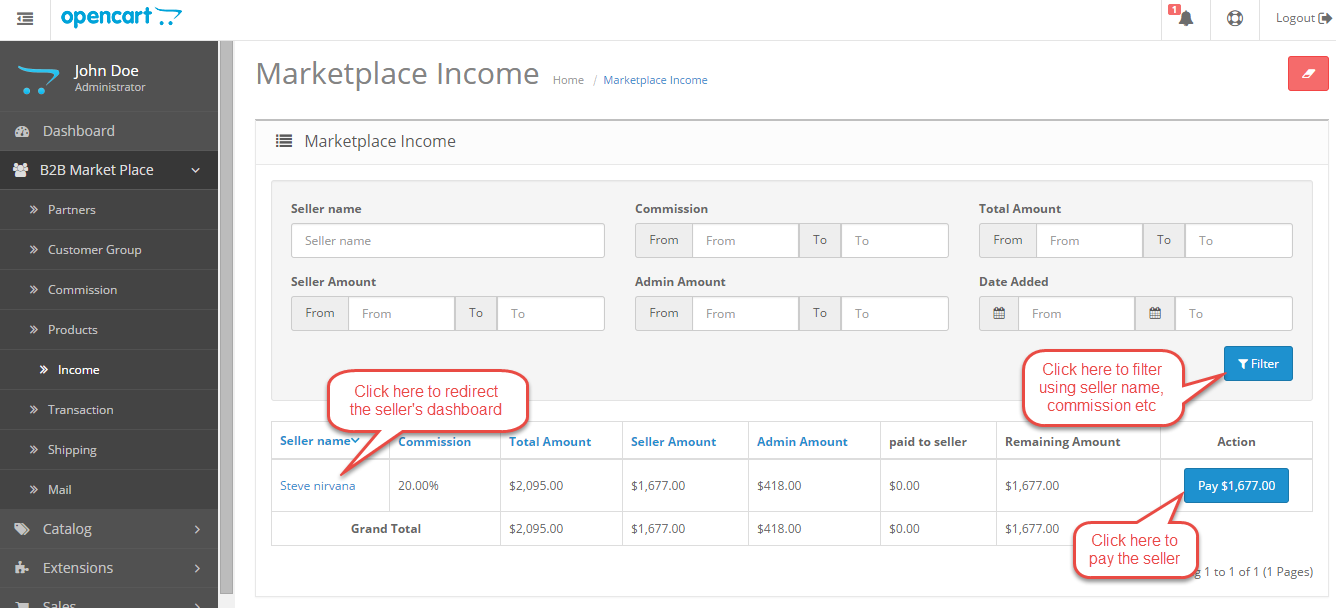
After click on Pay button below page will open. Admin can add transactions for Partners to maintain records. The Payable amount can be vary according to selected Order status and transaction status.

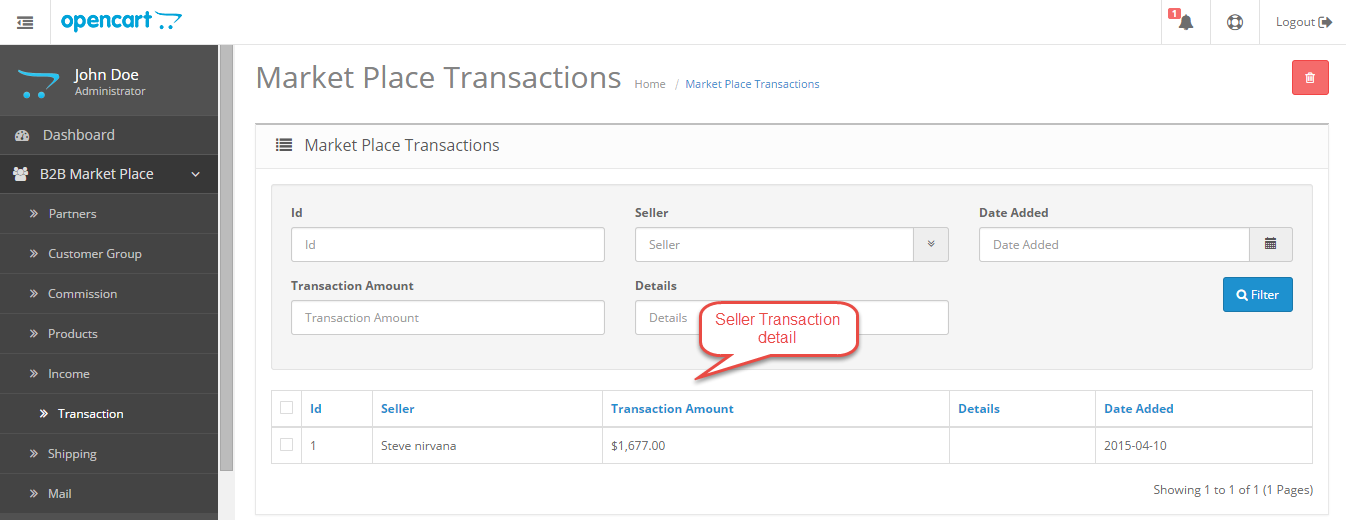
Admin can find Transaction of every seller to maintain the records under Marketplace > Transaction.
Marketplace Shipping
Admin can view the Seller’s Shipping information and also filter the shipping details using the customer name, shipping country, weight and many more.

B2B Marketplace Customer/Seller Login
To Become Multi User customer is very easy. If Customer Group at Registration Page is enabled from admin side then you can become multi user customer by selecting customer group from drop down.
Marketplace Seller Panel Management
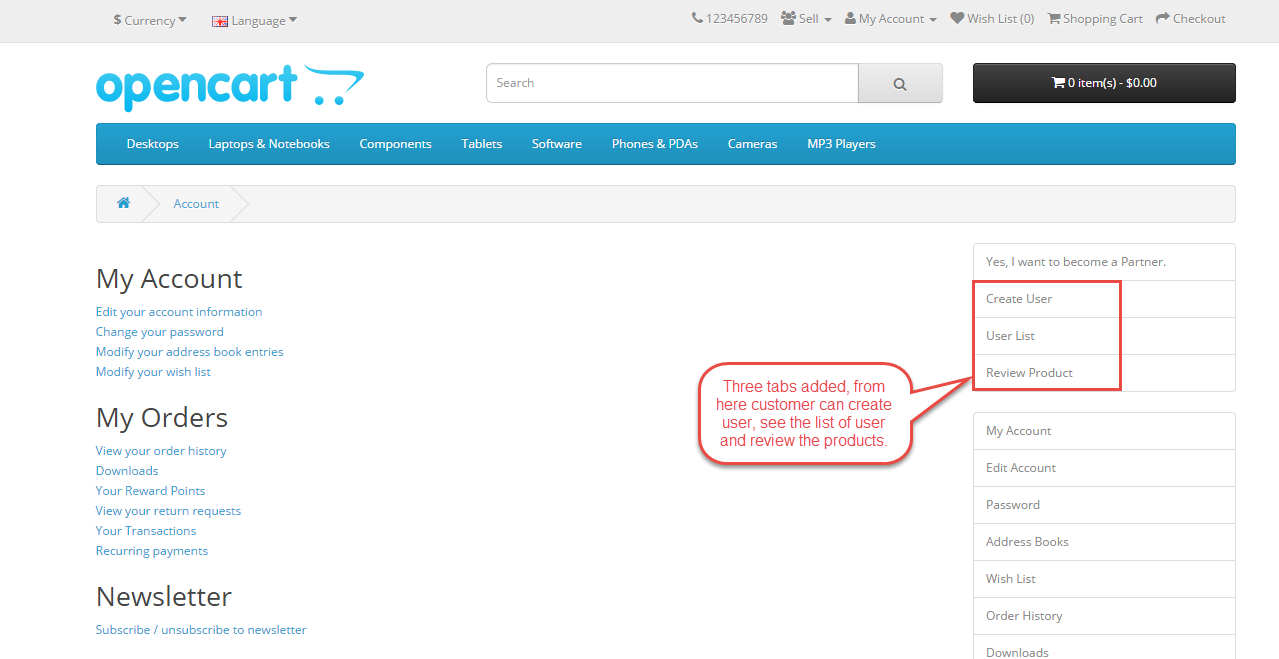
If the user has been approved as a seller then the marketplace block will display in the account section of the user as per the images. The seller can create Users and see the list of users if they have “Create User” rights.
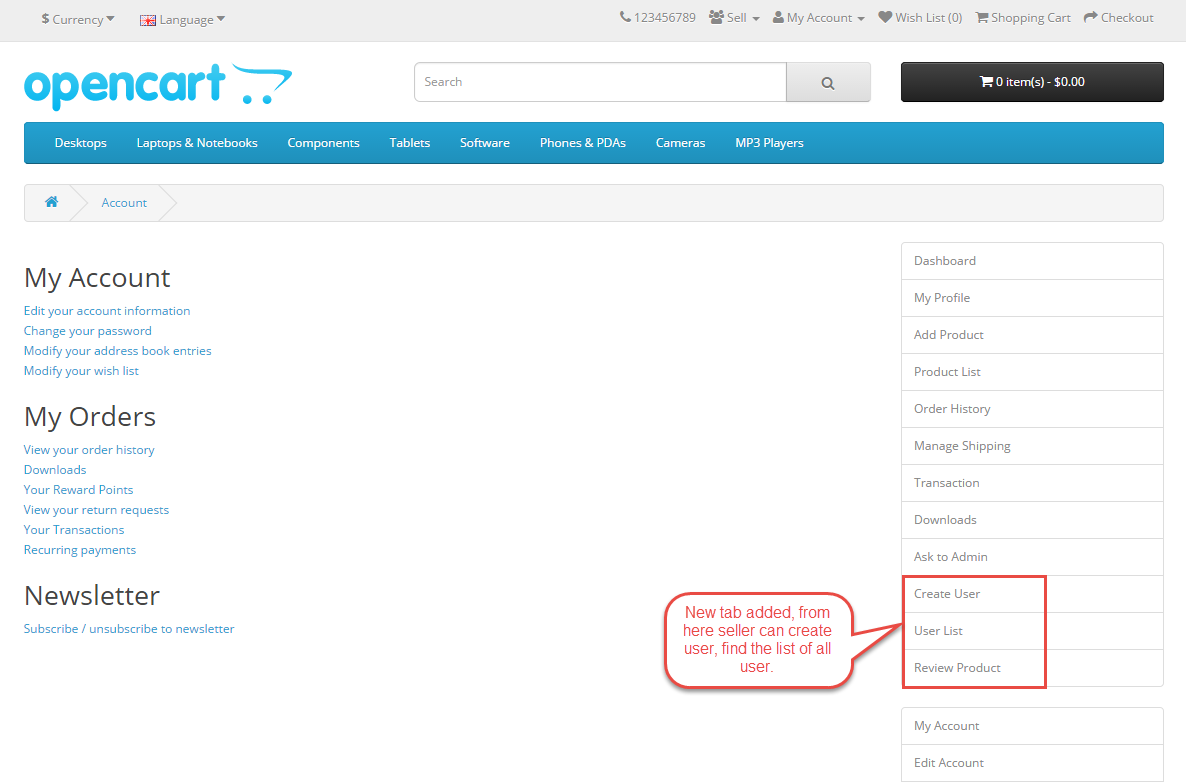
The normal customer can also find three new fields in B2B Marketplace if they have “create user” rights. With these fields, the customer can create new user, can see the user list and if the customer has no rights to order the product, then they will send the product for review and group admin will approve that product after that sub-user can buy that particular product. Create user, User list, and Review product tab will appear only if the customer has “Create User” right.
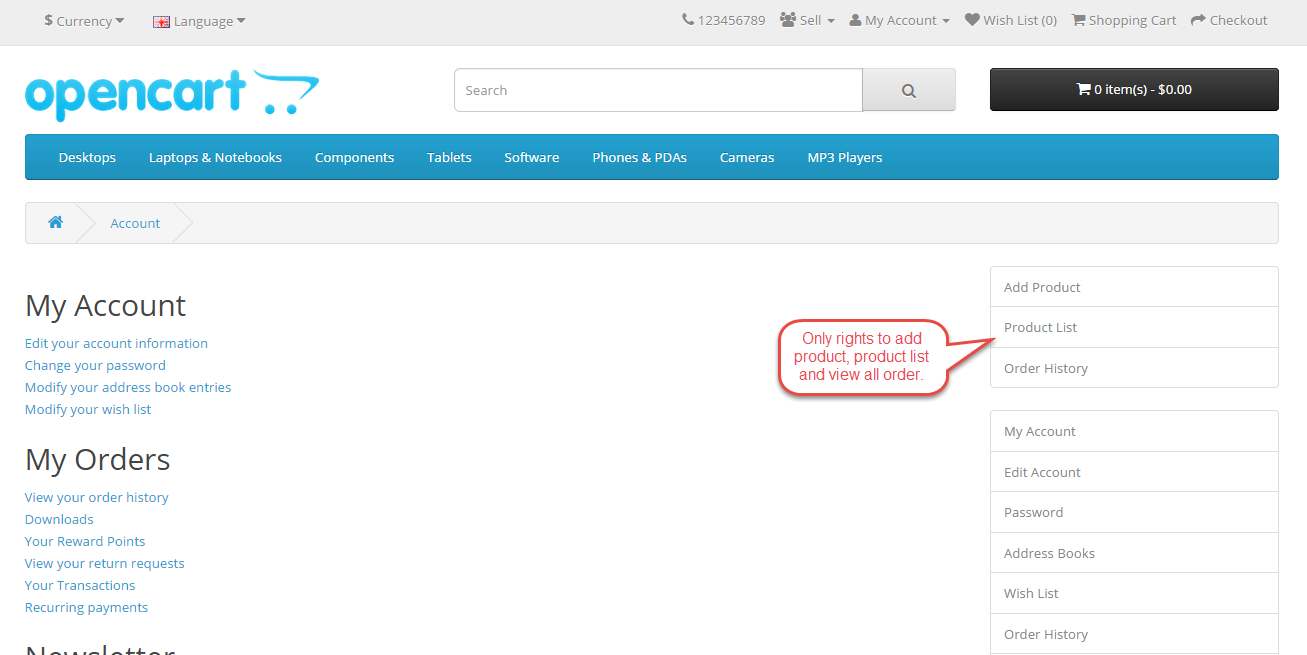
If any customer or seller has only rights to addproduct, product list and view all order, then he/she can find only Add Product, Product List and Order History tab in account section. Refer to below screenshot.
Customer groups and sub customer groups will able to do work based on their rights.

From above flow chart, you can understand that admin can assign rights to their customer groups (supplier). These suppliers can create sub customer groups (sub supplier). Child group(sub supplier) doesn’t have more than parent group(supplier) right. If customer groups or sub customer has right to add the product, only then they can add the product. Else they will unable to add products.
Marketplace Profile View
After entering all details into account registration field, Profile looks like this.

Payment Mode under payment details seller can add their bank account or PayPal id.

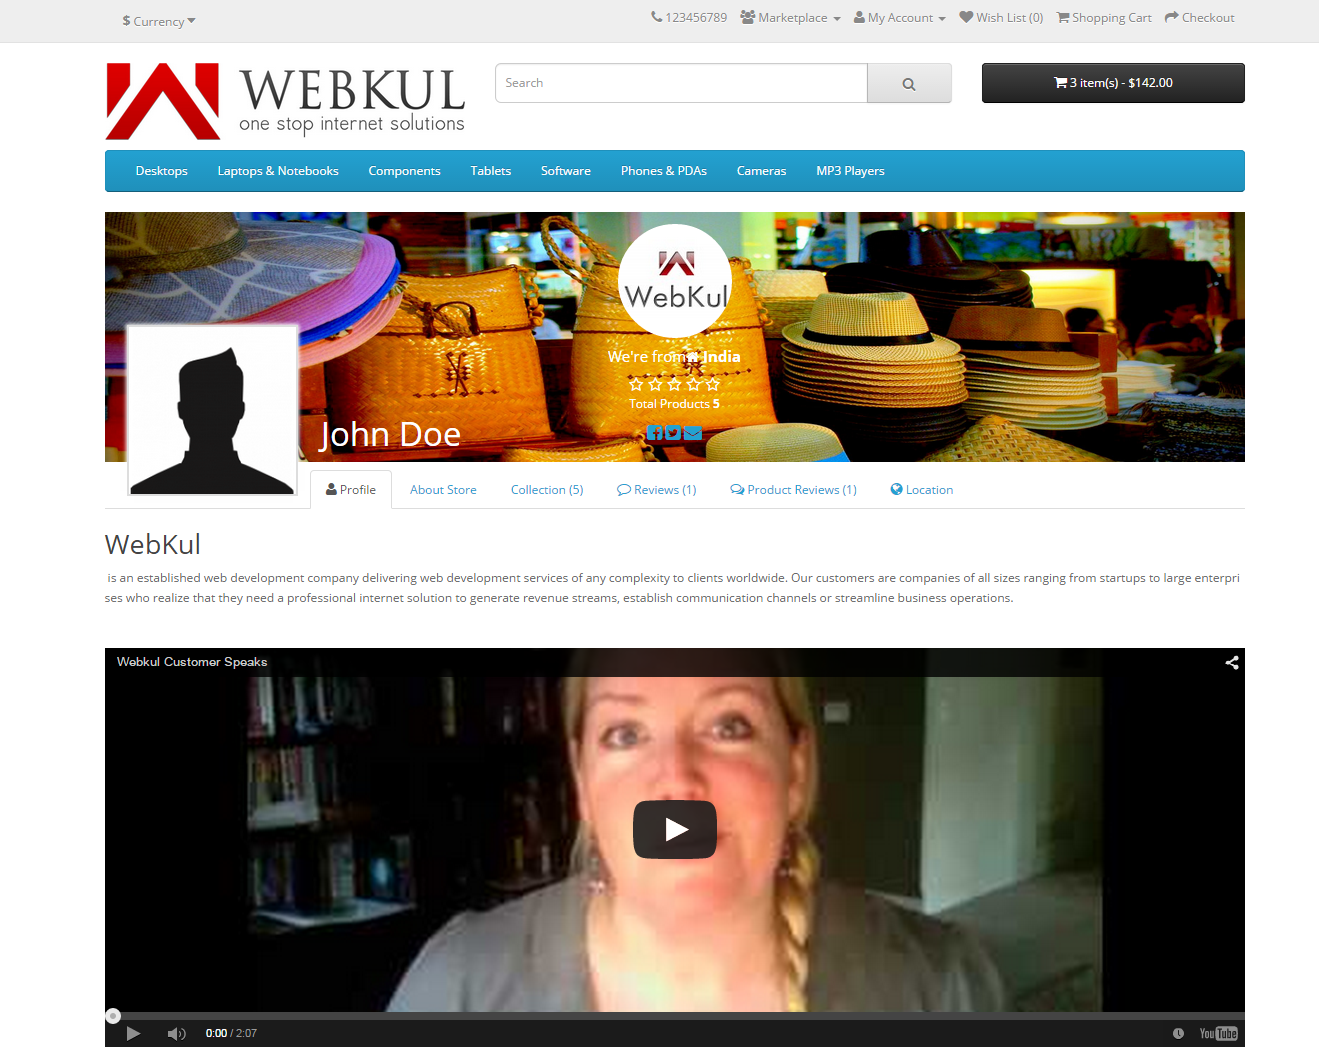
After entering all the information you will get an amazing page for your shop as below.
My Dashboard
Using seller dashboard seller can track his Total Orders, Sales, Buyers, world map with total sales matrix. Seller can also track latest orders.

Add Product
The Seller can add the products with all details enable by admin.

Product List
Using this menu seller can manage their product like they can add, edit, delete their products, and also track their products information as per the screenshot.

The Seller can view Order Details of the Product by clicking sold quantity. The seller can also find the Transaction Status.

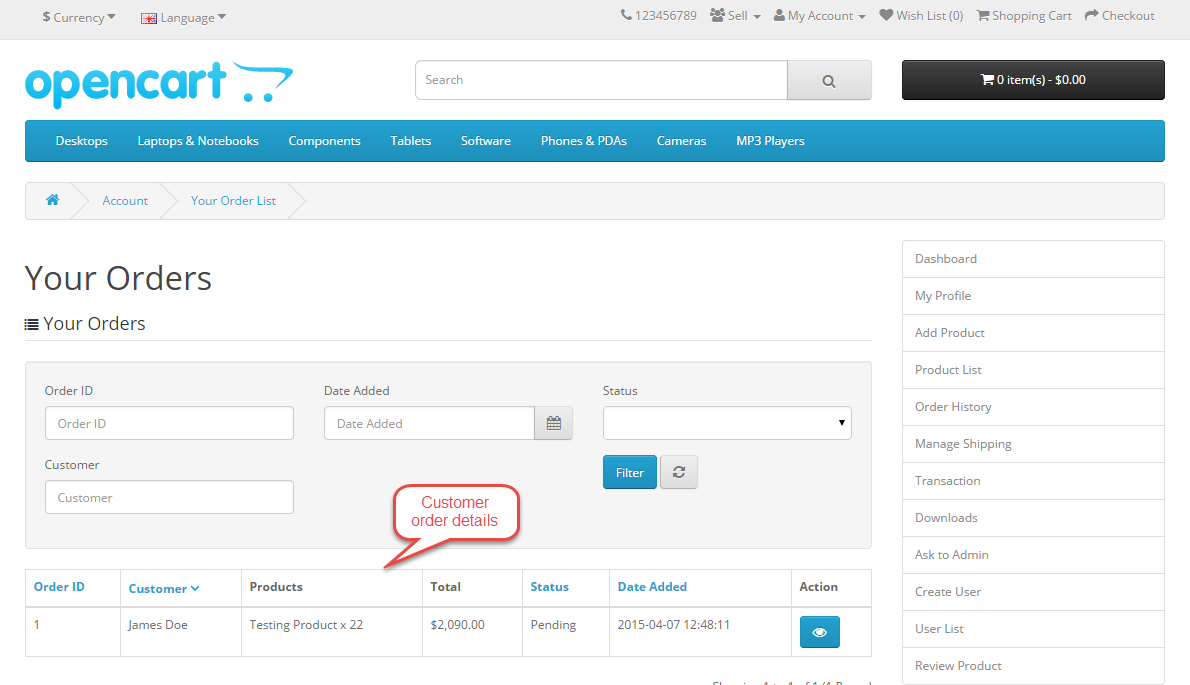
Order History
Using this link seller can see their products order history. There is also a filter option by which seller can view order history of individual customer.
After click on action field the whole Order information will appear. Buyer can also add comments to this order and to the admin and also print Seller order invoice. With transaction status, buyer will know whether the seller has been paid by the admin or not.

After click on Print Invoice below page will be open.

Manage Shipping
Seller can insert and update shipping data using this module just add CSV file with updated Price and can also add the flat rate for Shipping for your buyers. These shipping details will use at the time of Marketplace Custom Shipping Method.

Transaction
Seller can see their transaction by this field.
![]()
Downloads
Seller can add their Downloadable items using this field. Downloadable products can be Delete and edit using Marketplace Downloads.

After click on Insert option below page will be open. From here Seller can upload downloadable item.

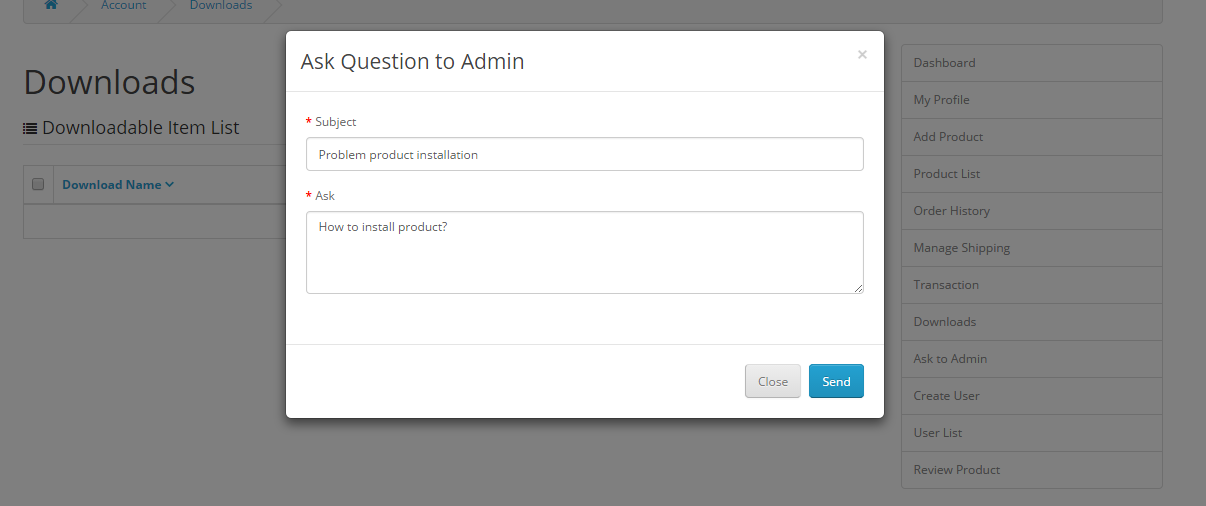
Ask To Admin
Seller can ask any question or doubt to admin like this way.
Create User
The seller or normal customer can create the user by simply selecting the customer group from the drop down in Registration form.

User List
Under User List section, seller or customer can see the list of Group User if they have “Create User right”. There is also an option for insert new user, edit the existing user and disable the user from the particular group. Child group has only their parent group rights.

Sub customer groups will able to do work based on their rights. If Sub customer has right to add the product, only then they can add the product. Else they will unable to add products. In below screenshot sub user has right to view all order, add product, product list so this sub user can not create an user, access the profile. The group admin of this sub user is not a seller, so this sub user will unable to add products and can not see the product list. B2B marketplace is right dependent.

If any group member has only the rights of “productlist” so they will unable to add or edit the product.

Review Product
This field is responsible, If the customer has no rights to order the product, then they will send the product for review and group admin will approve that product after that customer can buy that particular product. If the customer has no rights to create order then at the time of checkout they will redirect to below page.

After placing a review, customer can see the order review list in Review Product tab.
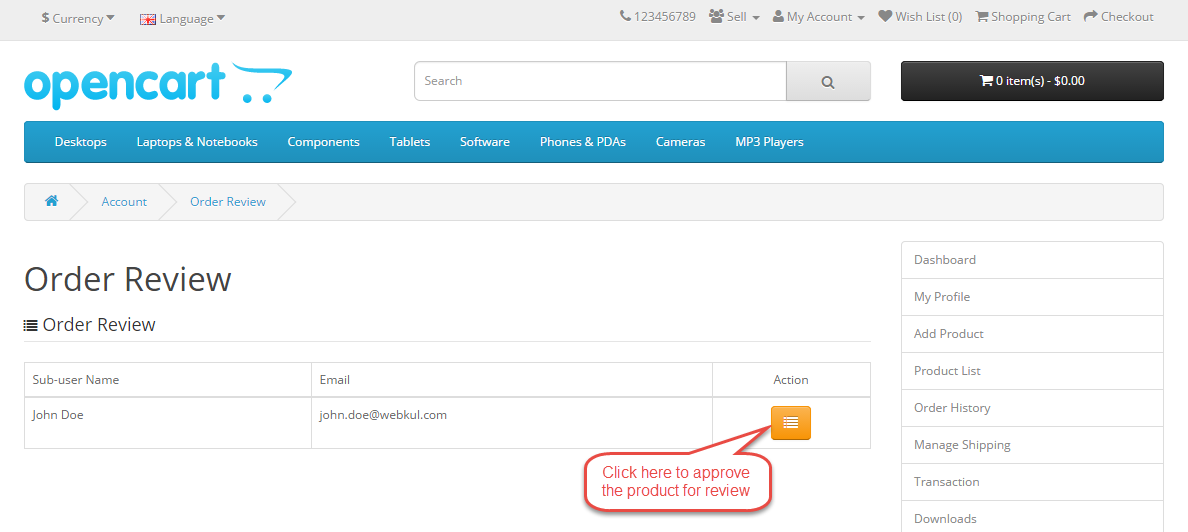
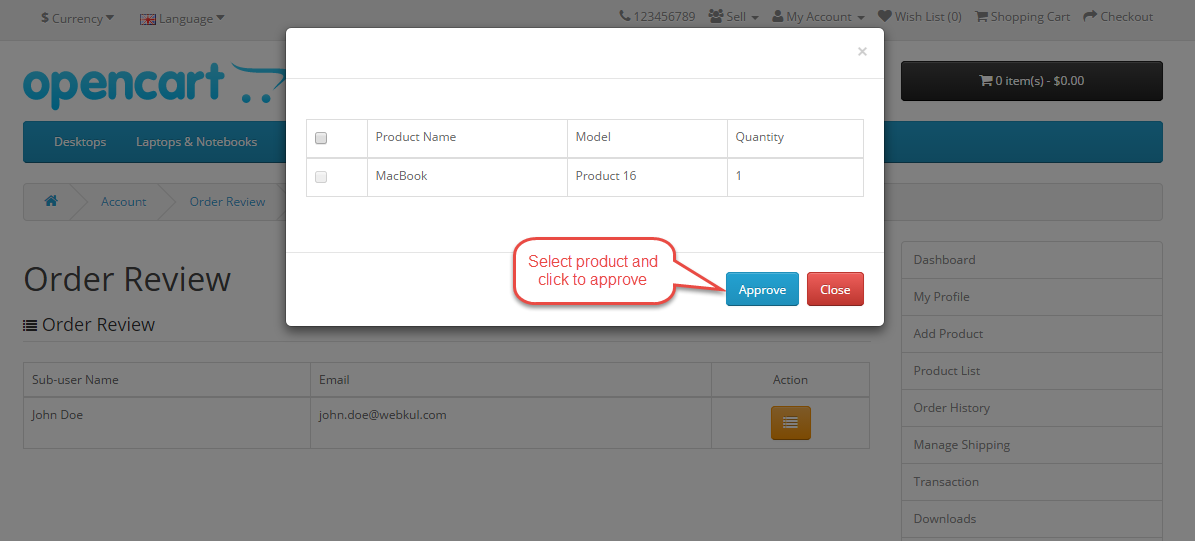
After click on “Action”, a pop up window will open. From here the user can select the product for approve.
This B2B Marketplace module is right dependent. That means Group user will able to do things based on their rights.
For any query or doubt Please add a ticket at http://webkul.com/ticket/index.php