Magento Multi Vendor DropShipping – Best described as process that optimize all shipping functions. Magento Multi Vendor DropShipping Module is useful to increase efficiency of the store and having the right products in stock for customers, properly identified and available to ship quickly to customers. In Magento Dropship Management Module, all the Warehouses are managed by admin. Admin can add/edit or delete warehouse if needed.And Buyer can select shipping method according to Warehouse. and this module also provide feature for add product by multiple vendors in your store. These vendors first register on your website then after approval they and add products on your site and identify that which product belong to which warehouse which you added in your store.


Features:
1: All browser compatible(IE7+,FF,Chrome etc).
2: Works very fine in all magento versions .
3: Easy to manage Warehouse.
4: Increase store Efficiency.
5: Easy to Ship product from various warehouses.
6: Order shipping is easy using this module.
7: Works in all custom magento template.
8: Admin can add/edit/delete warehouse.
9: Admin can change status of warehouse enable/disable.
10.Buyer can select shipping method according to Warehouse in same order.
11:Shipping will be calculated according to the warehouse.
12:Multiple Vendors Can add his product on your Store.
13:Vendors Can also define which product belong from which Warehouse.
Installation – Installation of the module is super easy you need to move the app in to Magento root directory 
After moving both the folder flush the cache from Magento admin module . Under system > cache management

After those primary step you just need to configure the module. How to use Magento Multi Vendor DropShipping - Magento Multi Vendor DropShipping module usage is easy after the installation of the module. you will be able to see the configuration panel under system > configuration as per the below screen .

this above configuration is related to vendors
after set configuration you need to make Warehouse on your store as following
Magento Multi Vendor DropShipping – after the successful setup of the Magento Multi Vendor DropShipping module admin will able to see new admin menu “Multi Vendor DropShipping” as per the below screen

As you can see there are seven menus under Multi Vendor DropShipping , i am going to explain you every menu one by one
Manage Warehouse - This menu is responsible for Warehouse management. From here admin can add/edit warehouse in his store as per the screenshot .


Manage Products - This menu is responsible for Vendor product management if from Multi Vendor DropShipping configuration panel (system > configuration > Multi Vendor DropShipping) product approval is required then in this case every product added by seller need to be approved by admin .Product approval will happen from manage product menu as per the screenshot

as you can see there is a prev button which will show the preview screen for product added by seller as per the image
 now we are heading to the next menu manage partners
Manage Vendor - This menu is responsible for seller management if from marketplace configuration panel (system > configuration >Multi Vendor DropShippingl) vendor approval is required then in this case every seller need to be approved by admin .as per the image

there is a action drop down menu by where admin can make pending customer to seller and visa versa
also as you can see a column order when admin will click here it will display all the order of the that particular seller as per the screen

also under view admin can view the complete order of that seller

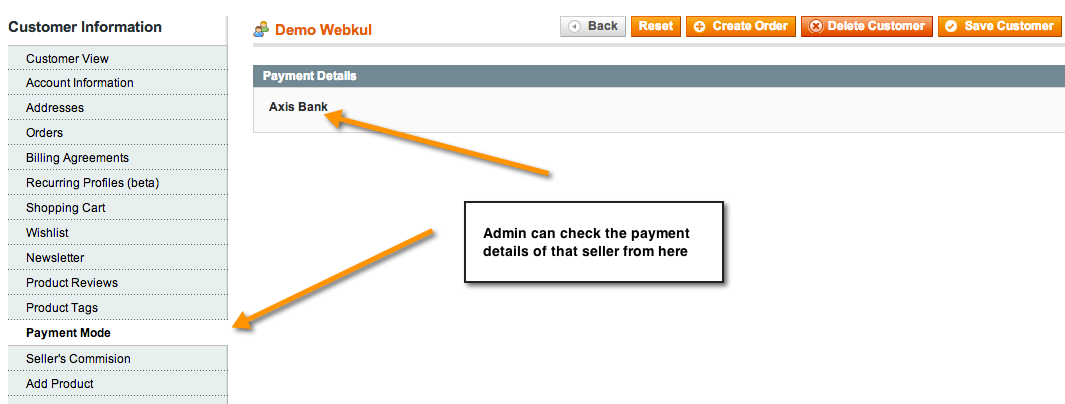
also mode of payment here is the payment details added by seller from my account > seller information . It can be anything lets sat bank account number or paypal id where seller need payment from admin . Now we are heading to the third menu
manage commission - Manage commission menu is responsible for all the commission management despite of global commission there is an individual seller commission by which admin can set different different commission for different different sellers .

under this screen there are some terms need to explain so i am going to explain them one by one .
Pay action - Pay action in grid will clear the payment for that particular seller lets say Seller S1 have a remaining amount 100 USD then after the pay button has been clicked thats mean seller have already send the payment now he / she is going to clear it (no actual payment with any payment gateway will happen here this link is for calculation only)
under drop down the action is same as per grid but it can be applied for multiple seller .
Commission This column is for per seller commission display .
all these information can be seen under customer > manage customer

as admin can all the sales matrix here and can set the per product commission % . Now we are going to explain every tab one by one
Payment mode - payment mode is payment detail entered by seller during account creation under my product > seller information , this payment details will be used by admin to pay the sellers .
Add Product - this tab is very useful when admin need to assign any product to any particular seller , admin can set the product id of the product in to seller account .

Want to remove Partner - using this tab admin can make that seller to a normal customer

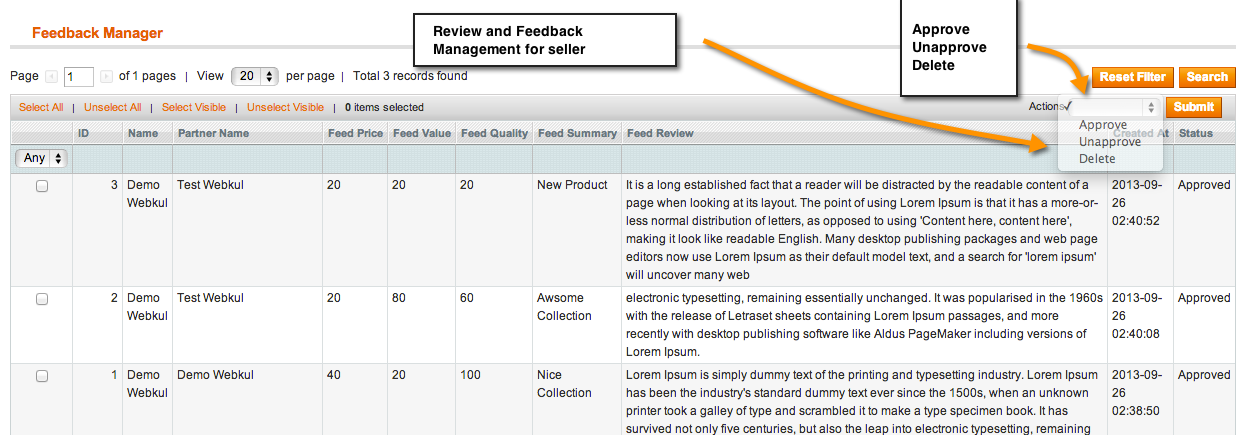
feedback management - This menu is responsible for all the feedback and review management for that seller which will be added by customers , admin can
- Approve
- Unapprove
- Delete
those feedbacks .
=>. Set warehouse for shipping for individual products like(for Admin panel):

Vendor Management

now you can compare both the screen and can understand , this is beautiful landing page for your marketplace module . Here list of sellers and latest added product by seller will display with shop create button and introduction text .
Vendor Dropshipping vendor sign-up - Seller signup is pretty easy , user can signup for seller using marketplace landing page button or from store my account link and during signup they need to choose “Want To Become Partner”
if they want to signup as a seller then they need to choose YES else NO . if they choose YES then they need to put their shop URL which will be unique as per the screenshot
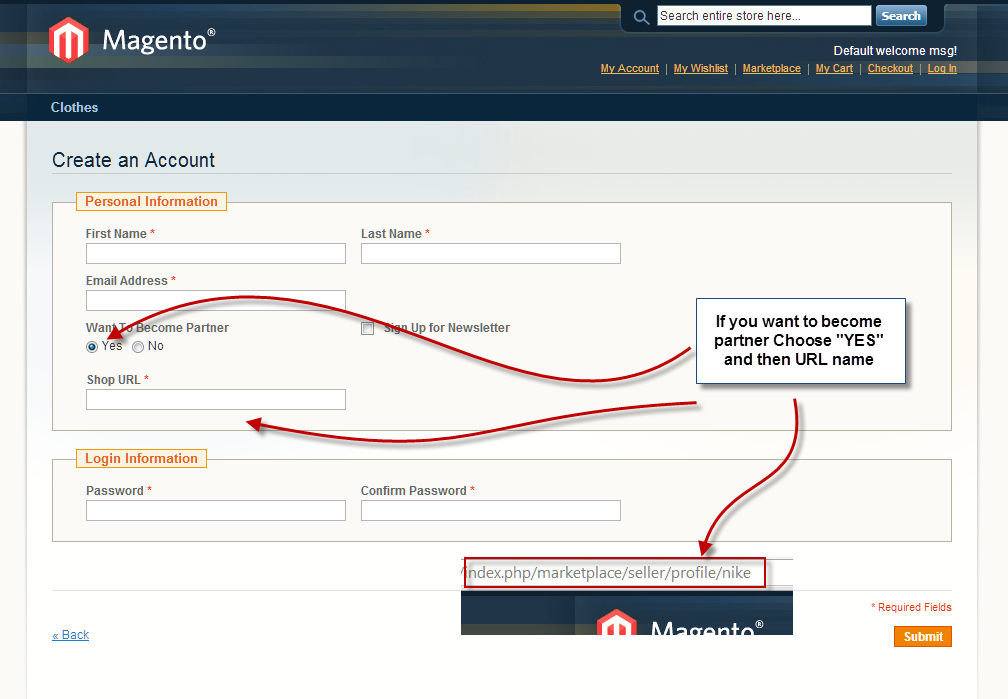
as in above screen you can see the url name is nike . This shop url input field is ajax driven by which seller can see that particular URL does exist or not as below screens

as per the above screen that URL does exist .
 and above url shows that URL does exist so seller need to choose another one .
Vendor Dropshipping Seller Panel Management - if the user has been approved as a seller then the marketplace block will display in my account section of user as per the images

You can see there are five links for base marketplace module to manage seller profile and to add product in store . lets proceed one by one .
Seller Profile - using this menu seller can his shop information like shop name , location about his/her shop banner image , shop logo , shop meta description and meta data and many more parameters , as per the below image screenshot

After inputting all the information you will get a beautiful shop page for your shop as below

and when user will click on see more he will reach to seller’s product collection page where user can filter the product based on the category where seller has assigned the product .

New Products - Under this menu seller can select suitable Attribute Set for any Product Type(simple,downloadable,virtual and configurable) to add his / her product . Seller can input product name , description , short description , price , stock , weight and multiple images . also seller can add custom attributes but to use custom attributes and custom option admin need to have install another addons of this module.
add product screen will look something like that . also proper validation has been applied for seller product add screen with live Ajax check for product SKU


after successful product addition (if in the module admin product moderation is set NO then product will be approved automatically ) seller can edit or delete the added product and can manage by their end using under my product list .
my product list - using this menu seller can manage their product like they can update their product , delete their product can track their product sales and can mange their stock . as per the screenshot

My dashboard - using seller dashboard seller can track his sales using interactive chart , recent orders and recent comments with total sales matrix

also seller can ask questions or doubt to admin directly from my dashboard

Vendor Dropshipping seller order history – using this link seller can see their products order history in one shop . order history comes with pagination as per the screenshot

thats all from seller front end using base marketplace module . more menu will appear in marketplace block as you will install more marketplace plugin.
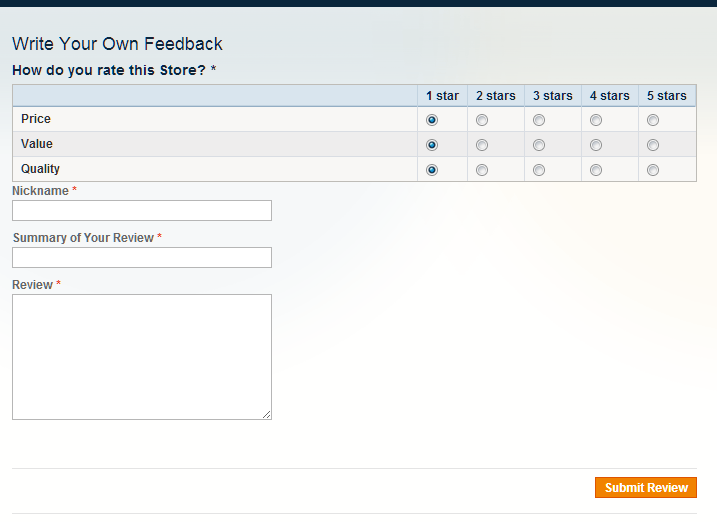
Vendor Dropshipping feedback and rating system - buyer can rate seller under their profile with star rate vote and feedback message , user need to be logged in to cast a review and rating

as above screen you can see feedback link under seller profile
=> Place an order with selecting Warehouse shipping Method.

4. Login Warehouse using details from mail and here can manage account,manage shipping and manage order from Warehouse Manager like:

Under “Shipping Setting”,Seller can upload shipping csv file and uploaded shipping details will be display here.

Here manage order grid contains collection of those product’s order for which this warehouse ship method is set and invoice is created.


Now The product is shipped from Warehouse. That’s all for the base Magento Multi Vendor DropShipping module, still have any issue feel free to add a ticket and let us know your views to make the module better http://webkul.com/ticket/index.php