CS-Cart Multi-Vendor Marketplace: Now convert your existing CS-Cart stores into Multi-seller Marketplace. This imposing Add-on enables the user to convert multiple CS-Cart stores into full fledged marketplace. It is the multi-functional shopping cart solution for building eCommerce web content incorporating multiple independent sellers with separate profile. In a matter of a few easy steps, you will be able to create a sophisticated, full-fledged online marketplace where all your sellers can manage their sales through one common web interface.
Features
- Well supported with CS-Cart Multi-store feature with the functionality to enable marketplace for multiple CS-Cart storefronts.
- Functionality to add as many seller on marketplace as desired.
- Functionality to set global commission for all sellers.
- Functionality to set the minimum pay limit for seller globally.
- Feature of setting different seller commission & Pay limit for individual seller.
- Option to allow sellers to view their customer’s list.
- Option to allow sellers to create shipments for their respective orders.
- If a seller is deleted, so on seller deletion products get disabled or deleted according to the Marketplace settings at the admin end.
- Admin has the power to assign the users as seller and set default status for synced sellers.
- Seller application and seller product application is disciplined/moderated by admin.
- Approval facility when a seller is added or a seller add any product depend on the Marketplace settings at the admin end.
- Option of registration of seller at frontend.
- All the features at seller end are managed via frontend that includes
- Products Management.
- Seller Profile Management.
- Orders Management.
- Dashboard.
- Customer Management.
Products Management :
- Seller can add/edit/delete product in CS-Cart store via frontend.
- Functionality to clone the products.
- Functionality to add multiple images to the product.
- Feature to add downloadable products.
- Functionality to add and manage Product Options.
- Seller has the functionality to suggest new category to be added to admin.
- A “Features” tab is provided in the products to add and manage the product features.
- A tab “Shipping” at product add/edit page for shipping properties is provided.
Profile Management & Features :
- Seller can edit his profile via frontend.
- Seller can add banner, shop logo, custom HTML text for describing the shop.
- The concept of featured product is also provided in seller profile management settings.
- Feedback and review system with interactive star rating makes seller profile attractive.
- Geographical seller location via Google Map is available.
- The buyer has the option to view seller details of every product.
Orders & Payments Management:
- Seller can view the latest five order details and reviews, statistic sales and revenue details of day, week and month on frontend dashboard.
- Functionality to create shipments at seller end for their respective orders according to the settings at admin end.
- Seller can print invoice slip and packaging slip.
- Seller can view the commission details per product in order details via frontend.
- The transaction process from buyer end is done via admin.
- Seller payment is viewed in My Payment tab where seller can view all the transactions from admin end.
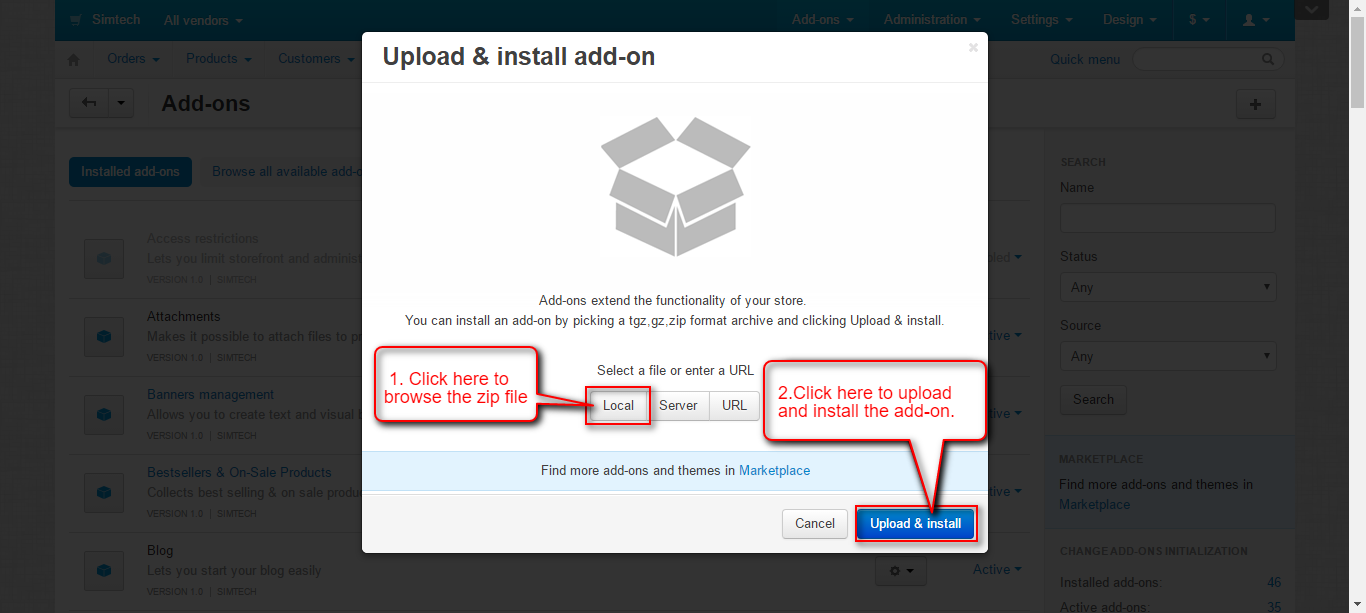
How To Upload and Install Marketplace
Go to “Manage add-ons”, click on “+” to upload and install the zip file as shown below.

Click on “Local” to browse the zip file and then click on “Upload & Install” as shown below in snapshot.
Global Settings
Once the addon is installed, we need to configure it. Click on “Settings” for marketplace settings.
 Marketplace Settings :
For Multi Store Marketplace Global settings applicable to all stores, click on the people icon provided on the right side of the settings. You can make settings for individual store as well by just navigating to that particular store and save the settings accordingly.
- Enable Marketplace for all the stores by clicking the checkbox provided.
- Click the checkbox to allow sellers to view their customer list.
- If you want to allow sellers to create shipments for their their orders then click the checkbox.
- Enter the Google API keys for google map here. A google map view is provided at frontend for every seller profile.
- Set the map zoom level accordingly.

In continuation to the above marketplace settings, if admin wants to provide various map controls at frontend then enable the settings by checking the box provided for :
- Map Zoom Control
- Map Type Control
- Scale Control

Commission :
- Global Commission
Here admin can set the percentage of commission for seller globally. If admin has set global commission 10% for every seller in marketplace, so when a product is purchased admin will be earning 10% of the product cost as commission. For example if a product cost is 100 USD when it is purchased admin will earn 10 USD as his commission. - Seller Pay Limit
Here admin can set how much amount will be paid to seller in each transaction. The transaction of seller is from admin end after purchasing of product.

Configuration :
Global configuration settings includes :
- Seller Product Status : If a seller is deleted, so on seller deletion products get disabled or deleted as per the product status selected here.
- Synchronize Seller Status : If the store customers are synchronised with sellers, the seller status of that newly synced seller will be Disable or Enable as per the status selected here.
- Seller Approval : If approval is required at admin end on new seller registration then select Enable.
- Product Approval : If approval is required at admin end on new product addition then select Enable.

Social Configuration :
Store Admin has been provided with the option that he can enable or disable the social media icons for his marketplace. By default Marketplace will be providing Facebook, Twitter, Google+ and LinkedIn icons.

Backened View
Marketplace Tabs :
View of Marketplace tabs which consist of Seller List where admin can view all the seller registered in his marketplace, Seller Reviews from customers, Product List , List of Categories suggested by sellers, Commissions of individual seller and Mail Template.

Let us proceed with the Tabs details one by one.
1. Seller List :
On this page the list of sellers with mail id as contact information, seller register date and status of seller is viewed.
- If the status of seller is disabled then he can not access as seller in admin’s marketplace till the status is changed to active from admin end.
- Admin has the privilege to convert the store customers into sellers by using Synchronise User button.

2. Seller Reviews :
All the reviews from customers associated with sellers are viewed on this page at admin end . If the review status is active then reviews get published at the store.

3. Product List :
- View of Product List
List of product with product details which include product image, quantity, code, price and status. - Product Assigning at Admin end
Here admin has the option to assign his products to the seller. He just need to select a particular seller and assign product by clicking the “Assign to Seller” button.

4. Suggested Category List :
Sellers can suggest categories to admin in case they do not find any suitable category related to their product. Admin can view and enable the categories suggested by vendors here in this tab.

5. Seller Commission :
In this tab admin can view the seller commission details which includes seller id, seller name, percentage of commission, rate of commission, total sale and seller last paid amount and pay limit.
- Admin can view and edit the individual seller commission and seller pay limit.
- Once the Seller Amount Remaining reaches the Seller Pay Limit then Admin gets the Pay button to pay the seller.

6. Mail Template :
Admin can set Mail Templates for the mails sent from Seller to Admin and from Admin to seller on various events using necessary place holders.
Mails on behalf of Seller to Admin includes the events :
- Seller Profile Update
- Seller Product added
Mails on behalf of Admin to Seller includes the events :
- Seller Deleted by Admin
- Review Status Mail
- Product Status Mail
- Product Deletion Mail
- Payment Mail to Seller

Seller Account View
For Seller Login View at front end we need to add the Block for Seller Account in the Layout Settings of desired page at backend.
To create a new block in the desired grid, click on “+” button and then Create New Block button.

Select the block for Seller Account.

- Enter the Name of the block.
- Choose the block template as Seller Account.
- Click on the button to Create block .

Now we need to make the necessary settings of this block.
- Select Onclick-dropdown wrapper for the block.
- Enter the User Defined CSS Class (Similar as that of My Account block)
- Save the details.
 Seller Account At Front End :
Option to register and sign in is available at front end where the block for the same is added.

After Login to seller account, the Seller Account Dropdown will display various tabs for different purpose.

1. My Profile :
This tab will allow seller to update/edit his individual profile. A seller’s profile consist of personal information like name, address, company name, location, social profile of seller and payment options.
Profile :

Social Profile : If a seller does have a link with social media (Facebook,Twitter,Google+,LinkedIn) he can use it in his profile for promotion.

Payment Method :
By default seller is provided with the option of “Paypal” and “Standard Method” for payment transaction. So here seller can set his method of transaction. It will be the mode of payment via which admin will transfer the seller amount to the individual seller.

2. Seller Profile Preview :
Overall profile view of seller which consists of star ratings and feedback of seller, geographical location of seller, concept of featured products, seller description and social profile. This profile is viewed by buyers as seller’s public profile at store.

3. Add Product :
A seller can add products for his store by clicking on Add Product in his Account. It provides the information of product including name, Images, Price and Inventory and product description.
Product Information :
Edit the product information which includes :
- Product Name
- Product Category (Option to suggest desired category to admin also.)
- Status of Product
- Availability
- Creation Date
- Stock Action

If in case the desired category for the product is not available in the list of categories, the seller can suggest the one to the admin by clicking on the button provided to suggest and entering the necessary details as shown below.


Price and Inventory :
- Set the price and inventory of individual product which includes price, list price, Code of product, zero price action, tracking inventory, minimum and maximum quantity and option of tax.
- Zero Price Action : If the price of product is set zero then seller can choose the actions that will be viewed in store.
- Inventory : Seller can set the action of inventory tracking.

Extra Info :
Here seller can add product description and set search words for product.
 Images :
Upload the product thumbnail image. Option of uploading additional images is also available.
- Click on “+” button to upload multiple product images.

This is how a seller can add a new product.
On creating new product additional tabs are available for more product information including Product Features, Options, Shipping Properties, Addon (Visible only of applicable for seller).
On the gear dropdown button, there are tabs to Preview, Clone and Delete the product. Refer the below snapshot :

Product Options :
Click on the tab available for Product Options and add options by clicking on the button provided.

Features :
In this tab seller can view all the available features and set according to the product’s features.

Shipping :
Seller can set shipping properties here.

Downloadable Product Option :
Provided the feature of adding downloadable products at seller end.
A tab “Files to Sell” is available only if admin has enabled selling downloadable products. Attach the downloadable files and save as per the below snapshot.

4. Dashboard :
View of Seller’s Dashboard
- The dashboard offers transparency and control over the data associated with Seller’s account.
- View of seller’s Dashboard which gives income details of day, week and month.
- Static report, total payout, remaining balance, latest five orders and reviews can be viewed.

5. My Products :
On clicking My Products tab seller can view all his listed products. Seller is allowed to Edit or Delete the listed products. Also he can assign any desired product to be the Featured Product.

6. My Pending Products :
On clicking My Pending Product tab seller can view the products which are not yet approved from admin end.
Products will be available to be sold on store once approved by Admin and will no more be available in this pending products tab.
7. Order List :
Here seller can view the list of orders. View of individual order which shows
- Order ID of seller and Admin Order Id
- Order date
- Order status at seller and admin end
- Sale amount

Click on the order id for which the shipment needs to be created. If Admin has enabled seller shipment functionality at his end, seller will be able to view a tab as shown below.

Click on the New Shipment button to create a shipment.

- Select the shipping method from the available list.
- Enter the tracking number.
- Choose the shipping carrier from the available carriers.
- Write the comments if any.
- Click the checkbox to send shipment notification to the customer.
- Click on Create button to create the shipment.

Click on the View All Shipments hyperlink and you will be able to view list of shipments created for the order.

To view shipment details click on the desired shipment id. Buttons to print packaging slip have been provided for each created shipment.

This is how Printed Packaging Slip looks like :

8. My Customers :
This tab will be available for customers only if it is enabled at admin end in Marketplace settings. On clicking this tab the vendor will be able to view the list of customers as shown below in the snapshot.

9. Seller List :
In this tab seller can view all seller’s information in three different views.
10. My Payments :
View of seller payment from admin end which shows the mode of payment, amount, payment date and time along with transaction id.

11. Ask To Admin :
With this functionality, the seller can directly send a mail to store admin regarding any query or suggestions just by sending the message as per the below screenshot.

View of Parent Order ID at Admin End :

Frontend View
Product Page :
The product page includes the name of the seller of the product.

Support
That’s all for the CS-Cart Multivendor Marketplace, still have any issue feel free to add a ticket and let us know your views to make the product better http://webkul.com/ticket/index.php